Clutter, clutter, clutter!
Oh, the ills of this age of tech! We’re drowning in emails, and most of us don’t want to read the millions of emails that reach our inbox.
And yet, we’re hardly ever pruning our inboxes. Once in a long while, we get the urge to make the inbox squeaky clean, as neat as it was the day we signed up for it.
Have you tried to mass delete emails on gmail? Such a chore, right? Well, fret not. In this blog post, we’ll make it super simple for you to clean up your Gmail so that you can finally have that much-coveted peace of mind 🙂
Table of Contents
Important Steps to Take Before You Clear Your Gmail Inbox
When you’re sorting, deleting, and organizing your inbox, there’s always a risk of accidentally losing important emails. That’s why it’s a good idea to take some steps to prepare before diving into your Gmail cleanup.
1. Back up the emails you need to keep
The first step is to back up your important emails. During a thorough inbox cleanup, it’s easy to delete or lose track of valuable information accidentally.
Fortunately, Gmail offers simple ways to export and save your emails for future reference.
Using Gmail’s export options
Gmail allows you to download email messages to your computer.
- Go to Gmail Settings (the gear icon) > See all settings.
- Navigate to Forwarding and POP/IMAP, and choose Enable POP for all mail in the POP download section.
- Save changes.
This lets you download copies of emails to a third-party email client (like Outlook or Thunderbird), where they’ll be stored.
Google Takeout
But if you want a complete backup of all your Gmail data, Google Takeout is the way to go. With Takeout, you can download your emails, attachments, contacts, and other Google services.
You just have to go to takeout.google.com, select the data you want to export, and follow the prompts to get a complete archive. With a backup, you can confidently start your cleanup without worrying about losing important messages.
2. Define your gmail cleanup goals
When you decide to run a Gmail cleanup, it’s essential to define your goals. Clarifying your objectives will help guide your decisions and avoid burnout along the way.
For instance, if you’re striving for Inbox Zero, the goal is to clear out all unread and unwanted emails. This will ensure that your inbox becomes a task list of sorts, with only actionable items remaining. It’s a more intense approach but can clean your Gmail inbox and improve productivity.
But if Inbox Zero feels too overwhelming, your goal might simply be to achieve better inbox organization moving forward. You can then focus on creating systems for sorting emails, using labels and filters effectively, and ensuring that your inbox is streamlined, even if there are still some unread messages.
Having clear goals will keep you on track and allow you to measure your progress more easily.
Step-by-Step Guide to Clean Up Gmail
Use our fail-safe steps to assist you in your Gmail cleanup the next time it looks poorly organized.
1. Sort and filter emails
You can easily filter your emails using size, date, and sender, allowing you to identify and remove unnecessary messages efficiently. Gmail’s built-in search operators and filters make this process easier and faster. Here’s how to do it.
Delete big attachments
Attachments can be space hogs. To free up storage, you can search for emails with large attachments and decide whether you still need them. Here’s how to do it:
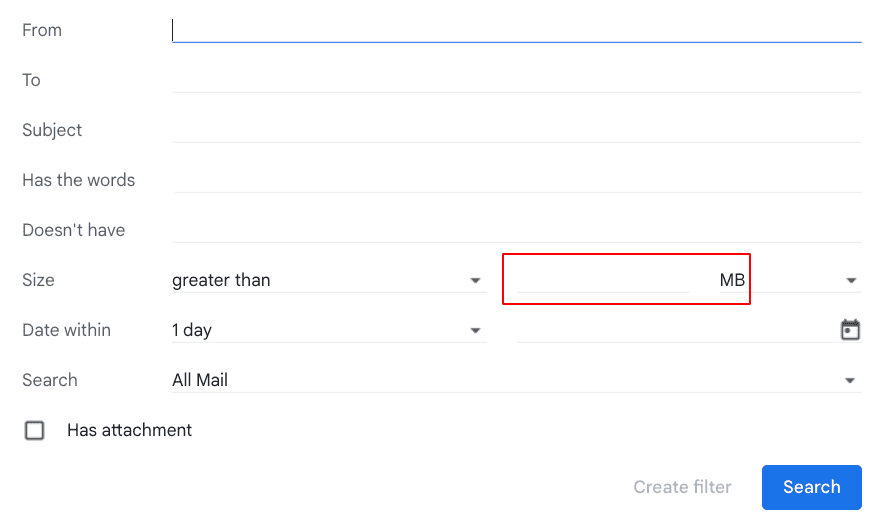
- On the Gmail search field’s right side, click the Show search option button.
- An advanced search parameter list shows up. Check out the Size field and select greater than and then enter your desired MB limit.
- You can also check the Has attachment box to filter emails with attachments.
- Click Search, and it will generate a list of all emails with large attachments.
Or,
Simply type has:attachment larger:10MB in the Gmail search bar, and it will locate emails with attachments larger than 10MB. You can adjust the size to fit your needs. Review these emails, save any important attachments locally, and delete the ones you no longer need to free up space.
Identify old or irrelevant emails for deletion
One thing that can take up a lot of storage space in your Gmail account is old messages. You will all have very old messages, some even 10 years or older, sitting idly in your inbox, eating up space.
Gmail’s search operators help you quickly locate emails you’re unlikely to need anymore. Here are a few you can use:
1. older_than
This is handy for finding emails you’ve received years ago. For example, type older_than:5y to find emails from more than five years ago.
Chances are, a lot of these emails are no longer relevant, and you can safely delete them. Skim over them to see if you need any, and delete everything else.
2. is:read
Want to focus on emails you’ve already read but haven’t dealt with? Use is:read to find these messages. You can then delete or label them for future reference.
3. s:unread
We all have unread emails sitting in our inbox, promising ourselves we’ll get to them later. But if you haven’t read an email from a year ago, chances are you won’t read it now.
Simply run is:unread in the Gmail search box to locate all unread messages.
From there, you can mark them as read, delete them, or respond to any important ones—instantly reducing clutter and improving inbox organization.
Remove by sender
If you frequently receive promotional emails or newsletters from specific senders, filter by the sender to handle these in bulk.
Type from:[sender’s email] in the search bar, and Gmail will show all emails from that sender. You can then delete or archive them in bulk or create filters to handle future messages automatically.
Remove by categories
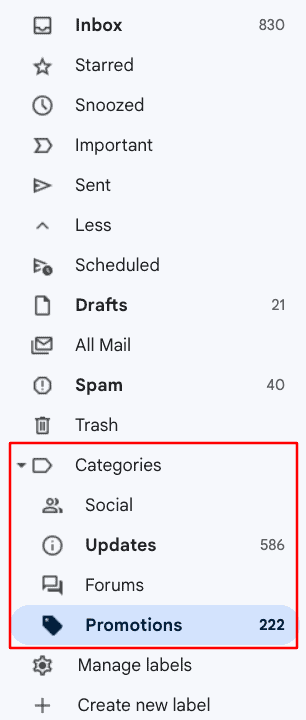
You can organize your inbox using the different categories available in Gmail. When Gmail is active, incoming messages that match these category characteristics will be automatically detected and sorted accordingly.
The different categories are on the left side of the Gmail inbox. When you click on the “Categories” button, several categories, such as “Social” and “Updates,” will appear.
You can also remove or add categories on your “Settings” menu. Include any category you want, like “Forums,” “Promotion,” etc.
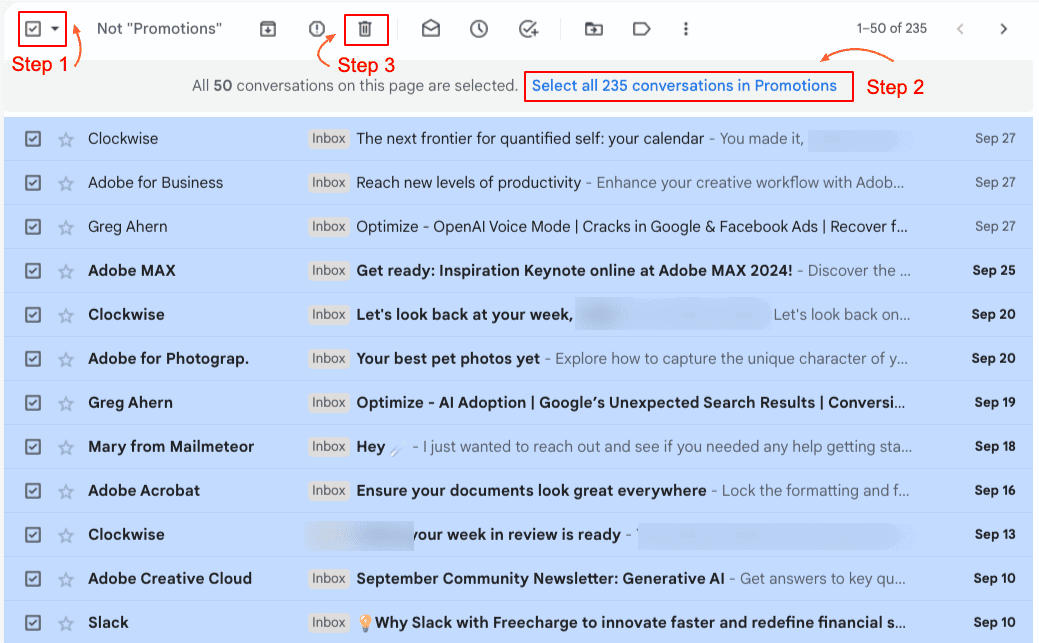
Creating all “Categories” that apply to your Google mailbox will help you easily find specific emails when needed. Once you have decided to delete emails, select the “Category” you want to clean and say–“Promotions.”
Then click on the box on the upper left side to select all emails that are shown on the page. When you do this, a message will appear at the top “Select all X conversations in Promotions.”
Click on the message to select all the emails in the category. You can then click the delete button to remove all the emails.
2. Unsubscribe from unnecessary emails
One of the quickest ways to clean your inbox is to unsubscribe from newsletters, marketing emails, and other recurring messages that you no longer need.
Many people receive daily emails from lists they once joined but no longer find relevant. Sometimes, we even unintentionally subscribe to newsletters. Unsubscribing is the easiest way to stop these emails from taking up more space in your inbox.
Start by manually reviewing some of your unread emails and identifying newsletters or marketing content that are no longer useful.
Gmail simplifies the process by including an “Unsubscribe” button at the top of most promotional or newsletter emails. Simply hover your cursor over the email, and at the right end, you’ll see the option to unsubscribe. Click it to automatically opt out of future emails from that sender.
You can also create a filter using a search operator like label:^unsub to group promotional emails together, making it easy to review and unsubscribe from multiple senders all at once.
If manually unsubscribing feels like too much of a task, you can use tools like Unroll.me to batch unsubscribe.
How to batch unsubscribe using tools like Unroll.me
Unroll.me scans your inbox and compiles a list of all your subscription-based emails. From there, you can quickly batch unsubscribe from multiple senders with just a few clicks. This saves you time and ensures you don’t miss any forgotten subscriptions.
Other tools like Clean Email and SaneBox offer similar features. They help you efficiently clean up your subscription list, reduce inbox clutter, and prevent unnecessary emails from piling up in the future.
Block unwanted senders
Sometimes, certain senders don’t offer an option to unsubscribe. In such a case, blocking these spammers is a great alternative. Once blocked, emails from these senders will automatically go to your Spam folder.
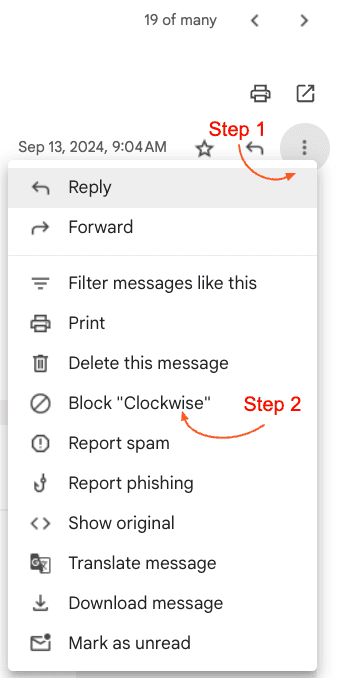
Here’s how to block a sender:
- Go to Gmail and open the message from the sender you want to block.
- On the right-hand top side of the email, click the More button (three vertical dots).
- Select Block [sender’s name] to prevent future emails from landing in your inbox.
(Tip: If you ever need to unblock them, you can do so by following the same steps.)
3. Archive or delete emails
You’ve sorted through and unsubscribed from unnecessary emails, but what about the messages still cluttering your inbox? Should you delete them or archive them?
Understanding the difference between these actions can help you manage your Gmail storage and keep things organized.
When to archive vs delete emails
Gmail offers 15 GB of storage with free accounts, shared across services like Gmail, Google Drive, and Google Photos.
As your inbox grows, you’ll eventually need to free up space, especially if you’re nearing that limit. Here’s where the choice between deleting and archiving comes into play.
Deleting emails
This is ideal for messages you no longer need. Once deleted, emails move to your Trash folder, where they’ll stay for 30 days before being permanently removed. Deleting is the fastest way to free up storage, particularly by removing emails with large attachments.
Archiving emails
Archiving is useful when you want to remove emails from your inbox but still need to keep them for future reference. Archived emails disappear from your inbox but remain searchable in Gmail’s “All Mail” section. Simply type in keywords or the sender’s name to find them later.
It’s important to note that archived emails still take up storage. If space isn’t a major concern but inbox clutter is, archiving is a great solution for keeping things tidy while retaining access to important emails.
If storage is an issue and you need more space, consider upgrading to a Google One subscription. Plans start with 100 GB (Basic) or 200 GB (Standard), and you can even share this storage with up to five users.
How to archive emails in Gmail
- Open Gmail and select the email you want to archive.
- At the top, click Archive or press E on your keyboard for a shortcut.
(Tip: Keyboard shortcuts need to be enabled in Gmail’s settings for this to work.)
To archive multiple emails, simply check the box next to each message, then click Archive from the top panel.
4. Organize with labels and folders
After clearing out unnecessary emails, the next step is to maintain an organized inbox so you don’t have to keep repeating the process of deleting and archiving.
This is where you begin building a sustainable relationship with your inbox.
Setting up and using Gmail labels
Gmail uses labels instead of traditional folders and offers greater flexibility by allowing you to assign multiple labels to a single email. For instance, an email from a client can be tagged under both “Work” and “Invoices.”
Here’s how to create and apply labels:
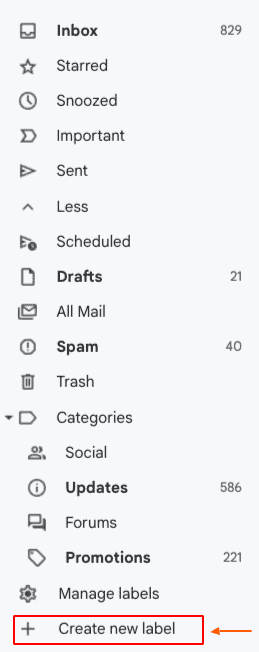
- i. Go to Gmail and on the left-hand side panel, click More.
- Scroll down and select Create new label.
- In the pop-up window, name your label and decide whether or not to “nest” the new label under another existing label.
- Once created, open the email you want to label.
- Click the Label icon (it looks like a tag) at the top of the message, and select the label you want to apply.
Labels categorize your emails, making it easy to search and retrieve them later. In fact, Gmail lets you color-code labels as well.
Color-coding labels
Color-coding your labels helps visually indicate the type or priority of an email. For example, you can use:
- Red for high-priority work emails
- Green for receipts and invoices
- Blue for newsletters
Here’s how to color-code labels:
- Find your label list on the left-hand side of Gmail.
- Click the three dots next to the label name and select Label color.
- Choose from Gmail’s preset colors or create a custom one that suits your preference.
5. Create filters to automatically label and categorize emails
Manually labeling every incoming email can be time-consuming. Luckily, Gmail offers a powerful feature: filters.
With filters, you can automate your email management by setting up rules that automatically label, archive, or delete emails based on specific criteria.
Here’s how to create a filter:
- Click the Gear icon in the top right corner of Gmail and select See all settings.
- Go to the Filters and Blocked Addresses tab and click Create a new filter.
- Set the conditions for your filter (e.g., emails from a specific sender or with certain words in the subject line). For instance, you can filter all emails from @yourclientname and automatically label them “Work.”
- Click Create Filter and choose what action Gmail should take (such as automatically labeling the email, archiving it, or forwarding it).
Examples of useful filters:
- Work Emails: Automatically label emails from your boss or team members as “Work” to keep them organized.
- Newsletters: Filter all newsletter subscriptions into a “Newsletter” category so they don’t clutter your priority inbox.
- Receipts: Automatically label and archive all receipts for easy access later without overwhelming your inbox.
Using Google Workspace’s Advanced Features to Clear Out Old Emails
If you’re using a paid Gmail account through Google Workspace, you’ve got access to several advanced tools that can seriously level up your email management.
Google Vault for long-term archiving
One of the standout features is Google Vault—a tool designed for long-term archiving and eDiscovery. Whether you’re a legal professional, in compliance, or just need a detailed record of communications, Vault lets you store emails securely without cluttering up your inbox.
Even when users delete emails and empty their trash, Vault holds onto them. Plus, you can configure it to automatically delete data after a set retention period, keeping things clean without manual effort.
Google Apps Script for custom automation
Another powerful tool is Google Apps Script. It’s a coding platform that allows you to automate routine tasks. For example, you can write a simple script to flag emails older than six months and generate a report for easy review. This way, you can keep email clutter in check without lifting a finger.
Third-Party Tools to Help with Gmail Cleanup
If you’re looking for tools to mass delete and mass unsubscribe emails on Gmail, we have three cool options here for you.
1. Clean Email
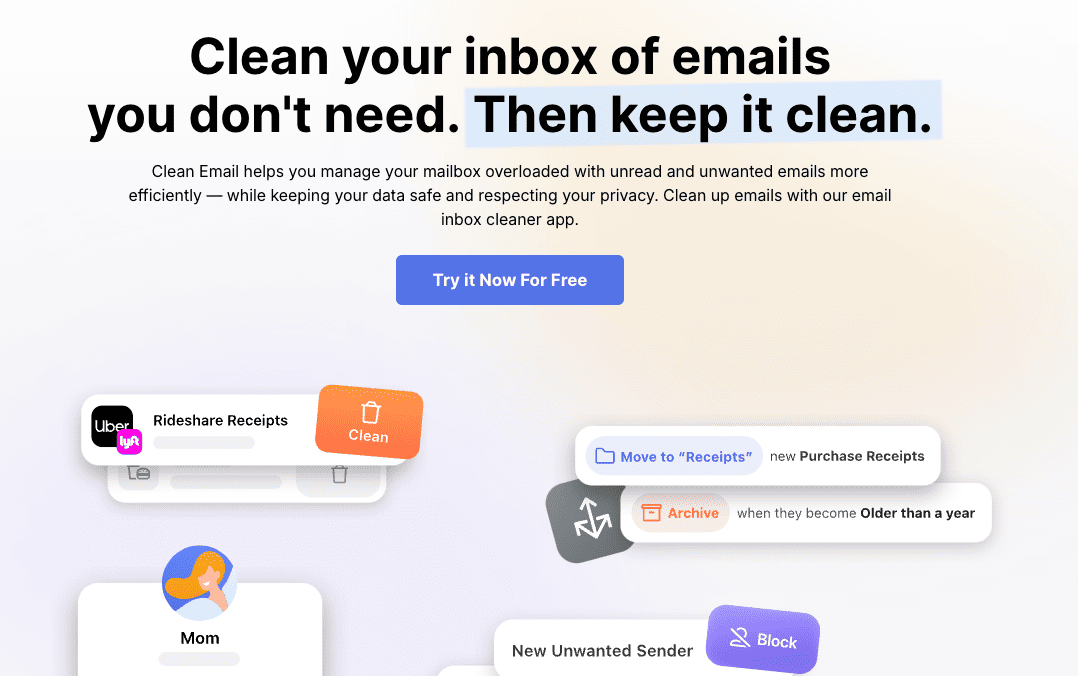
Clean Email is a powerful tool for efficiently decluttering your inbox. It allows you to group emails into relevant categories (such as subscriptions, social media updates, or unread messages), so you can easily archive, delete, or label them in bulk with just a click.
One of its standout features is Auto Clean, which automates repetitive tasks by applying filters and rules to incoming messages, saving you time and effort. You can also quickly unsubscribe from unwanted mailing lists, even from those that lack an unsubscribe link.
Pricing
Clean Email provides all features across all its plans, starting at $9.99/month for one email account and going up to $29.99/month for up to 10 accounts.
2. Mailstrom
If you’re looking for an efficient way to bulk-delete emails, Mailstrom is a great option. It organizes your inbox visually, helping you quickly spot patterns and clear out unwanted emails.
Once Mailstrom analyzes your account, it groups emails by sender, time frame, or subject line. This makes it easier to decide how to proceed and gives you more control over reaching inbox zero.
Pricing
Mailstrom offers a free trial for up to 5,000 emails. After that, tiered pricing starts at around $9/month for basic cleanup, with higher plans offering more advanced filters and features.
3. SaneBox
SaneBox is more than just a simple email cleanup tool; it’s a powerful smart email management system.
Instead of allowing your inbox to get cluttered with unnecessary messages, it intelligently filters out low-priority emails and places them into a folder for you to review later. This ensures your primary inbox remains focused on the emails that truly matter.
It also sends out reminders to follow up on emails that haven’t received a response, ensuring important conversations don’t slip through the cracks.
Plus, its “Blackhole” feature automatically sends unwanted senders to a digital void, so you never have to deal with them again.
Pricing
SaneBox offers a free trial, with plans starting at $3.49/month for two key features. Higher-tier plans unlock additional features and support for up to four email accounts.
Quick Tips for Maintaining an Organized Inbox
- Spend just 10 minutes daily to sort, archive, and delete unnecessary emails. A quick daily cleanup prevents the inbox from getting overwhelming.
- Create folders that suit your workflow, such as Work, Personal, Finances, etc. Label emails as soon as they arrive so you can keep track of them easily.
- After holidays or conferences, focus on clearing out the most critical emails first. Use search filters to target and delete bulk promotional or irrelevant messages.
- Periodically review your filters and labels to see if they need updating. This helps keep your email management system efficient and up-to-date.
These simple habits will keep your Gmail inbox tidy and manageable.
The Importance of Regular Gmail Cleanup
You’ve probably heard of Inbox Zero. Inbox Zero isn’t about having an empty inbox but keeping your emails organized. This concept was originally coined by Merlin Mann, the founder of 43 Folders.
One of his key principles—responding immediately to emails that take two minutes or less—aligns with David Allen’s popular Getting Things Done (GTD) productivity method.
Getting Things Done promotes stress-free productivity and increases a sense of control, which is exactly what you need to keep your Gmail organized.
A cluttered inbox is a major source of digital noise. It’s also harder to focus when your inbox is messy, as unread or disorganized emails constantly distract you from important tasks.
Consequences of a cluttered inbox
A messy inbox can have real consequences; here are some of them.
Missing important emails
In a cluttered inbox, key emails from clients, bosses, or loved ones can get buried under promotions, newsletters, or irrelevant updates. Missing an important message could cost you time, opportunities, or even money.
Wasting time
Sifting through a flood of emails to find that one attachment or message can waste hours. A well-organized inbox lets you locate what you need quickly and efficiently.
Increased stress
Let’s face it—a full inbox can be overwhelming. Seeing hundreds (or thousands) of unread emails can lead to stress, and studies show that email overload negatively affects mental well-being.
How Tiago Forte Boosted His Productivity After a Thorough Gmail Cleanup
Tiago Forte, the founder of productivity consultancy Forte Labs, is known for his innovative approaches to personal efficiency. While Tiago now spends just 17 minutes per day on email, it wasn’t always this way.
In fact, like many professionals, Tiago once found himself overwhelmed by his inbox. He had accumulated nearly 100,000 work-related and personal emails—60,000 of them unread. Despite using various tags, folders, and inbox extensions to manage the influx of messages, his system wasn’t working.
Tiago’s cluttered inbox had become a source of stress, blocking productivity and fueling an unhealthy habit of refreshing for new emails. He realized that his disorganized inbox was doing more harm than good. It was mentally exhausting and hampering his ability to focus on high-value tasks.
Solution
Determined to regain control, Tiago turned to the principles of Inbox Zero. He implemented a customized version of this system, breaking down the process into manageable steps instead of tackling everything at once.
The cleanup process took a few hours of dedicated time, but it was a gradual transformation. Tiago archived irrelevant emails, unsubscribed from unnecessary newsletters, set up filters, and reorganized his labels.
He adopted a system to process emails quickly, responding immediately to those that required less than two minutes and labeling others for future action.
Result
He saw a significant boost in productivity. By fully implementing this system, Tiago reduced the time spent on emails from hours to just 17 minutes a day—far less than the average professional worker, who spends about 28% of their time reading, writing, and responding to emails.
Tiago’s streamlined Gmail setup not only saved him time but also reduced stress and freed up mental space for more meaningful work. His story clearly highlights the tangible benefits of email organization, i.e., how it leads to a major productivity boost.
Read more: 41 Gmail Tips and Tricks for a More Productive 2024
Conclusion
Organizing your Gmail inbox doesn’t have to be overwhelming. By taking small, consistent steps — like unsubscribing from unnecessary emails, archiving what you need for later, and using tools to automate the process, you can create a clutter-free, efficient inbox.
The key is to stay proactive and boost productivity by maintaining a cleaner inbox. As the saying goes, “Make email work for you — not against you.“
Frequently Asked Questions (FAQ)
1. How do I quickly find and delete large attachments in Gmail?
Use the search operator has:attachment larger:10M to locate emails with large attachments. Review and delete emails you no longer need to free up space.
2. What’s the difference between archiving and deleting emails in Gmail?
Archiving removes emails from your inbox but keeps them searchable while deleting sends them to the Trash, where they’re permanently removed after 30 days.
3. How can I automate my Gmail cleanup to keep my inbox clutter-free?
You can create filters to automatically label, archive, or delete emails based on sender, keywords, or other criteria, ensuring a cleaner inbox over time.
4. What are the best third-party tools for Gmail cleanup?
Popular tools include Clean Email, Mailstrom, SaneBox, and Unroll.me, which help you bulk delete, unsubscribe, and organize emails efficiently.
5. How often should I perform a Gmail cleanup?
You should aim to perform a quick cleanup weekly, and a more thorough cleanup every few months to maintain an organized inbox.
Images updated by Abdul Bashid.
