Do you ever feel overwhelmed by your Gmail inbox? With over 1.8 billion users in 2024, it’s safe to say we all use Gmail. However, many of us deal with common annoyances like search difficulties, cut-off snippets, and an overflowing inbox.
Fortunately, there are workarounds for all these issues and more. You can get started today, making your inbox easier to manage and your email marketing more efficient.
In this blog post, I’m sharing 40+ awesome Gmail tips and tricks designed to expedite your work, reduce your email stress, aaccess to your Gmail.
nd save hours for you every week, boosting your productivity.
Table of Contents
Key Takeaways
- Turning on two-factor authentication is a simple step that makes a big difference in safeguarding your sensitive information on Gmail.
- Gmail lets you write quicker with its Smart Compose feature. It anticipates your text, providing common replies much quicker and easier.
- Use Gmail’s schedule feature to automatically send your emails when the Gmail user is likely available.
- Label important emails automatically using Gmail filters. This helps keep your important emails at your fingertips.
Gmail Security Tips You Shouldn’t Ignore
Securing your Gmail account is the first step toward enjoying peace of mind while managing your inbox. Let’s look at some easy but powerful steps you can take to boost your Gmail’s security.
1. Enable two-factor authentication for extra protection
Two-factor authentication protects data and helps keep your email more secure; this includes having an extra layer of security and protecting sensitive information like bank statements or business emails from hackers.
If you’ve ever experienced a data breach or had a hacker successfully guess your Gmail password, make sure you’re using Google’s two-factor authentication going forward.
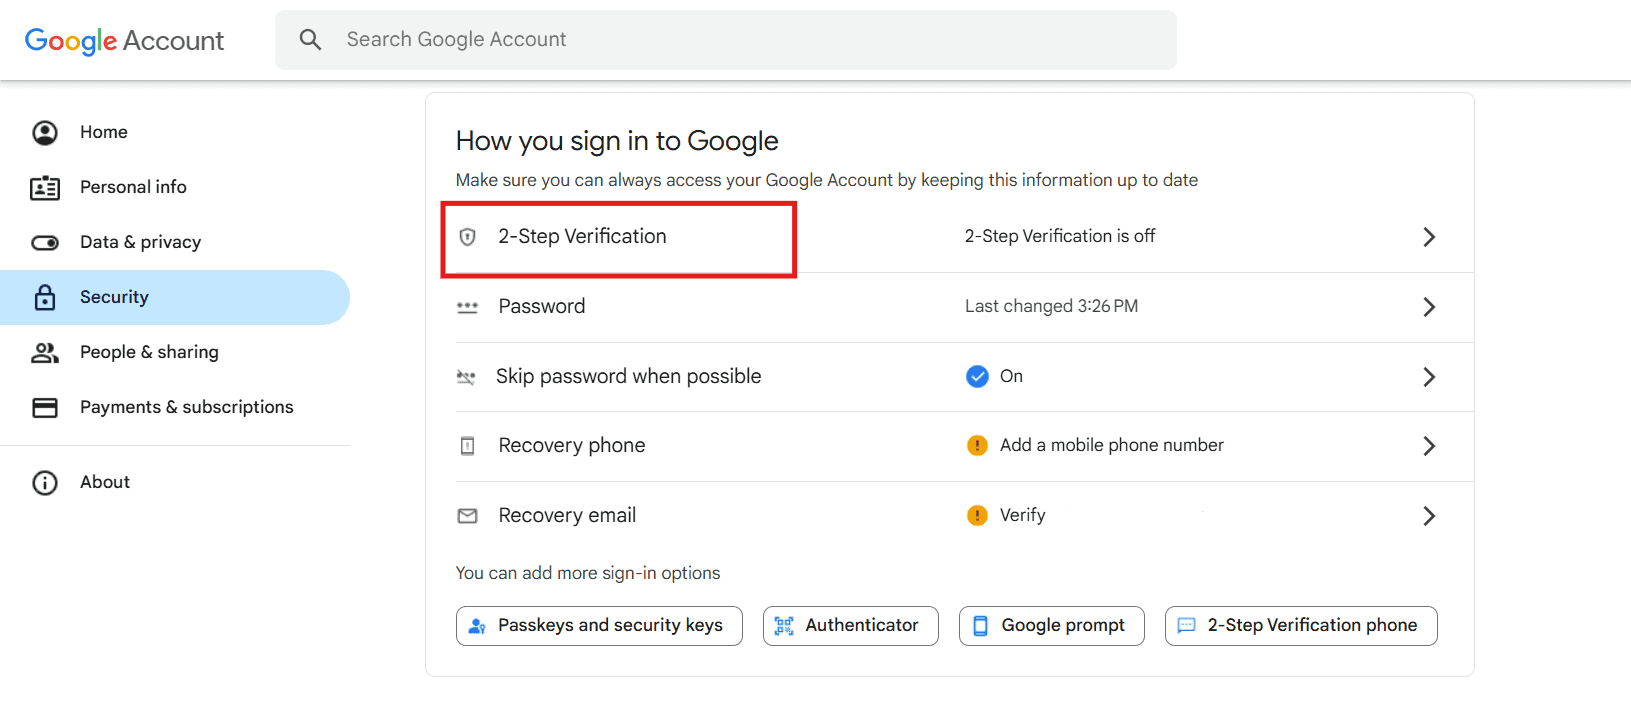
To turn on the Gmail feature, log into your Google Account, then go to the Navigation Panel. Choose Security. In the Signing into Google menu, select 2-Step Verification.
From there on out, when you log into Gmail, you’ll have to verify with another device, such as your smartphone.
2. Use confidential mode to secure sensitive emails
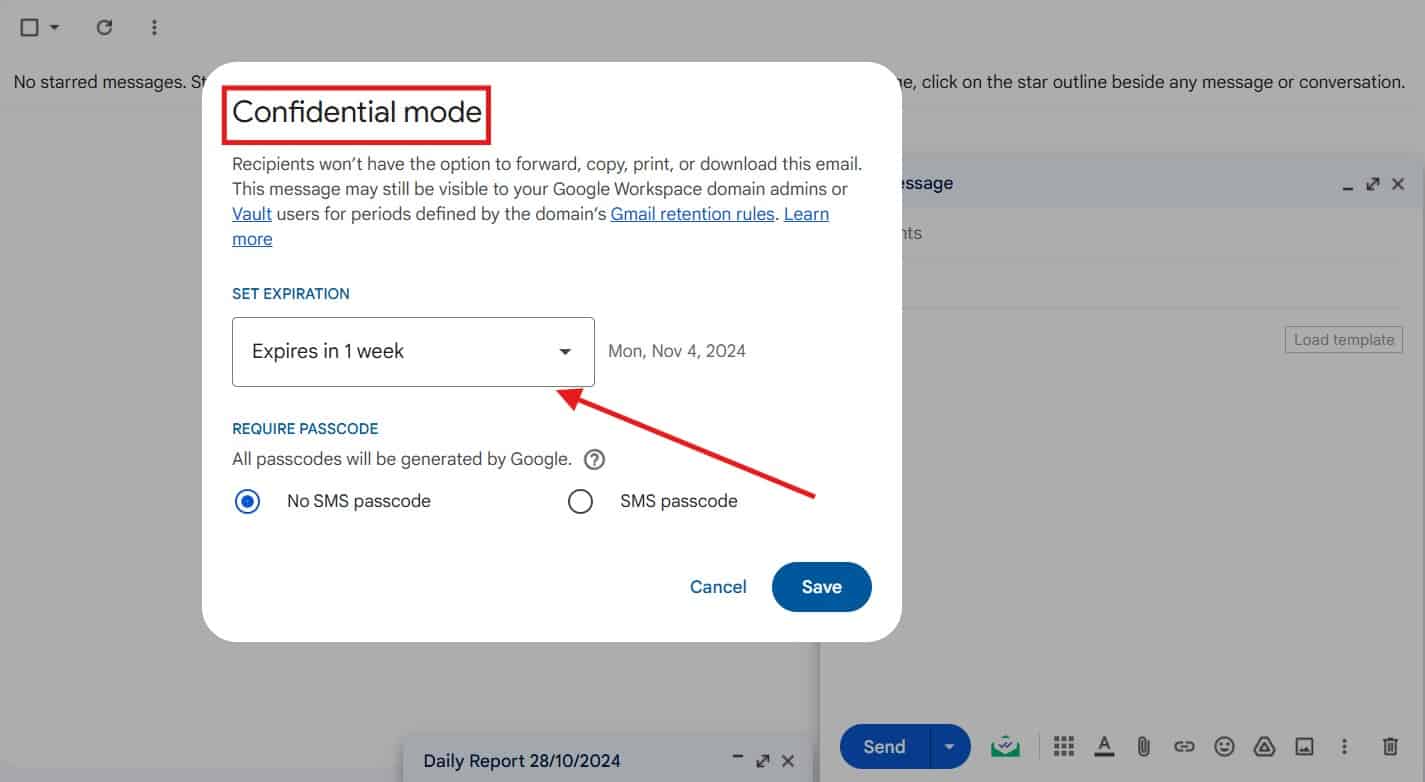
If you want to send emails more privately, Gmail has a Confidential Mode that prevents other users from downloading, printing, copying, or forwarding the email contents. Confidential Mode requires a password to access (if you set one) and can be protected for as long as you choose.
- Sending confidential emails is as easy as opening Gmail, composing a message, and then choosing Confidential Mode in the bottom right.
- You’ll see it represented by a lock icon with a clock beside it.
- You can toggle whether you want an SMS passcode.
- Anyone who accesses your email will receive a passcode in their text messages, so you must input their phone numbers before you send the email.
- Then, choose Save.
3. Block unwanted email senders
Sometimes, snoozing or sending an email to spam won’t do the trick. You want to block an email account within Gmail.
There’s only way one way to do it. Open Gmail, select the offending message, then choose More on the upper right. You will see an option to Block. Click it, and you will not receive any further messages from that person.
4. Avoid mistakes with Gmail’s undo send

Oh, no! Did you send an email too soon, or is it missing information you wanted to include? Rather than send an immediate follow-up, which can come across as unprofessional, you can undo the email you sent and add to it, change it, or fix it.
- Where you see a message sent at the bottom left, select Undo.
- You can alter the time Gmail lets you unsend a message by going into Settings, then Undo Send.
- You should see a cancellation period for sending your emails. The current times available are five, 10, 20, and 30 seconds.
- Choose the right one for you and click Save Changes.
5. Password best practices
Truth be told, no one remembers multiple unique passwords that you use at work. If you do use them, to avoid forgetting any of them, it’s best to maintain a password manager to track all your important passwords in one place.
Just ensure that the passwords are strong, unique, and filled with lowercase letters, numbers, and special characters, and avoid using easily guessable passwords like “123456” or “password.”
6. Google security check-up
I promise this step helps a lot! You just have to remember to use Google security checkups effectively and regularly review connected devices, app permissions, and account activity. That’s it! And you’re done, Voila!
7. Double-check links for phishing emails
Beware and double-check any links before you click on any for better security while handling suspicious phishing emails.
Try these security features today to keep your Gmail account safe from hackers!
Gmail Productivity Features to Boost Efficiency
We all probably want to get more done with less stress, right? These productivity features will help you organize your Gmail inbox and manage your emails effectively, saving you valuable time.
8. Set up an email signature for a professional touch
It’s super easy and efficient to set up a Gmail signature. Incorporating a signature can increase brand awareness, professionalism, and website/social media traffic if you add links to your products or socials.
Whether you’re an Android or Apple user or use Gmail on your phone or your desktop, you can create engaging, appealing signatures that will make sending each email on your to-do list a part of your marketing outreach.
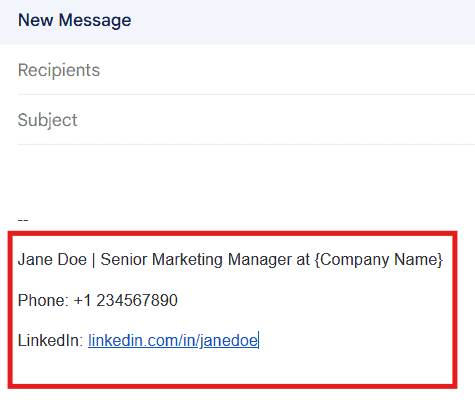
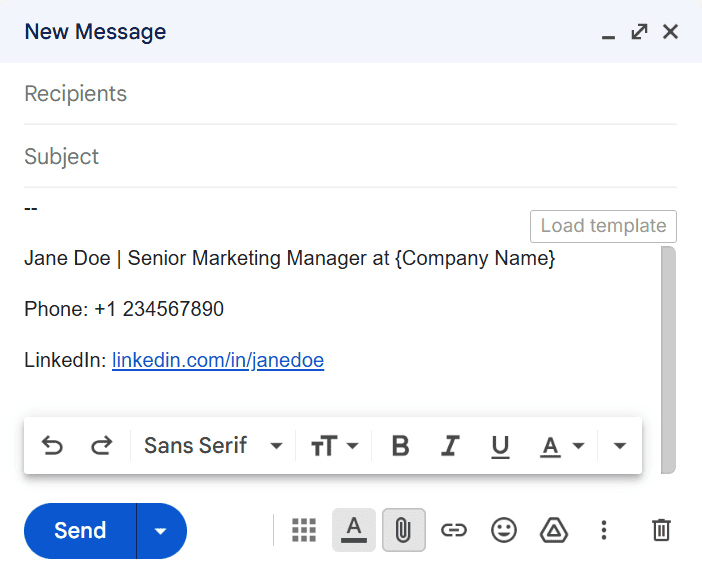
Here’s an example of a professional email signature:
“Example: Jane Doe | Senior Marketing Manager at {Company Name}
Phone: +1 234567890
LinkedIn: linkedin.com/in/janedoe”
Be aware that the signature you make in your mobile Gmail versus the desktop version is not the same but different by default and is not synced automatically. You may need to create separate signatures.
9. Write emails faster with smart compose

Do you struggle with writing emails? If so, you can waste dozens of hours per week, which adds up to hundreds of hours over the year.
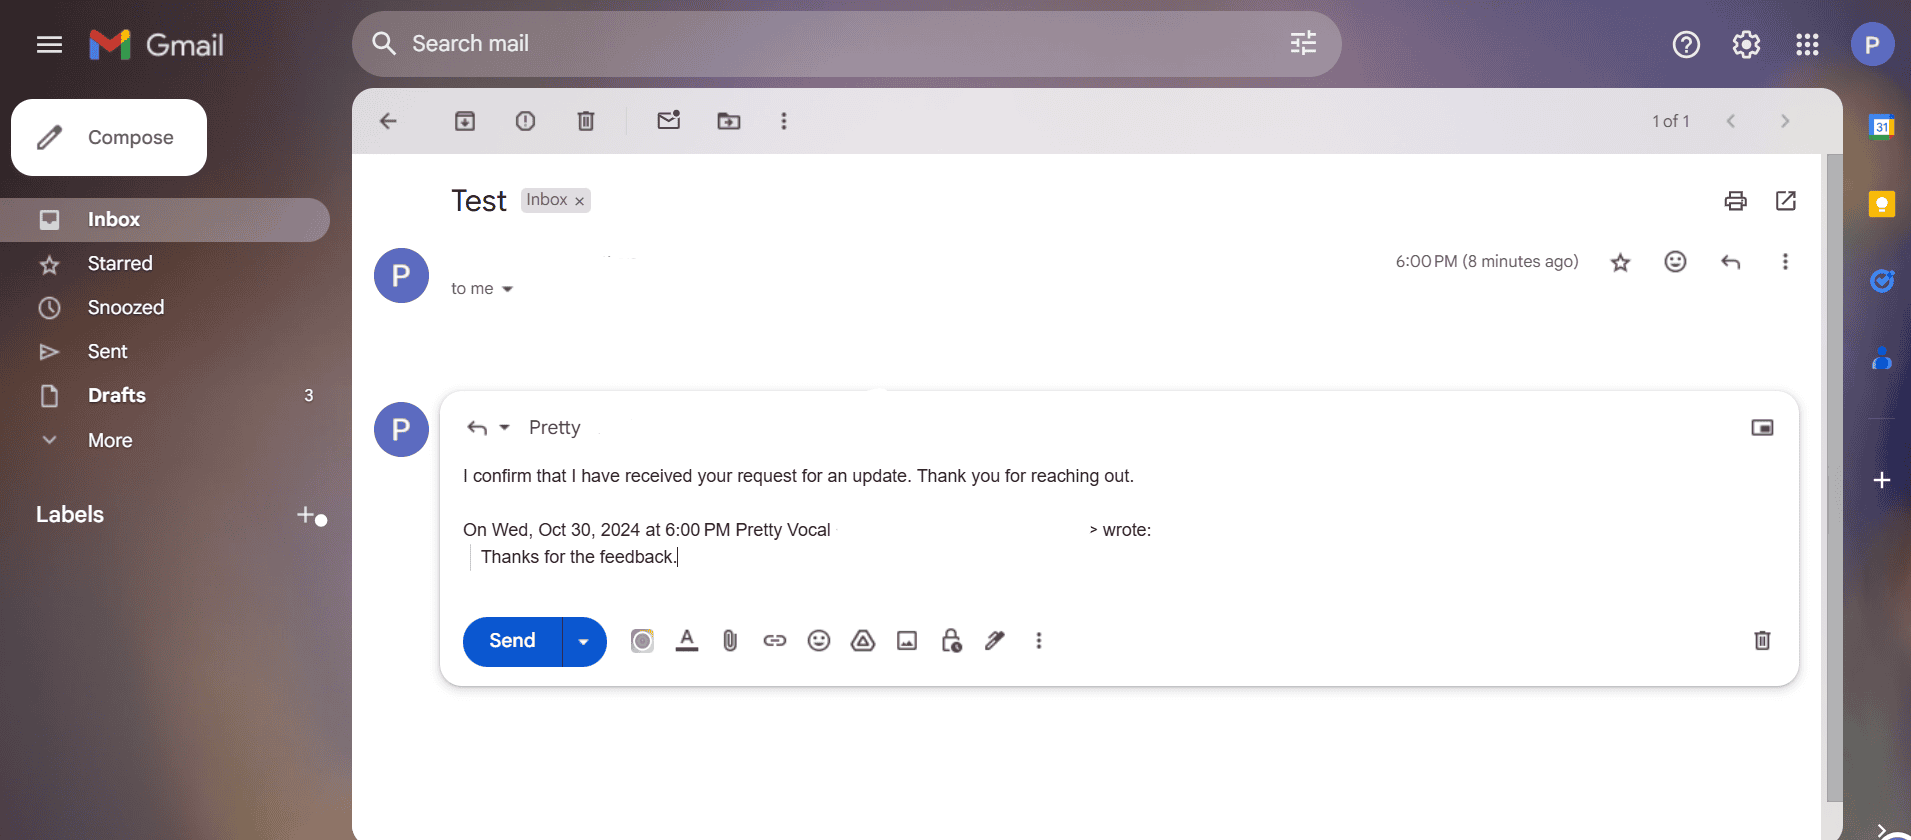
Gmail has a Smart Compose function designed to make email-writing less of a chore. Smart Compose is driven by machine learning and will guide your verbiage with each word you type, helping you complete your thoughts succinctly.
For instance, consider that you are writing an email and have started typing, ‘Thanks for….’, and the smart compose could suggest, ‘Thanks for your email,’ significantly reducing the time spent on typing by offering relevant suggestions, saving you tons of time in the future.
- You must be logged into your Google Account to use Smart Compose.
- Turn it on by accessing Gmail, clicking the Settings gear, and then choosing See All Settings.
- Next, navigate to General, then choose Smart Compose. Turn Writing suggestions on.
Gmail currently has Smart Compose available in these languages: Portuguese, Italian, French, Spanish, and English.
The ability to write effective emails is developed as early as school and college years. Unfortunately, educational institutions often do not allocate sufficient time to teaching business correspondence or proper email writing.
As a result, students frequently spend a significant amount of time developing these skills on their own and may lose focus on their academic studies. By seeking assistance from the assignment writing service Edubirdie, students can receive not only a well-written assignment but also a clear example of proper academic writing and text structuring skills, which can later serve as a solid foundation for professional business correspondence.
10. Set up canned responses for frequently asked questions
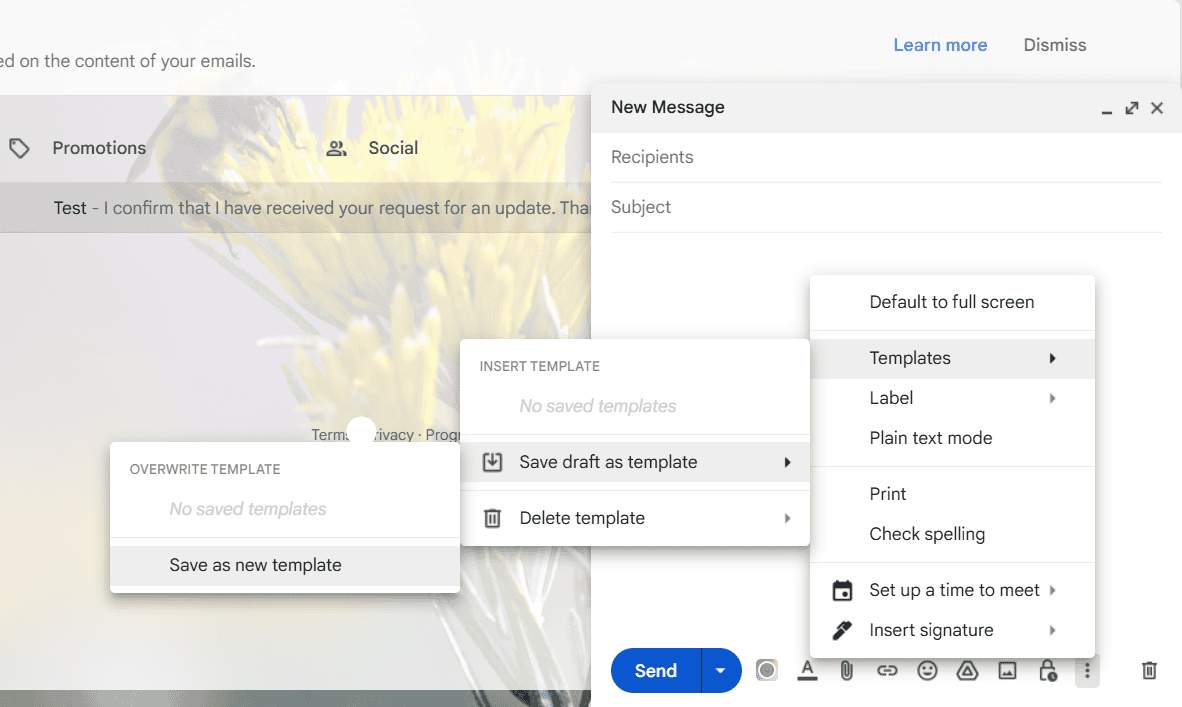
Do you ever feel like you’re repeating yourself when you send emails? Rather than rudely tell everyone, “per my last email,” you can send canned responses within Gmail instead.
Access Settings, then Advanced, Templates, and Enable. Don’t panic if your Gmail reloads. It’s supposed to do that.
The next time you write a message, choose Templates in the bottom right of your email and save it. You can then use that canned response when someone asks you a very similar question you’ve answered 100 times this week.
11. Schedule emails for convenient delivery

As part of a business, you often need to schedule emails ahead of time. While you might have email automation software that takes care of this task, did you know you can also schedule emails in Gmail?
It’s fast and easy to do. When logged into Gmail, select the pencil icon or Compose. Write your email as usual, but don’t click send!
Instead, by the Send button on the left, you should see a downward arrow. When you click it, you can choose to Schedule send, scheduling 100 emails at once.
If you need to change the time you schedule the email, log into Gmail, then choose Scheduled from the left panel. Open the email, change the scheduled time, and click the Schedule Send button.
For instance, imagine you are working late at night and don’t want to bother a client out of working hours. Scheduling your important email ensures that they receive your information at the right time without you needing to stay up late.
Setting up scheduled emails can also be handy if you work in different time zones and want your clients to get emails during their designated work hours.
12. Change your email previews
Don’t you hate how Gmail cuts off your received emails mid-sentence, leaving you in suspense as to what the sender is messaging you about? End the agony by previewing all emails without the need to open them.
This feature couldn’t be highlighted enough, as it saves time by letting you skim through the content without ever opening an email, helping you clear your inbox much faster, leading to making your email handling more efficient than ever before. Isn’t that so cool?
Imagine being able to peek into emails from your boss or clients without having to open them completely–now, that’s a time-saver! You can easily enable the feature for reading panes by following the process below.
- Log into Gmail, then select Settings and See all settings. You should see a menu at the top that reads Inbox tab. Select it, then choose the Reading pane by scrolling to it.
- Check the box marked Enable reading pane, choosing the Split Pane display mode. Your options are Below Inbox, Right of Inbox, or No Split.
- When you’re pleased, check Save Changes.
Advanced Gmail Tips and Tricks to Take Your Skills to the Next Level
If you’re ready to take things up a level, these advanced tips will help you get the most out of Gmail’s powerful features.
13. Turn Google Docs into Gmail drafts effortlessly
Imagine crafting your emails in a Google Doc and then seamlessly turning them into Gmail drafts with just a click using this handy Chrome extension (Convert Google Docs to Gmail Drafts).
No more copy-pasting—this feature is great for those who prefer drafting in a Google Doc for easy email access in Gmail.
14. Use Gmail search operators for advanced filtering
We just wrote a detailed guide that includes more than 30 Gmail search operators you should begin using.
What is a search operator, you ask? It’s a free way of searching your Gmail inbox via symbols or words. You can combine search operators to make your Gmail searching more efficient, narrowing results such as:
- Whether the email has an attachment (and what kind of attachment is included)
- Whether the email has a YouTube link
- Email byte size
- Specific date range
- Specific sender
Here’s a quick example that includes a list of common Gmail search operators for you to copy and paste:
- Has:attachment — Finds emails with all attachments.
- Before:2025/01/01 — Finds emails sent before January 1, 2025. It makes the information easier to scan and use right away for your convenience.
15. Use forward emails as attachments
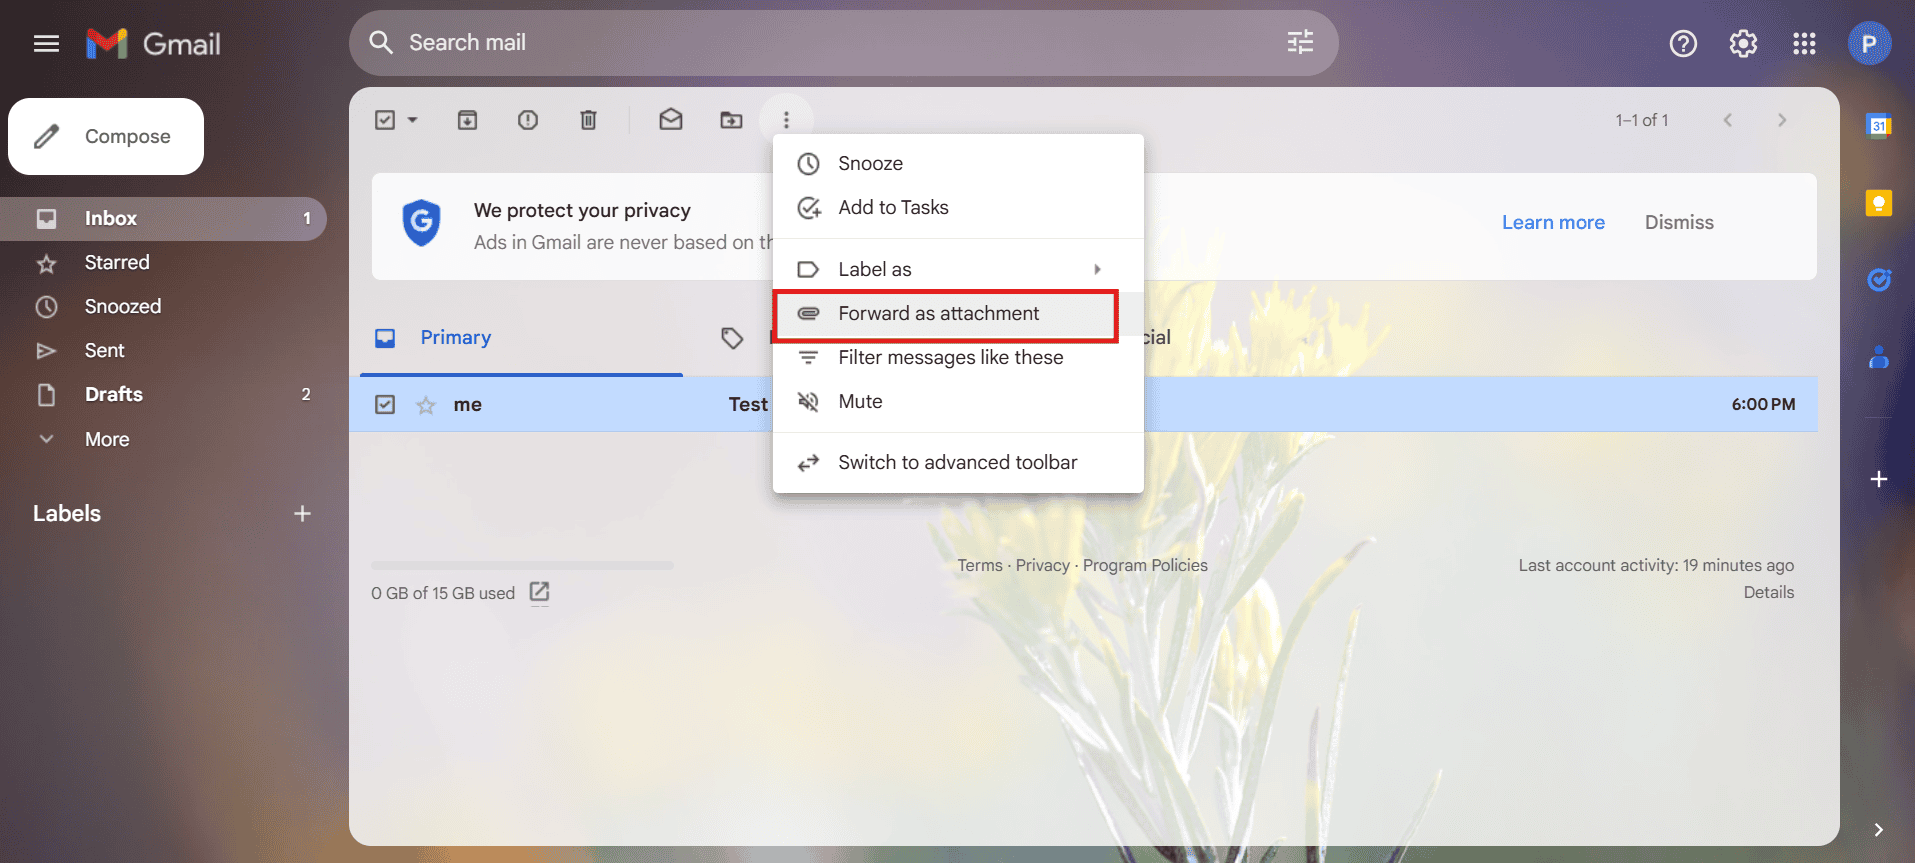
If your business deals with a large volume of email, you’ll love this next Gmail strategy. You can forward an email or emails as attachments, summarizing messages, or sending them to support a point.
Try to keep the file size of your emails at around 25 megabytes. Otherwise, they’ll be attached to the email through your Google Drive. Let’s get forwarding!
- Open Gmail, then click an email to forward. Choose More (three vertical dots), then Forward as an attachment.
- Type the recipients in the To field, write your subject line, compose your email, and choose Send.
- You can also respond in Gmail using the attached emails. When you choose Reply, navigate to the upper right and click the rectangle icon with an upward-facing arrow (the Pop-out icon).
- Choose the email, drag it, and choose Send.
16. Access multiple Gmail accounts from one browser window
Many companies juggle multiple accounts, from a communications account to your sales, marketing, and customer service departments. Don’t keep logging out and into Gmail to stay abreast of all the emails on your radar when you can open your multiple accounts at once.
Even better, you can do this from a single browser window.
How, you ask? In Gmail, select your profile image. Then, choose Add account. When you do this, you can open any account in a different tab but still within the same window.
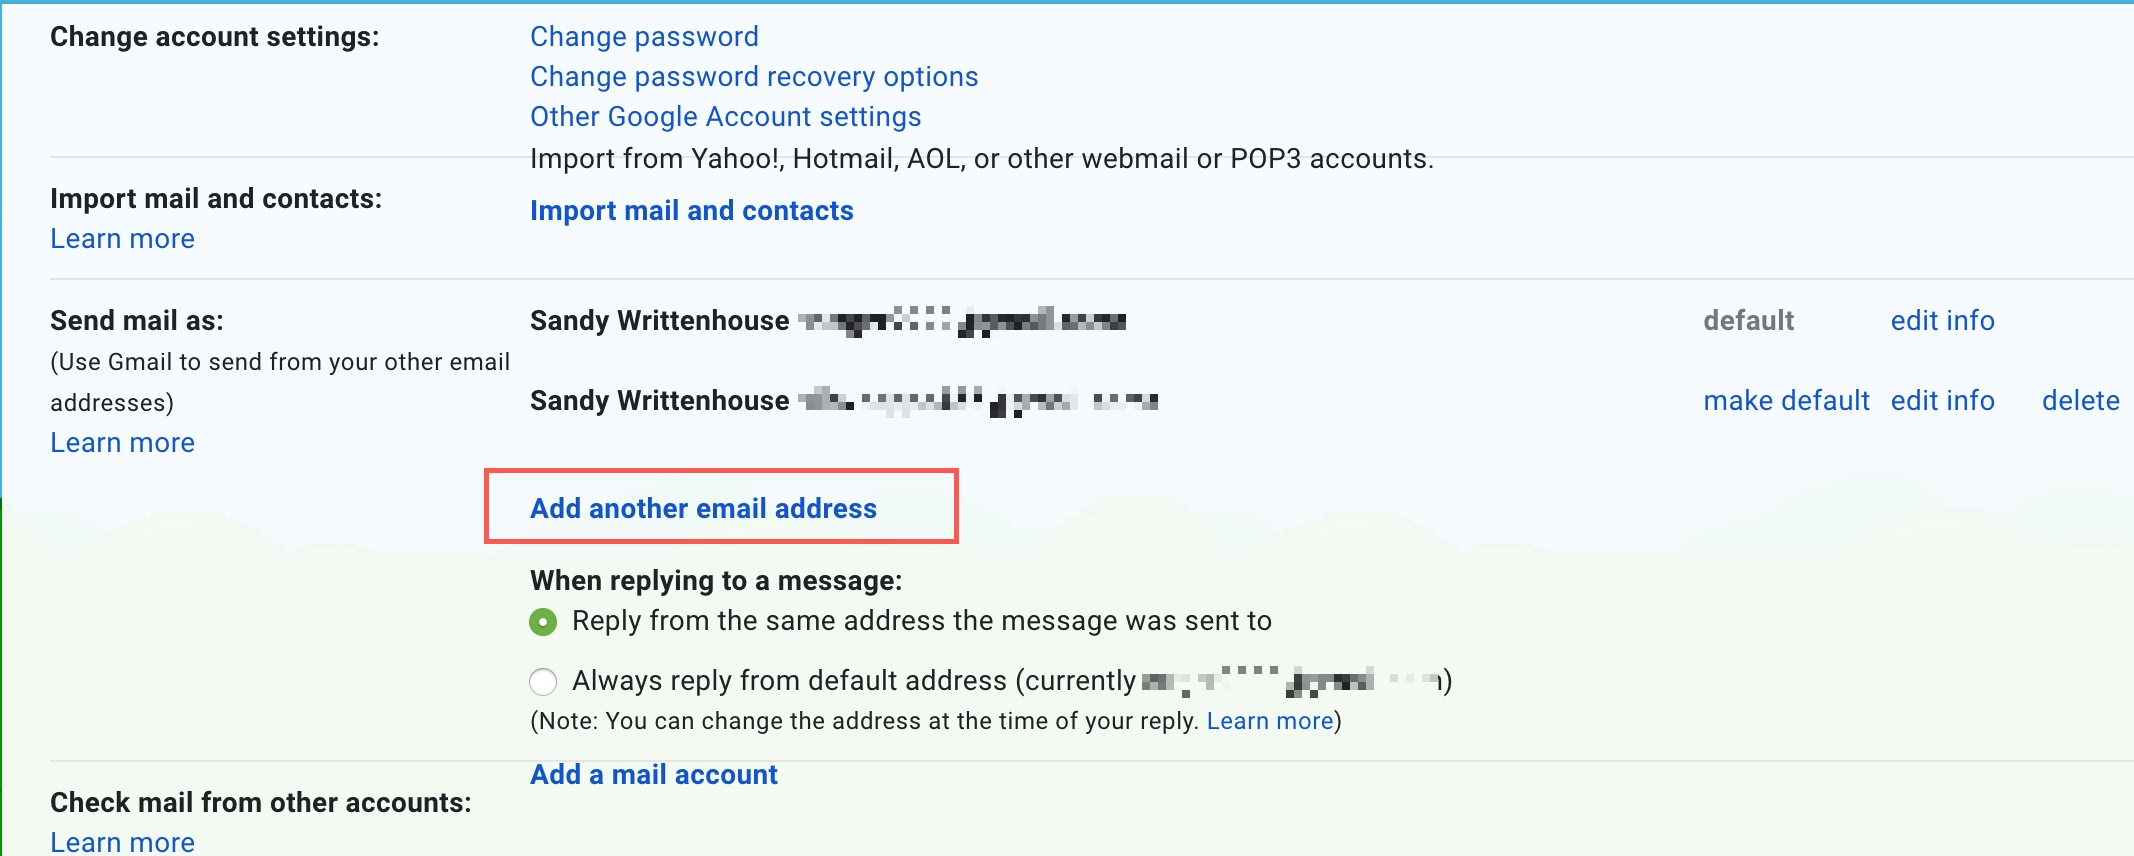
17. Send emails from different accounts
Do you have another email account? Don’t we all? You can send emails from your Gmail inbox to the other account, including email providers outside of Gmail.
Access Settings, then select Accounts and Import. Under Add another email address, choose Send mail as. Include the secondary email account on the list, and you’re ready to start sending more messages.
18. Create aliases to manage communications more effectively
An alias in Google Workspace is for Gmail account admins. You can think of it as an alternative email address that forwards all messages to your main gmail address automatically.
Only one user can have an alias, and you might not have access to all Google services, such as Google Drive. However, you can make 30 aliases per account for free, although they’re not always private.
A Gmail alias can appear in search terms for other parties you contact.
Here’s how to set one up.
- Log into your Google Admin console as an account administrator.
- Next, choose Menu by selecting the three vertical lines in the Admin console, then Directory (the person icon) and Users.
- Select a Gmail user, then choose Add Alternate Emails to the left of the name.
- Choose an Alternate email and create an alias name, adding a secondary domain as needed.
- Click Save.
It can be upwards of 24 hours before your alias takes effect.
19. Add unlimited aliases for better organization

Although Gmail limits you on aliases, you can use two methods when making an email address that will let you create as many as you want. Gmail will always send emails to an address if you add a plus sign after that address or a dot in the email address.
For example, if your base email address is [email protected], you will still receive emails if someone emails [email protected] or [email protected].
20. Delegate gmail access to another person
You can delegate Gmail accounts if you want them to have access to your Gmail. Assigning this access to an email management virtual assistant is a practical way to keep your inbox managed without staying glued to it yourself. In effect, a delegate is a shared email account.
After establishing a delegate, you can now hide or show their name when sending emails, use more labels to track messages, archive your messages, and create rules or filters for automatic email sorting.
Delegates have control over your Gmail account the same way you do. They can open any message, respond, create filters, change signatures, schedule emails, change Gmail settings and appearance, block accounts, and delete messages.
Each Gmail account can have ten delegates in total. If yours is an organization, Gmail lets you add 1,000 delegates max, with 40 able to get into the Gmail account concurrently.
Create a delegate by opening Gmail on your computer, as you don’t have access to this feature on the mobile version. Select Settings, then See all settings. Next, choose Accounts and Import, then the Accounts tab.
Under Grant access to your account, choose Add another account and input the delegate’s email address.
Choose Next Step, then Send an email to grant access. The delegate must confirm within a week to assume the new responsibility.
Efficient Inbox Organization for a Tidy Gmail
A cluttered inbox can make any person overwhelmed. These tips are here to take the edge off and keep things tidy and organized so that you can find what you need and when you need it.
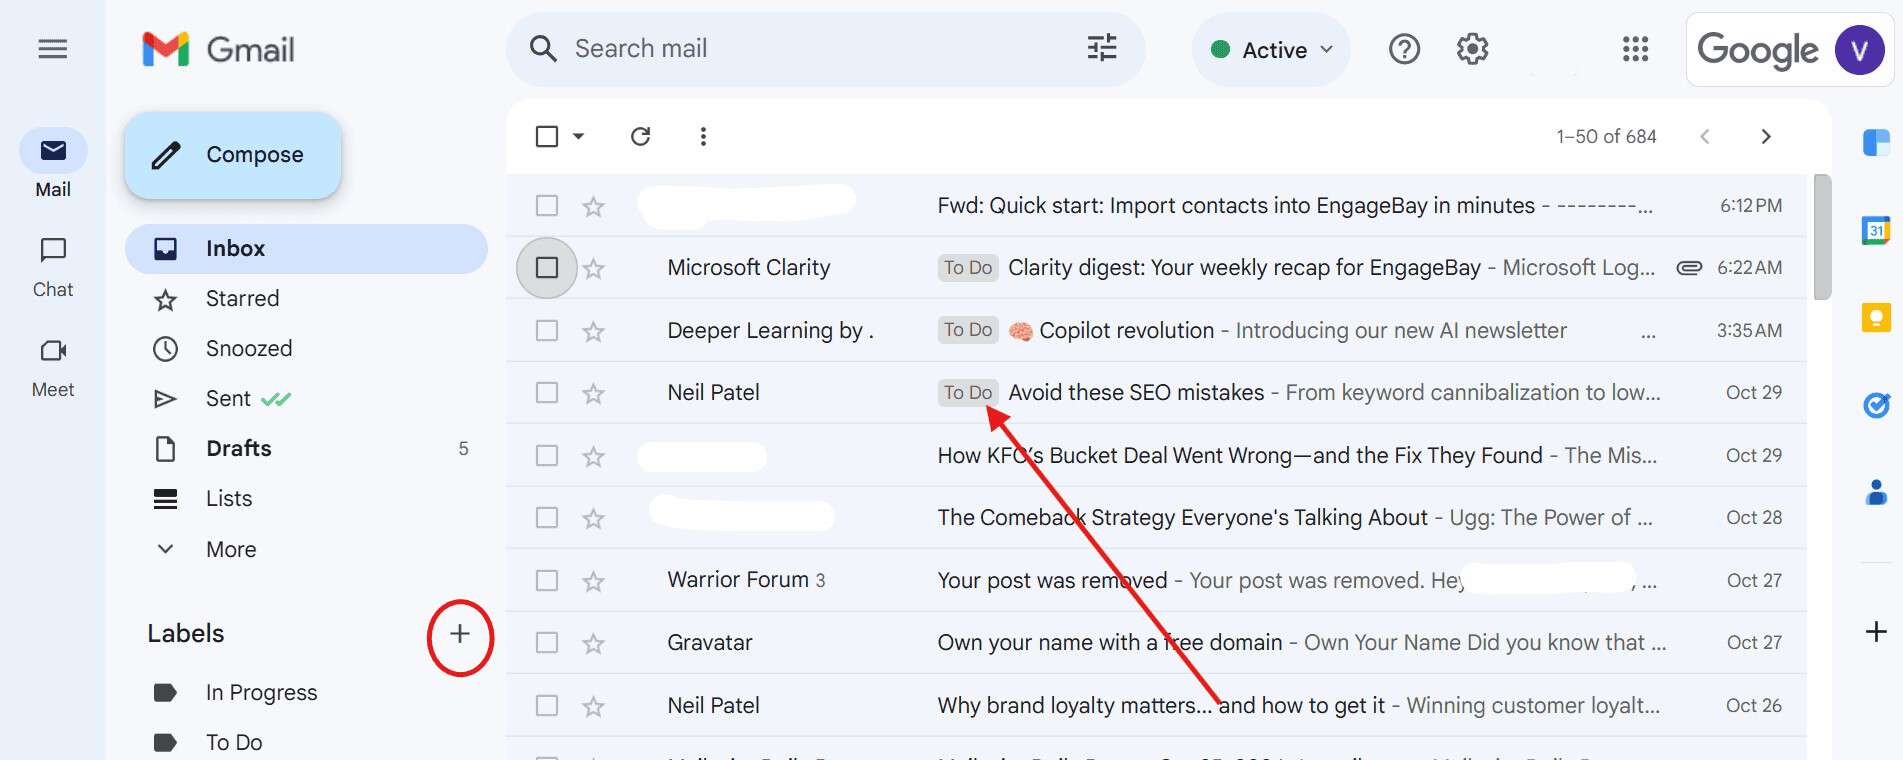
21. Create labels and categories for incoming emails
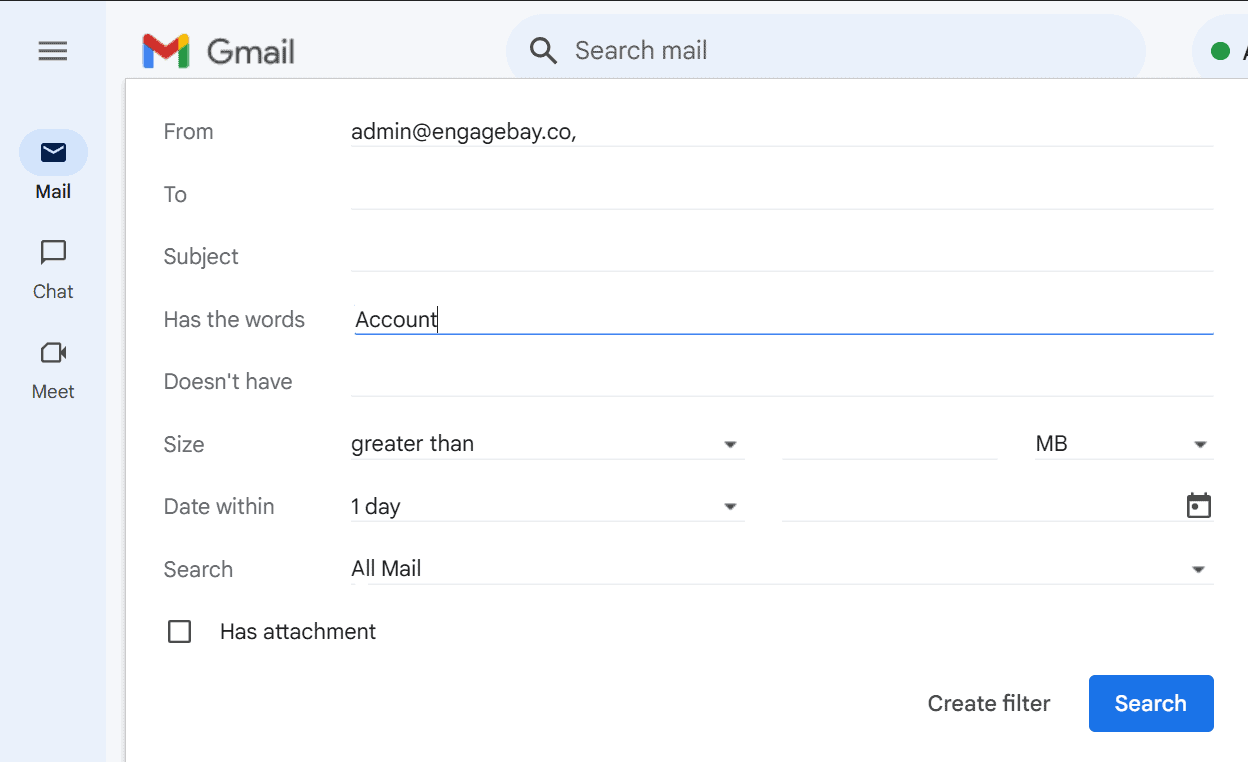
Another great function for staying on top of your emails is the categorization option Gmail offers for any emails you receive.
This isn’t an automatic feature; you must create a Gmail filter to take care of this task.
To do that, open your Gmail and select Show search options near the search bar. Type your requirements, then select Create Filter. Make the filter rules and choose Create Filter.
You can also create filters based on specific messages. Check the email, choose More (represented by three vertical dots), then select Filter messages like these. Input the criteria and choose Create filter.
22. Make a new Gmail label for better organization
Gmail labels are the key to better organization. You’ll already start with some basic, Gmail-generated labels when you open your inbox, but you can add more anytime.
Log into Gmail, then scroll and select the option More. Next, choose to create a new label by designing a name for the label. Choose Create, and voila.
23. Archive emails to declutter your inbox
Gmail allows you to archive any message in your inbox by clicking the Archive icon, which is a downward-facing arrow. The toolbar keeps track of your archived messages in their own separate folder.
24. Send and archive emails in one click
Once you’ve begun archiving emails in Gmail, keep the momentum going by automatically archiving messages after you’ve sent them.
In Gmail, navigate to your Settings, then choose Send and Archive. Select the Show “Send and Archive” button in reply.
As the name suggests, checking this activates the archive button. You can send any email as normal or use Send and Archive.
25. Mute unwanted email threads
It’s the worst when you get roped into an email chain that never wants to end, isn’t it? You don’t remember when you got copied, but there you are, dragged into all these replies that barely pertain to you.
Stop the madness by muting Gmail conversations. In Gmail, open the email you want to mute. Then, navigate to the top toolbar and choose More. You will see an option to Mute. Select it, and Gmail will automatically archive the thread.
If any of the recipients add you to a CC or write you directly, the email will go back to your inbox.
26. Mark open emails as unread for later attention
Better email management is possible through this handy Gmail tip, especially if you read a message but won’t have time to do what’s required in the email until later.
In Gmail, click the three dots, then choose Mark as unread. The email will pop up in your inbox again like you never read it.
Gmail Integration for Streamlined Workflow
Do you want to make your Gmail even more powerful? This integration will help you connect Gmail to other tools for enhanced workflow, making your day a lot easier.
27. Start a Google Meet from within Gmail
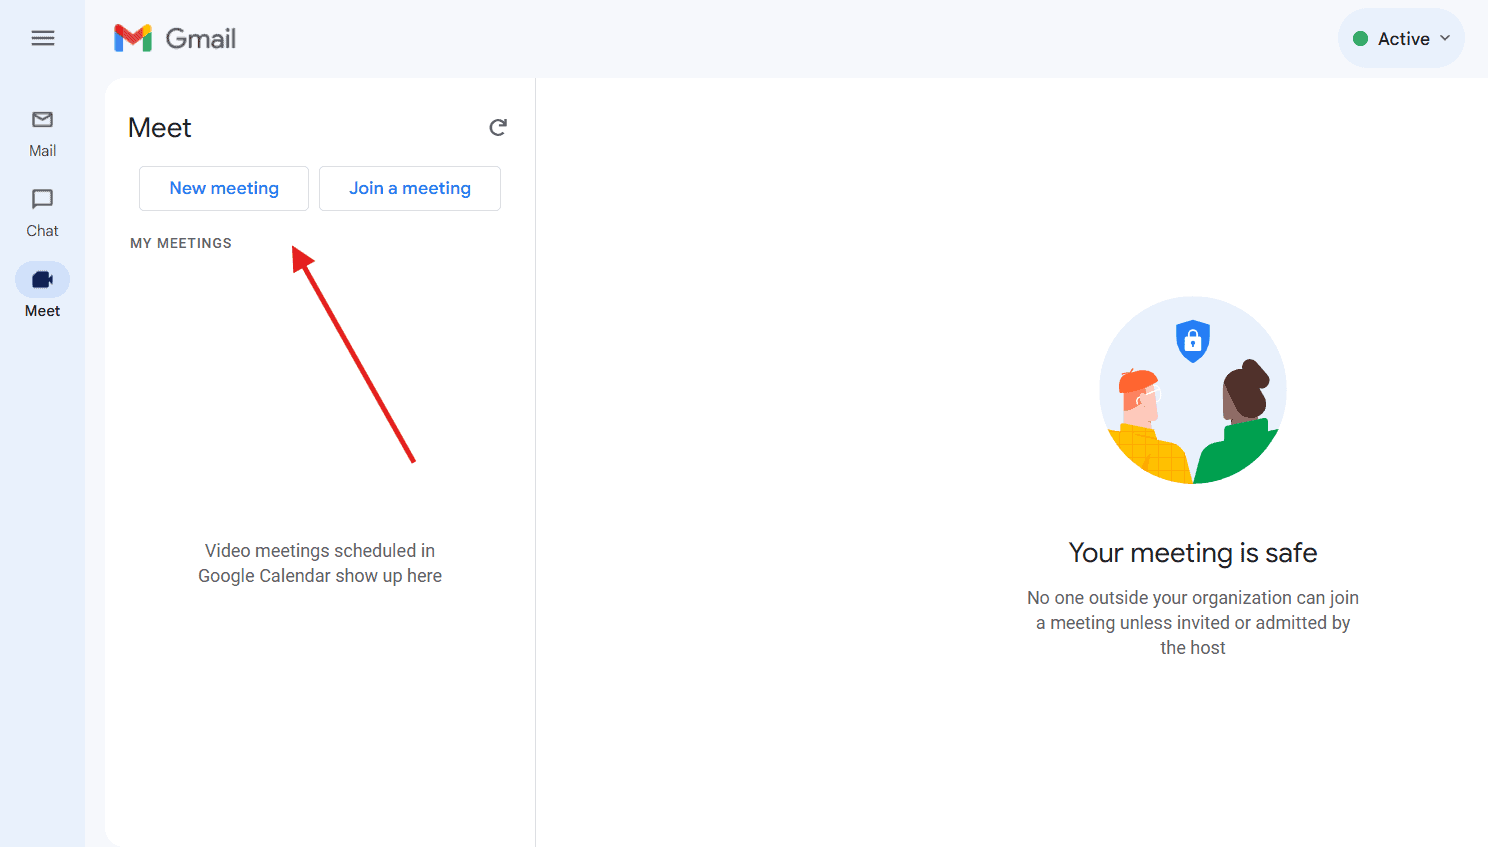
Meetings, meetings, and more meetings! If that’s all your day is filled with, simplify your schedule by starting meetings in Google Meet without having to leave Gmail. Good news – you can also join meetings using this handy feature.
In Gmail, navigate to the Meet area. Next, choose New meeting, then Send invite. You can also use Share via email or Copy meeting invite here.
If you receive a meeting invite to Google Meet, you can select Join Now in Gmail. However, check your camera and mic permissions to ensure that others can see and hear you. For easier note-taking during calls, consider using an AI note taker for Google Meet.
Read also: Gmail Cleanup: Unleash the Power of an Organized Inbox
Mobile Gmail Hacks to Stay Productive On-the-Go
If you’re often on the go, these Gmail hacks will help you stay productive no matter where you are.
28. Use Gmail offline to access your inbox without internet
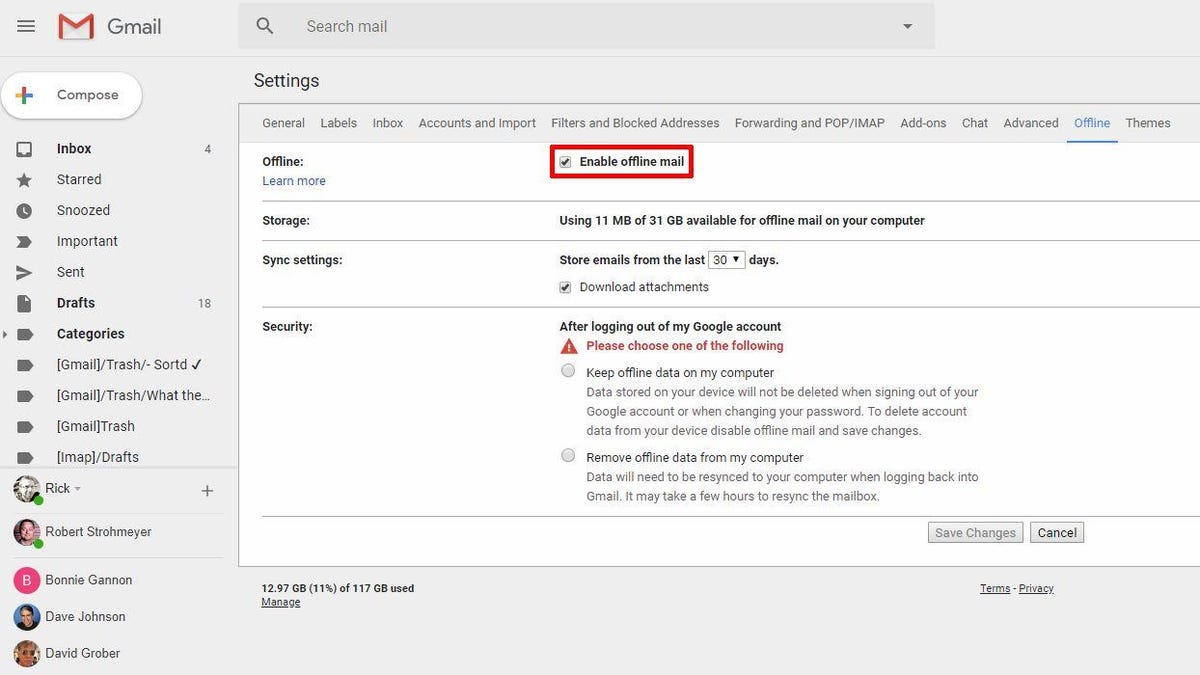
Are you logging off for a while but don’t want to miss anything important? Gmail lets you access your emails even without an internet connection. This feature is also handy if you’re traveling without a reliable internet connection or have a power outage but can’t miss your messages.
You can still read and respond to your emails, which will be sent once your connection is back online. How cool is that, right?
Here is how you can do this: first, access Gmail, then select Settings. In Settings, expand it to All settings, then choose Offline. In that tab, turn on Enable Offline Mail, then toggle how you’d like to receive your email updates. Click Save when you’re done.
29. Format emails on Android for a professional appearance
Who says your emails have to forego formatting? Lend your messages more professionalism and skim-ability by incorporating formatting such as numbered lists and bullet points.
This couldn’t be any easier. Open any email or create a blank email. You will see a bar that includes your font, text size, and other text options like bolding, italicizing, and changing the text color.
Besides those options, you can incorporate formatting by choosing the numbered list, bulleted list, or quotes.
To know about more rules to make your life easier, read our guide on Gmail rules.
Manage Notifications and Stay Connected
Managing notifications effectively and staying connected has never been this easy. These tips will help you make the most of Gmail’s notification and call features.
30. Snooze Gmail notifications to stay focused
Are you feeling overwhelmed by emails you don’t need to deal with right away? Gmail’s snooze feature is here to help. It lets you temporarily ignore emails until you’re ready—like snoozing an alarm, but for your inbox!
For example, if you receive an email about a project that’s not urgent till next week, just click on the clock icon and select the date when you want it back— say, Monday morning. It keeps your inbox clutter-free and ensures important emails get back when they’re actually relevant.
You can use snooze to manage non-urgent messages, like event reminders, so they pop up exactly when you need them. It’s a simple way to declutter and stay on top of things without the stress.
31. Unsubscribe from unwanted emails directly in Gmail
Do you hate getting bombarded with emails from businesses you’re not going to give your hard-earned money to?
While you can’t unsubscribe from everyone within Gmail, you can go into the search bar and input unsubscribe. You’ll see unsubscribe links in the results, allowing you to reduce the number of messages coming into your inbox.
Read our article on Gmail cleanup for more tips on how to quickly clean up your inbox.
32. Make calls using Gmail
Ring-ring! It’s your Gmail calling.
Okay, not literally, but if you have a Gmail-registered number, you can use this email platform to call. You must have speakers to hear the other person and a microphone so they can hear you.
In your inbox, you should see a phone icon at the bottom left of the Gmail screen. Click the icon, select a contact, and call.
Keep in mind when you call, your name will be displayed as No Caller ID, but hey, you’re calling from Gmail!
Now that you’ve mastered the productivity features, let’s focus on some hidden gems in Gmail that can make a huge difference.
Hidden Gmail Features You Need to Master
Discover some of Gmail’s lesser-known but important and useful features to take your experience to the next level.
33. Set the star color to highlight key emails

Gmail uses stars to denote email importance. The stars are available in various colors, and you can add one to four stars per email.
If you like the idea of a color-coded inbox, create your own email system within Gmail by going into Settings, then General. Next, choose the Star option, adding as many star colors or numbers as you want. Drag them into use and choose Save.
34. Select all emails within a label in your inbox
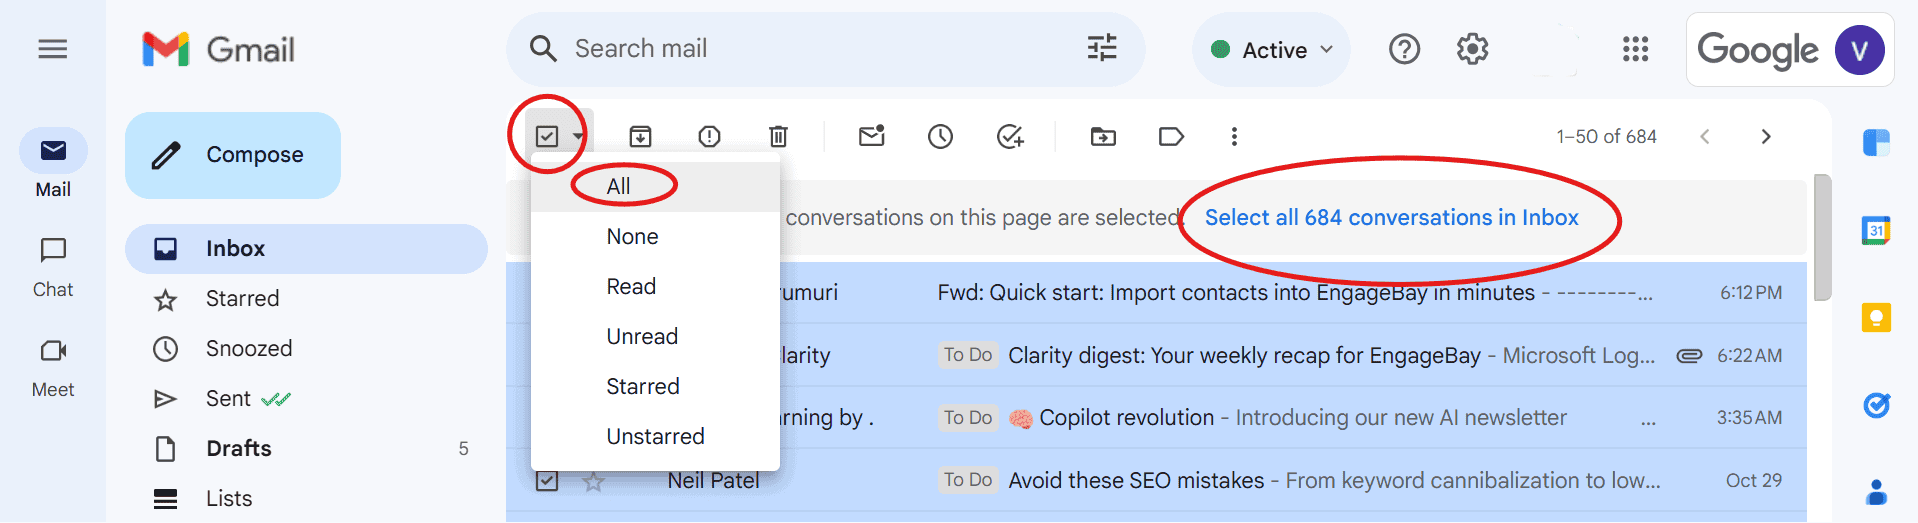
If you’re ready for a change and want to dump your email content, you can select every message in your inbox by label. Check the box and click the Select all conversations in [Label] link to wipe everything.
This saves so much time, as you usually have to delete emails 100 at a time.
35. Use Gmail nudges to follow up on forgotten emails
Keeping track of everyone you need to follow up with is tough, especially as your business grows. Fortunately, Gmail will nudge you if it’s been several days since you’ve heard from someone. This helps you stay on top of all the important emails you may have missed or forgotten and ensures you don’t leave an important mail unanswered.
The email floats to the top of your inbox so you can prioritize a follow-up. You can also dismiss the nudges.
36. Change the number of emails viewable in your inbox
Have you ever wished you could see the whole shebang of your inbox at once? Or, perhaps you’re interested in limiting the view.
Well, either way, you can. In Gmail’s settings, under General, keep scrolling until you see Maximum page size. Increase the number of conversations and contacts per page, then save.
Personalize Your Gmail for a Unique Experience
Let’s start by making Gmail feel more like home! These tips will help you personalize your inbox so that you can enjoy a more comfortable, visually pleasing, and organized emailing experience.
37. Turn on Gmail themes
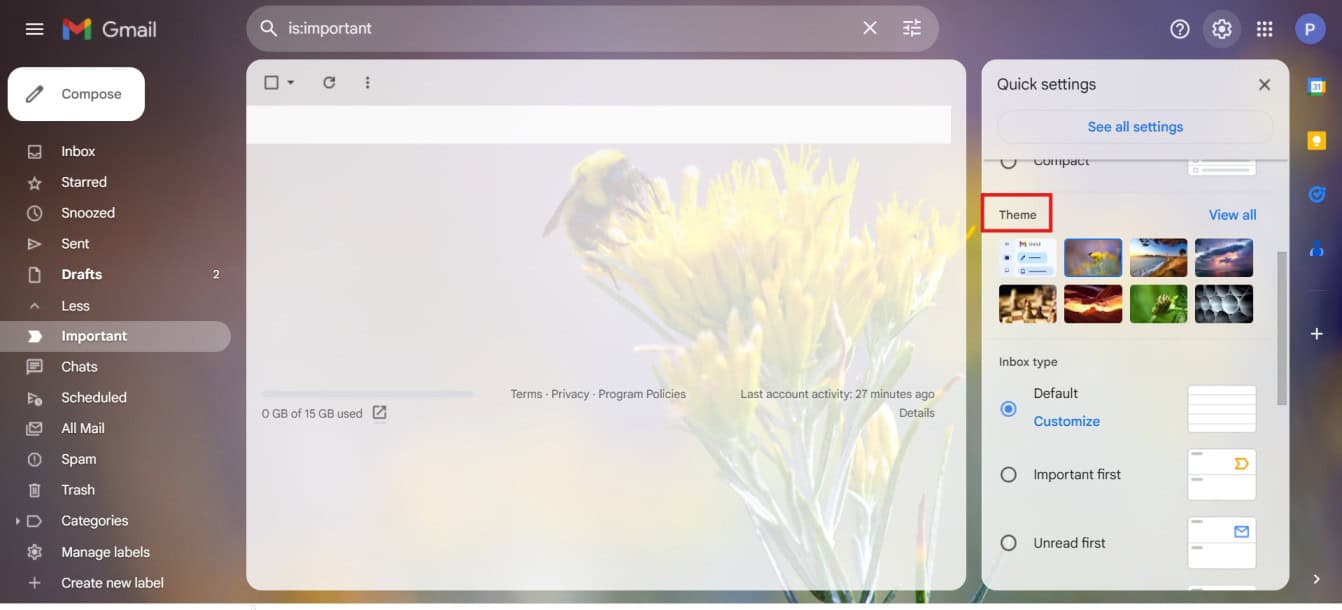
Source: Author Screenshot
Okay, so maybe this next tip doesn’t help with productivity, per se, but it’s still worth doing. Setting a Gmail theme adds panache and flavor to your emailing experience, also making Gmail easier on the eyes.
Here’s how to do it.
- Open Gmail, then choose Settings. You should see an option marked Theme, so select it and choose View All.
- Next, you’ll go to the theme window. The current theme will be Default, but you can select from many others for a more appealing background. You can also set the Dark theme by choosing Dark.
- If you have a photo you’d like to upload as your background, go into Gmail and select Settings by clicking the gear icon. Next, navigate to Theme, then View All. Check the bottom left of the window and choose My Photos.
- Upload a photo, then choose Select. You can even customize your background further by selecting features like Blur, Vignette, and Text Background.
- Make sure to click Save when you’re finished!
38. Move the chat out of your way
If the chat being on the left side of Gmail makes you bonkers, it doesn’t have to stay there. You can move it to the right side so you’re ready to work!
39. Turn off Gmail chat
You know how to move Gmail’s Chat from one side to another, but what if you want the Chat gone altogether? That’s simple.
Log into Gmail, then choose Settings. Select the email address you want to adjust the Gmail setting for, go to the General menu, and under Chat, turn it off. Click Save.
Smart Tools to Boost Email Efficiency
These tools are here to save you time and effort, making it easy for you to interact with your emails quickly and effectively.
40. Auto-open your emails
This feature makes it faster and more efficient to go through your inbox, and who doesn’t want that?
- Open your Gmail Settings, then find the Advanced tab.
- By activating Auto-advance, the next unread message in your inbox will pop up automatically once you delete, mute, or archive your messages.
41. Use email attachments smartly
How many times do you mean to send an attachment, but you get so caught up in the verbiage of your email that you simply forget?
Fortunately, if you use the words “included” or “attached” in your body copy, such as saying, “I’ve attached the file,” Gmail will remind you that you haven’t included an email attachment before you hit send.
Click the paperclip icon to attach a file to your email or drag it from a folder on your computer. Your files can’t exceed 25 MB unless you want to use Google Drive.
42. Implement Gmail keyboard shortcuts

Why manually implement commands within Gmail when you can use keyboard shortcuts instead?
- Activate them within Gmail by choosing Settings, then See all settings.
- In that menu, select Settings again.
- Continue scrolling until you see Keyboard shortcuts, then turn Keyboard shortcuts on.
- Choose Save Changes and configure shortcuts for deleting, archiving, and formatting text.
You can see all available keyword shortcuts anytime in Gmail by pressing Ctrl on PCs and Command on Macs, then typing.
43. Quote selected text
Underscore an important part of a person’s response by highlighting it within Gmail. When you reply, the text you selected will be quoted. This will keep your email responses more tailored.
Tips for a Clean and Efficient Inbox
A cluttered inbox can be overwhelming, but with these tips, you can easily manage your emails and keep everything tidy, providing you with a clutter-free and productive experience.
44. Find emails by size
Your Gmail account has 15 gigabytes of storage space, which can be reduced quickly if you send and receive a lot of attachments, emails, or otherwise.
Once you exceed that amount, you have to either delete your emails or buy more storage space.
Yet the task of deleting emails is so gargantuan to many of us that it’s easier to shell out for the extra space.
It doesn’t have to be!
Typing size: [number]m into Gmail will bring up messages that exceed that storage amount.
For example, if you input size 20MB into Gmail, you’ll see all messages of that file size, so you can then mass-delete them.
45. Set Gmail inbox type
If you always want to see your unread emails first or messages from a specific person, you can use Gmail’s Inbox Type feature. To activate it, just go into Settings, then find your Inbox tab. Next, in the dropdown, select Inbox Type.
Choose the type of inbox that suits your work style and click Save. And, Voila! There you have it, the best way to set up your inbox type.
Gmail Integrations with Third-Party Apps
Want to streamline your workflows and make Gmail work for you? But you can’t seem to figure out how? Then, you’re in luck!
Let’s see how you can use Gmail to connect with your other project management tools and work seamlessly across platforms, making your work hassle-free. Here are three popular integrations:
Asana
Did you know you could integrate your Gmail account with your Asana account and create clear to-do tasks in your Gmail inbox itself? You can use this to handle various team projects, ensuring that none of the tasks fall through the cracks.
Trello
With this integration, you can easily turn the emails in your Gmail inbox into actionable tasks. You also get to add emails directly to your Trello boards to make tracking project-related convos easier.
Slack
This integration is special! It lets you forward important emails to any Slack channel or DM (direct message) to keep your team updated without ever having to switch between the apps. (Lazy people, time to rejoice!)
Bonus: Gmail Tips for Android Users
Using Gmail on Android can feel like an entirely different ball of yarn, but it doesn’t have to be! Here are some tips that will help you master Gmail in no time.
Turn off spaces and chat
Spaces (group convos)? Nah. Chat? Nuh-uh. You don’t have to allow your inbox to stay clogged up when you can control what you see each time you log into Gmail on Android.
Go into Gmail, then select Settings for your email address. Under General, go into Chat and turn it off.
Use action confirmations
Although some view it as hand-holding, Gmail Action Confirmations can save your skin before you send an email without an attachment or with a spelling blunder.
Activate this handy feature in Android by accessing Gmail and then Settings. Next, select General Settings and Action Confirmations. Toggle the Action Confirmations your way, then select Save.
Erase your search history
Gmail search history? Not here. Get rid of it by going into Settings, then General Settings. You will see a menu on the top right with three buttons. Choose Clear search history.
Format your emails
Although you don’t get quite as many formatting options on mobile Gmail as you do with the desktop version, you can still spiffy up your messages, so you should!
These options are available in Compose Email, but you can’t normally see them. Make them visible by accessing the Gmail app on Android and then choosing Compose.
Write your email, then tap the parts of the text you wish to format, holding them. Choose Format and bold, italicize, and otherwise format your text.
Gmail Productivity Hacks for Professionals
Can’t figure out how to make Gmail work for your small business needs? Worry not! Check out these simple, actionable Gmail tips to use Gmail for maximum productivity.
- Use Gmail to label and organize client communications.
- Create filters to prioritize high-value customers automatically.
- Use keyboard shortcuts for efficiency.
These productivity techniques using Gmail are specifically tailored for business users.
Best Practices for Gmail Productivity
Who doesn’t want to maximize productivity using Gmail? Absolutely no one! Here are some of the effective best practices for enhancing your Gmail productivity in 2025.
Use filters and labels
Imagine you are looking through your inbox effortlessly because you used filters and labels to organize it. Ain’t that pretty?
You can create filters easily to label emails from your boss as ‘Important’ or mark requests as ‘Client inputs.’ It’s like having an assistant sort through your inbox before you lay eyes on it.
Pro Gmail tip: Marketers can filter emails containing labels or demo requests to manage campaigns better.
Use templates
Ever get tired of writing out the same reply over and over? Setting up email templates is a huge time-saver.
For example, if you’re always answering similar customer queries, just create a template, and with a click, you’re ready to send a full reply to any customer. It’s like having pre-written scripts for frequently asked questions—kind of like your own “cheat codes.”
Take advantage of keyboard shortcuts
Keyboard shortcuts are a complete game changer. Imagine deleting emails, archiving messages, or jumping to another folder without ever touching your mouse.
For example, press “C” to start composing an email or “E” to archive one. Mastering these shortcuts feels like leveling up your email game—it’ll save you a lot of time!
Set up smart folders
Smart folders are your secret weapon for staying organized. Let’s say you’re juggling multiple clients—use smart folders to group all emails from a specific client in one place.
Or, if you’re handling leads, create a folder for “High-Value Leads” so you can follow up without having to scroll endlessly through your inbox.
New Gmail Features for 2025
Time and again, Gmail keeps innovating and adding new features to improve user productivity and security. Let’s look at two new Gmail features for 2025: AI-driven Smart Compose and improved security enhancements. Here are some highlights for you:
AI-driven smart compose
Who knew the already Smart Composer could get smarter with advanced AI capabilities? Guess we all kinda knew this day would come. Now, this feature is more effective at anticipating your sentences, helping craft emails quicker, and saving typing efforts.
Enhanced security improvements
Jammy jammy, double whammy! You’ll feel the excitement, too, when you get to know about the new security features that Gmail has added to improve phishing detection and encryption. These upgrades will protect against evolving threats and help both individuals and businesses keep sensitive information secure.
Common Mistakes and Quick Fixes
Let’s face it! We all make mistakes at work. But you can correct your mistakes before your boss finds out. Here are some common mistakes and their quick fixes:
Misusing filters
Filters are a powerful feature in Gmail, but they can sometimes lead to messy inboxes if not set up well.
Mistake: For instance, creating vague filters can lead to important emails being missed because they’re automatically archived or labeled incorrectly.
Quick fix: Regularly review your filters and adjust them to be more clear. For example, instead of filtering all emails containing the word “client,” specify the sender or add a subject line keyword to make it more clear.
Not utilizing smart compose
Smart Compose can save you time by offering text as you write your emails, but many Gmail users either don’t use it or ignore its suggestions altogether.
Mistake: For example, when writing routine replies, smart compose can help you complete sentences like “Thank you for your email” with just a few keystrokes, reducing the time spent typing it.
Quick fix: The fix? Enable Smart Compose and actively engage with its suggestions—it’s like having an assistant who helps you craft professional emails in a matter of seconds!
Wrapping Up
Better productivity starts with knowing the right hacks. With the 40+ Gmail tips and tricks in this blog post, you’re ready to take your inbox by storm and keep it under control.
Learning these Gmail tips and tricks won’t just keep your inbox clear; it will also clear the clutter in your mind, providing you control over your day ahead. Start using them now and see the difference!
If you’d like to try a free marketing automation tool to handle all your email and customer management, try EngageBay. Thousands are already using it to grow their business!
FAQ
How do I schedule an email?
To schedule an email in Gmail, follow the steps below:
- Click on “Compose” to start a new email.
- Write out your email as you would.
- Instead of choosing the “Send” button, click on the small arrow next to the “Send” button and then select “Schedule Send.”
- Now, you can pick your desired date and time and press “Schedule Send.”
Scheduling your emails allows you to send your messages strategically at your convenience, improving your chances for a response.
How do I block spam in Gmail?
Blocking spam emails in Gmail is simple:
- Open the spam email.
- Click on the three-dot icon in the upper right corner.
- Next, choose “Block {sender’s name}.”
To avoid unwanted email, consider using Gmail’s filtering tools to catch spam emails preemptively. Alternatively, you can use Gmail’s “Report Spam” button to keep your inbox organized, automatically shifting similar emails to the spam folder.
How do I create email templates in Gmail?
You can create email templates in Gmail to save your time on repetitive tasks:
- Go to your Gmail settings and click “see all settings.”
- In the advanced tab, enable “templates.”
- Write a new email, then click on the three dots at the bottom right, select “templates,” and save your draft as a new template.
Enabling this feature can improve your Gmail productivity.
How do I make my Gmail more effective?
To improve Gmail productivity, consider the following tips:
- Use Gmail’s “labels” to categorize emails efficiently.
- Set up filters to automatically sort your emails.
- Enable “Undo send” to avoid sending emails with any errors.
Label your emails efficiently and use Gmail filters to keep things sorted automatically. For more advanced cleanup tips, explore this blog on Gmail cleanup tips to learn how to keep your inbox organized and under control.
What is the +1 Gmail trick?
The +1 Gmail trick is a neat way to create multiple Gmail addresses with one Gmail account. By adding “+[something]” after a username (example: [email protected]), you can create unique email addresses that lead back to your primary inbox. This trick can be used to filter or identify spam sources.
How to use Gmail offline?
Using Gmail offline is a great way to access, read, and even respond to your important emails when you don’t have an active internet connection. Here’s how you can set it up:
- Open Gmail settings, click on the gear icon, and select “See all settings.”
- Next, enable offline mail by going to the “offline” tab and check on “enable offline mail.”
- Later, sync your settings by choosing how many days of emails you want to sync (it could be 7, 30, or 90 days).
- At last, click on “Save the changes.”
Content updated for freshness and SEO by Veena.