Email authentication involves a wide range of simple and complex processes that prevent malicious actors from ruining your marketing campaigns. SPF, DKIM, and DMARC are the three primary email authentication methods that support advanced functionalities for validating the authenticity of your emails and preventing cybercriminals from stealing subscriber information, sending harmful or unwanted content, or harming your reputation.
But as vital as this is, many marketers don’t use authentication protocols due to the complexities and complicated setup processes. Even more, these methods are not without limitations, so setting up a functioning email validation system can be challenging, especially if you’re not tech-savvy.
In this guide blog post, we broke down these email authentication protocols to help you understand the fundamental principles behind their operations. What will you learn?
- The basics of SPF, DKIM, and DMARC
- How to setup these authentication protocols
- Components of the SPF, DKIM, and DMARC records
- Benefits of email authentication

Table of Contents
What is SPF?
SPF stands for Sender Policy Framework. It is an email authentication protocol that allows receiving email servers to accept incoming emails from authorized senders. It enables you to place restrictions on the number of email senders who can use your domain name to send emails.
Sender Policy Framework uses established policies known as SPF records, containing useful data to help the receiving email server identify illegitimate email senders.
An SPF record is a form of TXT record in your DNS zone file containing the list of IP addresses authorized to send emails using your domain. Usually, email servers will reject emails from IP addresses not listed in this record, thus preventing spoofers and spammers from using your identity to send harmful content. If the IP address in the email header is not in the SPF record, the server will either reject or flag it as spam.
How does SPF work?
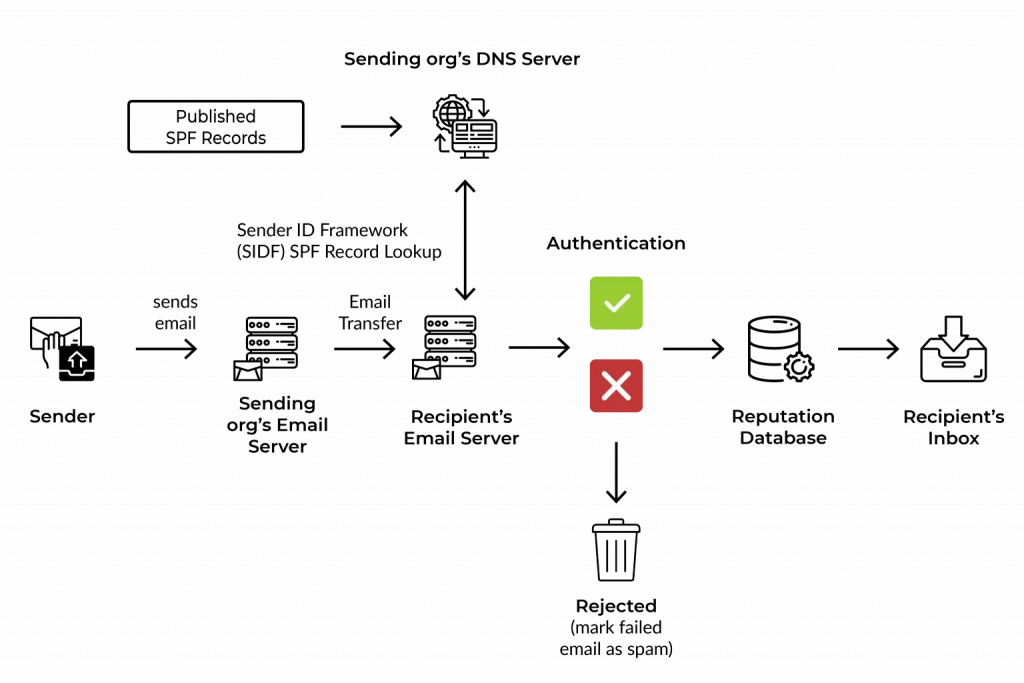
SPF verifies the source of the email using the envelope From: address to match the records in the owner’s DNS server. Here are five major steps that summarize how SPF works:
- Domain administrators publish SPF records to the DNS database, setting rules email servers should follow whenever they see an incoming email
- The receiving email server performs a DNS lookup for the incoming email, retrieves the SPF record, and examines rules for the domain in the return path or bounce address
- The email server then compares the sender’s IP with the list of authorized addresses in the records
- Following the rules, the server decides if it should deliver, flag, or reject the email
-
- If the sending IP is in the SPF record, the email authentication passes
- If the sending IP is not in the SPF records, the authentication fails
What does an SPF record look like?
An SPF record contains tags that give receiving email servers instructions on how to match incoming emails and handle failed authentications. There are two main components of an SPF record:
- Mechanism
- Qualifiers
This is how it may look:
v=spf1 a:mail.solarmora.com ip4:192.72.10.10 include:_spf.google.com ~all
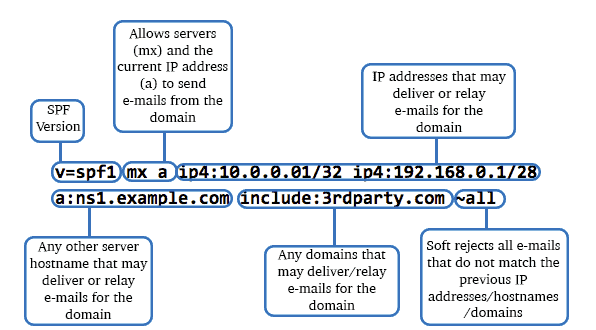
1. Mechanism
SPF mechanisms are special elements or tags in an SPF record that show email servers what to match against the sender’s address. Here are some of these elements:
- v: This is the first mechanism in every SPF record. It specifies the SPF version and in this case, the value is 1
- a: This specifies the authorized IP addresses in the A or AAAA records of the domain. If the domain has an A record that returns the sender’s IP address, this mechanism passes
- Ip4 or Ip6: This specifies the Ip4 or Ip6 address respectively. The IP address range is given in the record and if the sender’s address matches an address in the network range, this mechanism passes
- mx: This specifies the authorized email servers the sender uses to relay messages on behalf of the domain. The mx record of the domain is defined in the SPF record and a match is successful if the sender’s IP is linked to the list of addresses in the record
- include: This specifies third-party IP addresses authorized to relay emails for the domain. This mechanism uses external mail servers’ SPF records to match the sender’s IP address. It returns a permanent error (PermError) if the third-party server has no SPF records
- all: This is the last mechanism in an SPF record and it defines how the incoming email server will handle any address that doesn’t match other mechanisms. It uses qualifiers to determine what happens to the email after evaluating the addresses with other mechanisms
2. Qualifiers
The qualifier is a prefix that specifies the action the server takes after matching the addresses with the records. The four major qualifiers include:
| Qualifier | Result | Meaning |
| + | Pass | This qualifier allows the receiving email server to accept all incoming emails even if it has no match in the SPF record |
| – | Fail | This is the Hard Fail. It instructs the receiving server to reject emails when the sending server is not authorized or has no match in the SPF record |
| ~ | Soft Fail | The Soft Fail instructs the server to accept all emails but may flag them as spam if the sender is unauthorized |
| ? | Neutral | This qualifier gives no clear instruction on whether to pass or fail authentication, even if the sender is unauthorized |
How to set up SPF record
Setting your SPF record is a complex process, and improper configuration can result in several errors. However, here’s a general overview of the setup process:
- Get a list of the IP addresses, email servers, or domains authorized to send emails on your behalf
- Create your SPF TXT record specifying the authorized addresses. You can do this in your DNS settings depending on your domain host
- Publish the record and test to ensure proper configuration
Read also: What Are Email Protocols? Basics of SMTP, IMAP, POP3
Points to consider when creating your SPF record
- Your SPF records should only contain lowercase characters
- It has a 255-character limit
- You can only have one SPF record per domain
- Avoid using the “+all” or “?all” mechanism
- SPF records should not exceed 10 DNS lookups
What are the limitations of SPF?
- Receiving email servers will fail authentication if your records exceed 10 DNS lookups
- Forwarded messages cannot pass authentication since the new return path may not be in the SPF record
- SPF records setup is complex and companies need to update them as they change email servers
- SPF only matches the bounce address and not the From: address, thus making your customers susceptible to spam and phishing attacks
Read also: How To Avoid Spam Filters For Better Email Deliverability
Enhance Your Email Marketing
Want to make your emails more impactful? Check out our beautiful, easy-to-customize HTML email templates. Designed to boost engagement, these templates from EngageBay will help your emails stand out. Just customize the images, headings, and CTAs for your brand, and hit send in a few minutes!
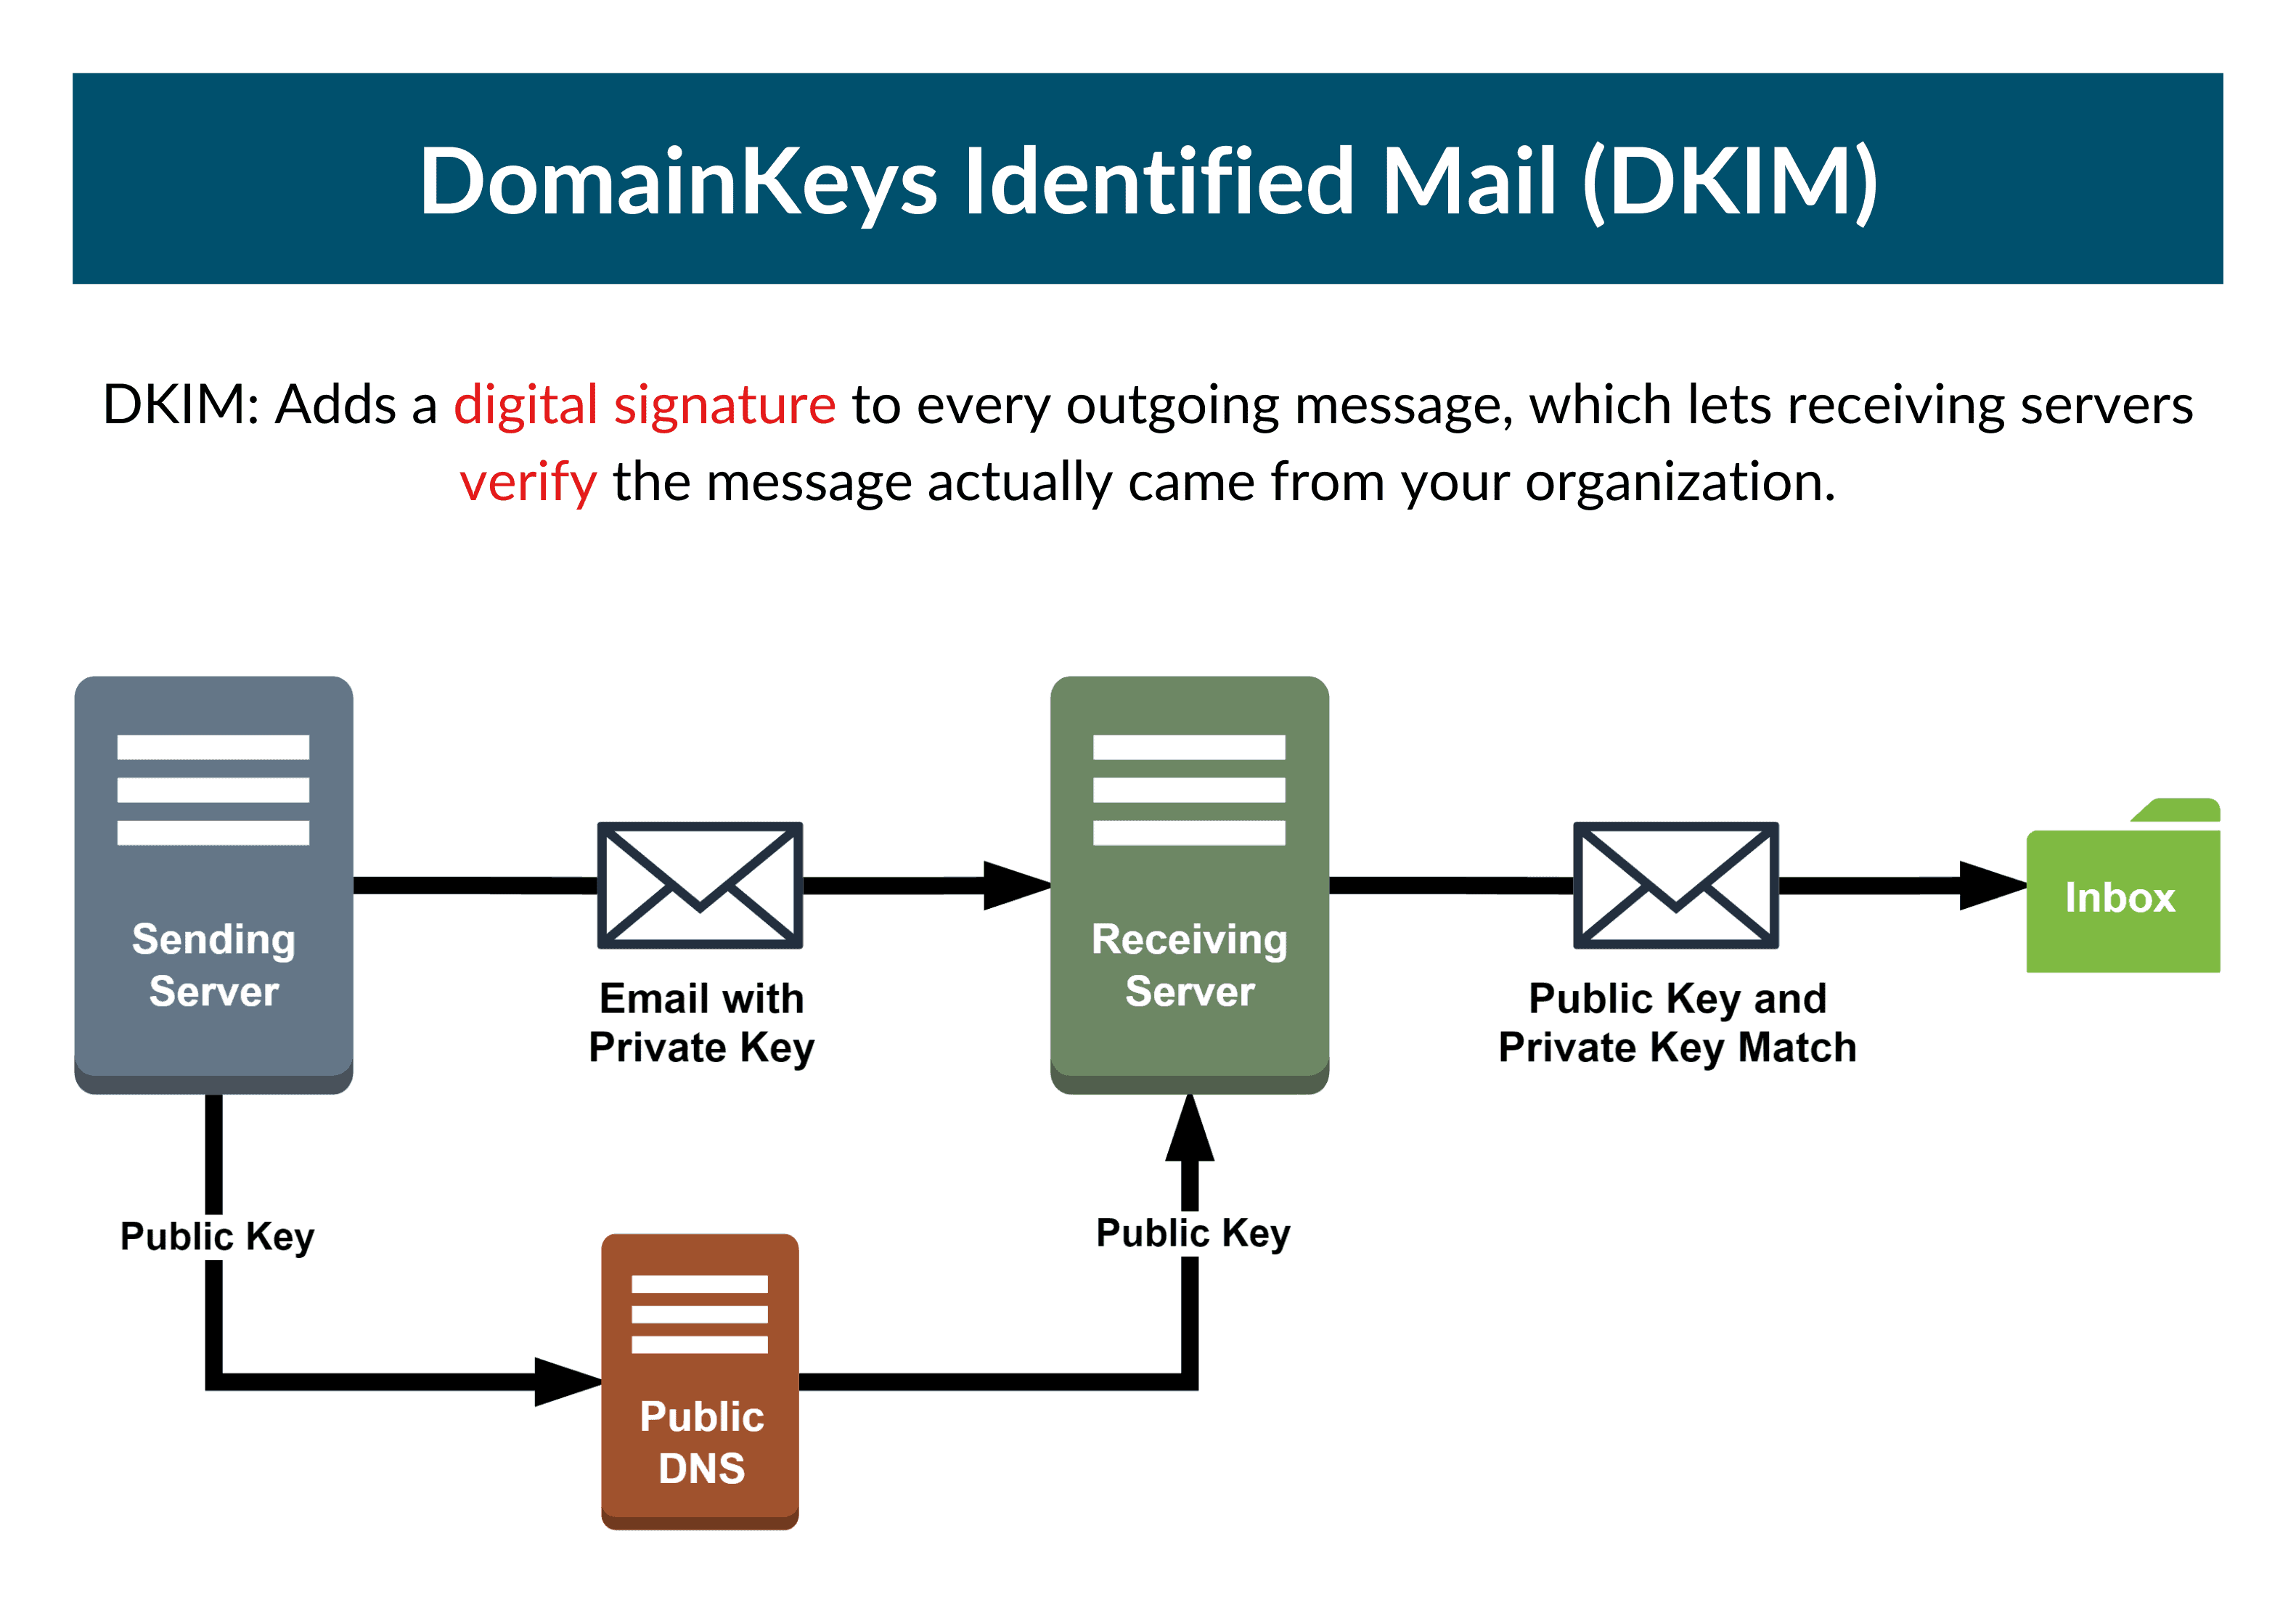
What is DKIM?
DKIM stands for DomainKeys Identified Mail. It is an email authentication protocol that uses cryptographic (digital) signatures in message headers to validate the integrity and legitimacy of a message. Unlike SPF, DKIM provides your domain with an encryption key that enables you to sign your emails to prove they came from you.
This method prevents cybercriminals from spoofing your domain, as they don’t have access to the private key that encrypts cryptographic signatures in email headers – anyone who has access to your private key can sign emails on your behalf. DKIM adds an extra layer of security to SPF by telling receiving mail servers that the message came from you and has not been altered in transit.
A DKIM record is a form of TXT record in the DNS zone file containing the DKIM public key. The public key is an asymmetric key that decrypts the signature signed by the private key.
How does DKIM work?
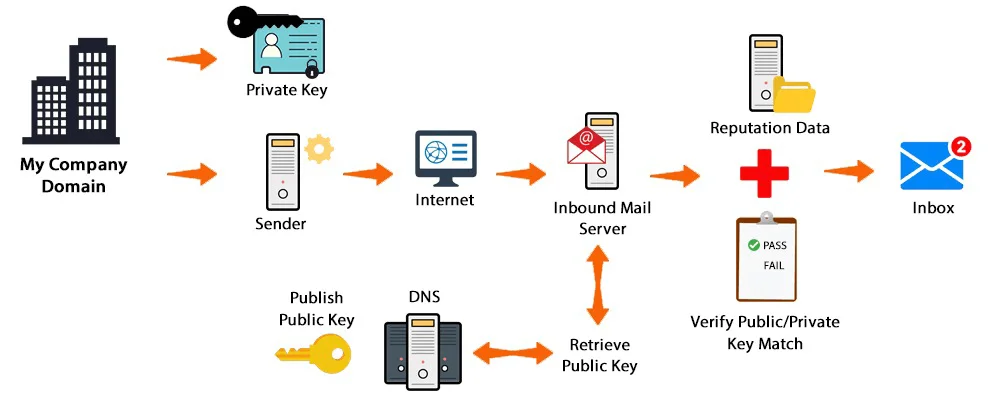
DKIM uses asymmetric cryptography to secure and authenticate email messages. This process works by encrypting and decrypting your email signature with a private and public key respectively.
Here are the major steps that summarize how DKIM works:
- The domain administrator creates a cryptographic key pair (private/public key pair), secures the private key, and publishes the public key in the DKIM record in TXT format.
- A digital signature is created for each email by using the message header and content to generate a hash (an alteration in any of these fields can change the hash value). This hash is encrypted using the domain’s private key and attached to the email header.
- The receiving mail server examines the incoming email, performs a DNS lookup to find the public key in the DKIM record, and generates another hash based on the email content. It also uses the public key to decrypt the DKIM signature in the email header.
- Finally, the receiving mail server compares both hash values. If there’s a match, the authentication passes and the email is secure. But if both values don’t match, the authentication fails, meaning the message has been altered or the email sender is not authorized.
Read also: What Is a DNS Record? Tools, Steps, and More
What does the DKIM Signature look like?
The DKIM signature is a long string of randomized characters created by several components in the message – body, header, or domain. A simple DKIM signature is composed of several parts and may look like this:
The signature contains tags that include:
- v= This specifies the DKIM version, and the current value is set to 1
- a= This specifies the hash algorithm the signer uses to generate the signature. Usually, the value is either rsa-sha256 or rsa-rsa1.
- d= This specifies the domain name of the email sender
- s= This specifies the selector. The receiving mail server uses it to locate the public key for a given signature.
- h= This specifies the header hash value. It contains all information in the email header – from: to: subject: date: etc.
- b= This specifies the digital signature of the header and body encoded in Base64
- bh= This specifies the email body hash value. It is a string of characters representing the encrypted version of your message content.
- t= This specifies the timestamp when the signature was created. The format is the number of seconds since 00:00:00 on January 1, 1970, in the UTC time zone.
How to set up DKIM
Like SPF, DKIM setup is a complex and time-consuming process. However, it is worth the effort, as it protects your brand reputation and shields your email subscribers from spam and phishing attacks. Here are general tips to help you set up DKIM email authentication.
- Generate the public/private key pair for encrypting and decrypting your DKIM signature
- Publish the public key in your DNS zone file as a TXT record – and secure your private key
- Generate your signature and test your emails to ensure proper configuration
Points to consider when creating your DKIM record
- The private key should be kept secure
- Avoid gas or errors in the DKIM records
- Ensure you rotate your key regularly to reduce the effects that may occur when it is compromised
- Ensure your records are aligned with your email header details
- You can reduce errors by using a trusted DKIM record generator
What are the limitations of DKIM?
- DKIM is complex to implement as it involves managing cryptographic keys and generating email signatures
- If email servers or other programs alter the message in transit, the message may fail authentication
- DKIM only authenticates the senders’ domain names, not the senders themselves, so if a cybercriminal has access to your account, the messages they send will pass authentication.
- Sometimes, the DKIM signature doesn’t cover all parts of the email, so even when a part of the email message is altered, it may likely pass the authentication
- The DKIM signature doesn’t cover the return path (bounce address).
👉 Want emails that wow? Use EngageBay’s free HTML email templates to create stunning campaigns. Quick, easy, and effective. Get started now!
Read also: Avoiding the Spam Folder: An Intro to Email Deliverability
What is DMARC?
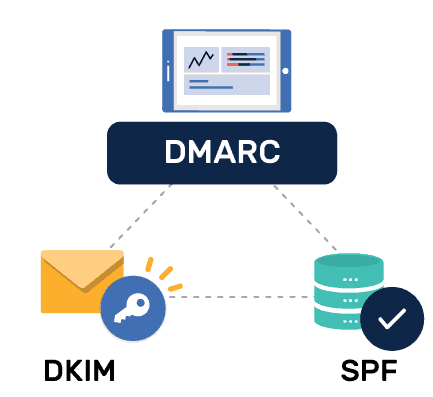
DMARC stands for Domain-based Message Authentication, Reporting, and Conformance. It is an email authentication protocol that enables domain administrators to publish policies for handling incoming emails. This method builds on the SPF and DKIM framework, thus adding an extra layer of security to your emails.
- DMARC + SPF: DMARC ensures the header “From:” address matches the return path or envelope “From:” address in the SPF record, thus validating the source of the email.
- DMARC + DKIM: DMARC ensures the header “From:” domain matches the d= domain in the DKIM signature. This validates the authenticity of the message.
DMARC ties these email authentication protocols together to find possible alignment signals and suggest actions the receiving mail servers should take when an email fails authentication. Additionally, it also provides well-detailed reports – in XML format – to help domain administrators monitor how their domains are used in email communications.
DMARC prevents phishing and spoofing by ensuring unwanted or harmful content doesn’t get to the inbox. It uses records from SPF and DKIM to combine standard authentication and encryption tools, ensuring that only authorized senders dispatch emails on behalf of your company. Usually, the DMARC record contains policies for handling these emails.
A DMARC record is a form of TXT record published in your DNS database, containing policies that tell receiving mail servers how to handle messages that fail SPF and DKIM email authentication. It also contains instructions that enable the sender to receive reports about emails sent using the domain.
Read also: How to Set Up DMARC: Safeguard Your Business from Phishing
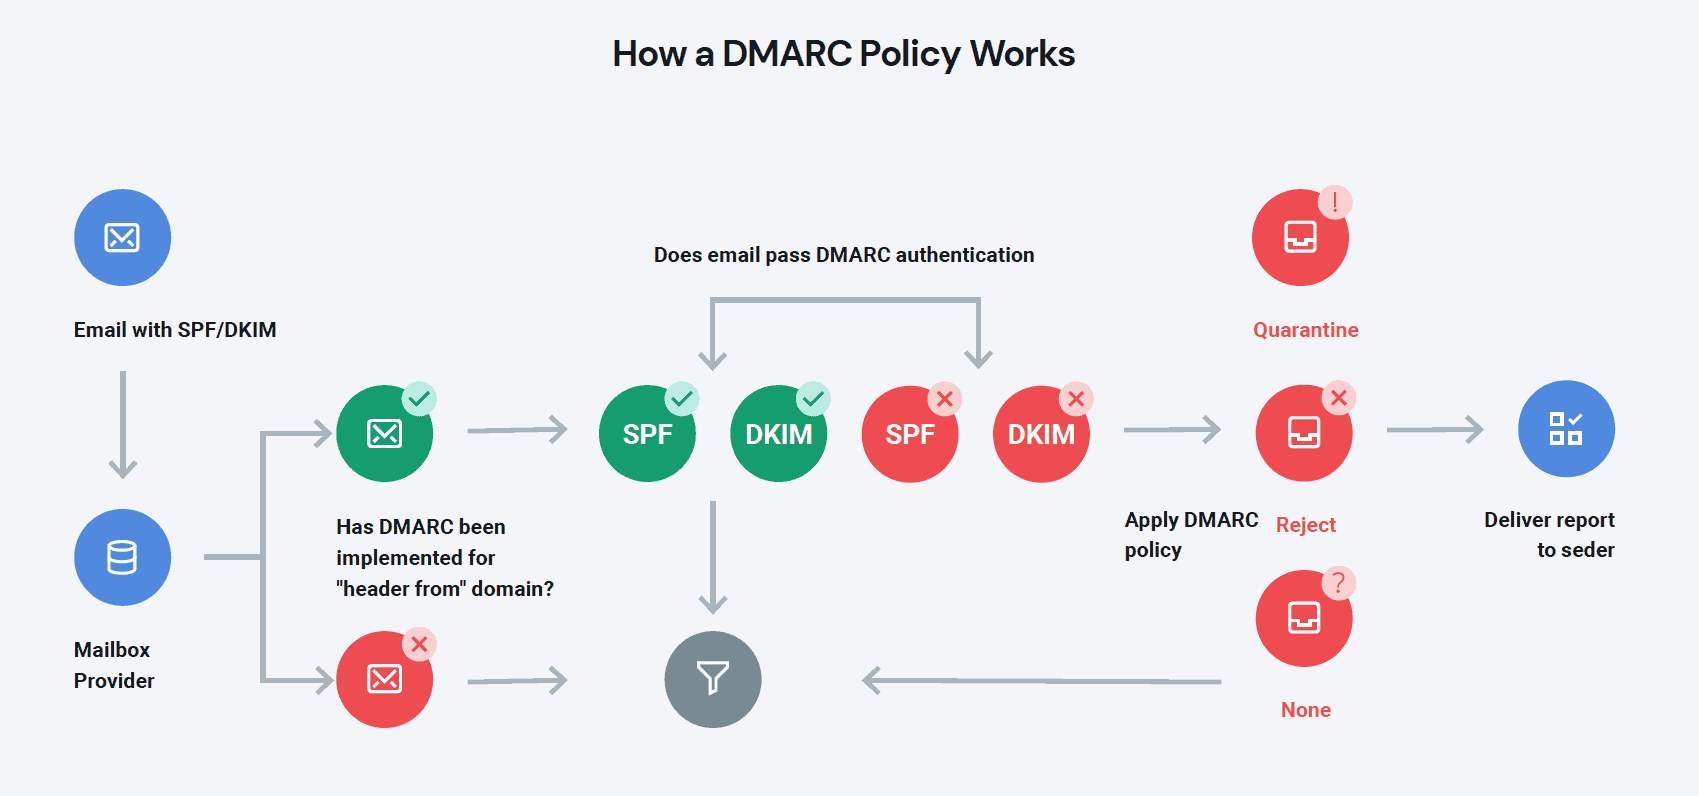
How does DMARC work?
DMARC is not a stand-alone authentication method. It works with other protocols to identify legitimate email senders and suggests actions to take against unwanted or harmful emails.
Here are the major steps that summarize how DMAARC works:
- The domain administrator generates and publishes a DMARC record in TXT format in the DNZ zone file.
- When the receiving mail server spots an incoming email, it performs a DNS lookup to find the DMARC record. It also does SPF and DKIM authentication to verify the legitimacy of the email.
-
- Uses the SPF record to find out if the IP address is authorized
- It checks if the “From:” address and domain aligns with the records
- Uses the DKIM record to validate the email signature
- The DMARC record contains three major instructions the receiving mail server should follow if one or more authentication fails. The policies include:
-
- None: Do nothing with the email
- Quarantine: Place failed emails in the spam folder
- Reject: Delete email
- Finally, the email server sends a report that summarizes the performance of emails sent from your domain.
What does a DMARC record look like?
A DMARC record may look like this:
v=DMARC1; p=reject; rua=mailto:[email protected]
The record contains tags which include:
- v= This specifies the DMARC version, and the current value is set to 1. It is the first tag in the DMARC record.
- p= This is the policy tag. It specifies how the receiving server should handle the emails that fail authentication. The three values are none, quarantine, or
- pct= This specifies the percentage of emails that will be affected by a quarantine or reject policy. It works with the “p” to gradually test a small sample of the message that fails DMARC authentication, to ensure receiving servers don’t mark legitimate emails as spam.
- rua= This specifies the email address or addresses where you receive your DMARC Aggregate Reports. These reports give you valuable insights into how email senders use your domain.
- ruf= This specifies the email address or addresses where you receive your DMARC Forensic Reports. Unlike the aggregate reports, these reports give insights into emails that fail SPF, DKIM, and DMARC authentication.
- adkim and aspf= The adkim and aspf tags specify the alignment instructions for DKIM and SPF, respectively
- sp= This specifies the subdomain policy. Like the “p” tag, the policy gives actions to take on emails sent with the company’s subdomain
Read also: Everything You Need to Know About Email Subdomains
How to set up DMARC record
Unlike SPF and DKIM, DMARC set up is fairly easy. However, it still requires critical processes to avoid errors. Here are general tips to help you set DMARC email authentication:
- Generate and publish your DMARC record in TXT format in your DNS database
- Ensure you set up SPF and DKIM correctly
- Monitor your emails to identify and analyze emails that fail authentication
- Gradually tighten your DMARC policy from none to quarantine, and reject, and choose an email address for receiving DMARC reports
- Identify legitimate and illegitimate sources that fail authentication. This gives you insights to help you adjust other security protocols
Points to consider when creating your DMARC record
- Use DMARC reports – aggregate and forensic – to identify authorized and unauthorized email senders
- You can only have one DMARC record for one domain
- Gradually move from one policy to another, using the “pct” tag to authenticate a small sample of your messages to prevent legitimate emails from being flagged as spam
- Regularly check and update your SPF and DKIM records to see if they match your current security requirements
Read also: Bounce Rates and Email Deliverability – A Simple Guide
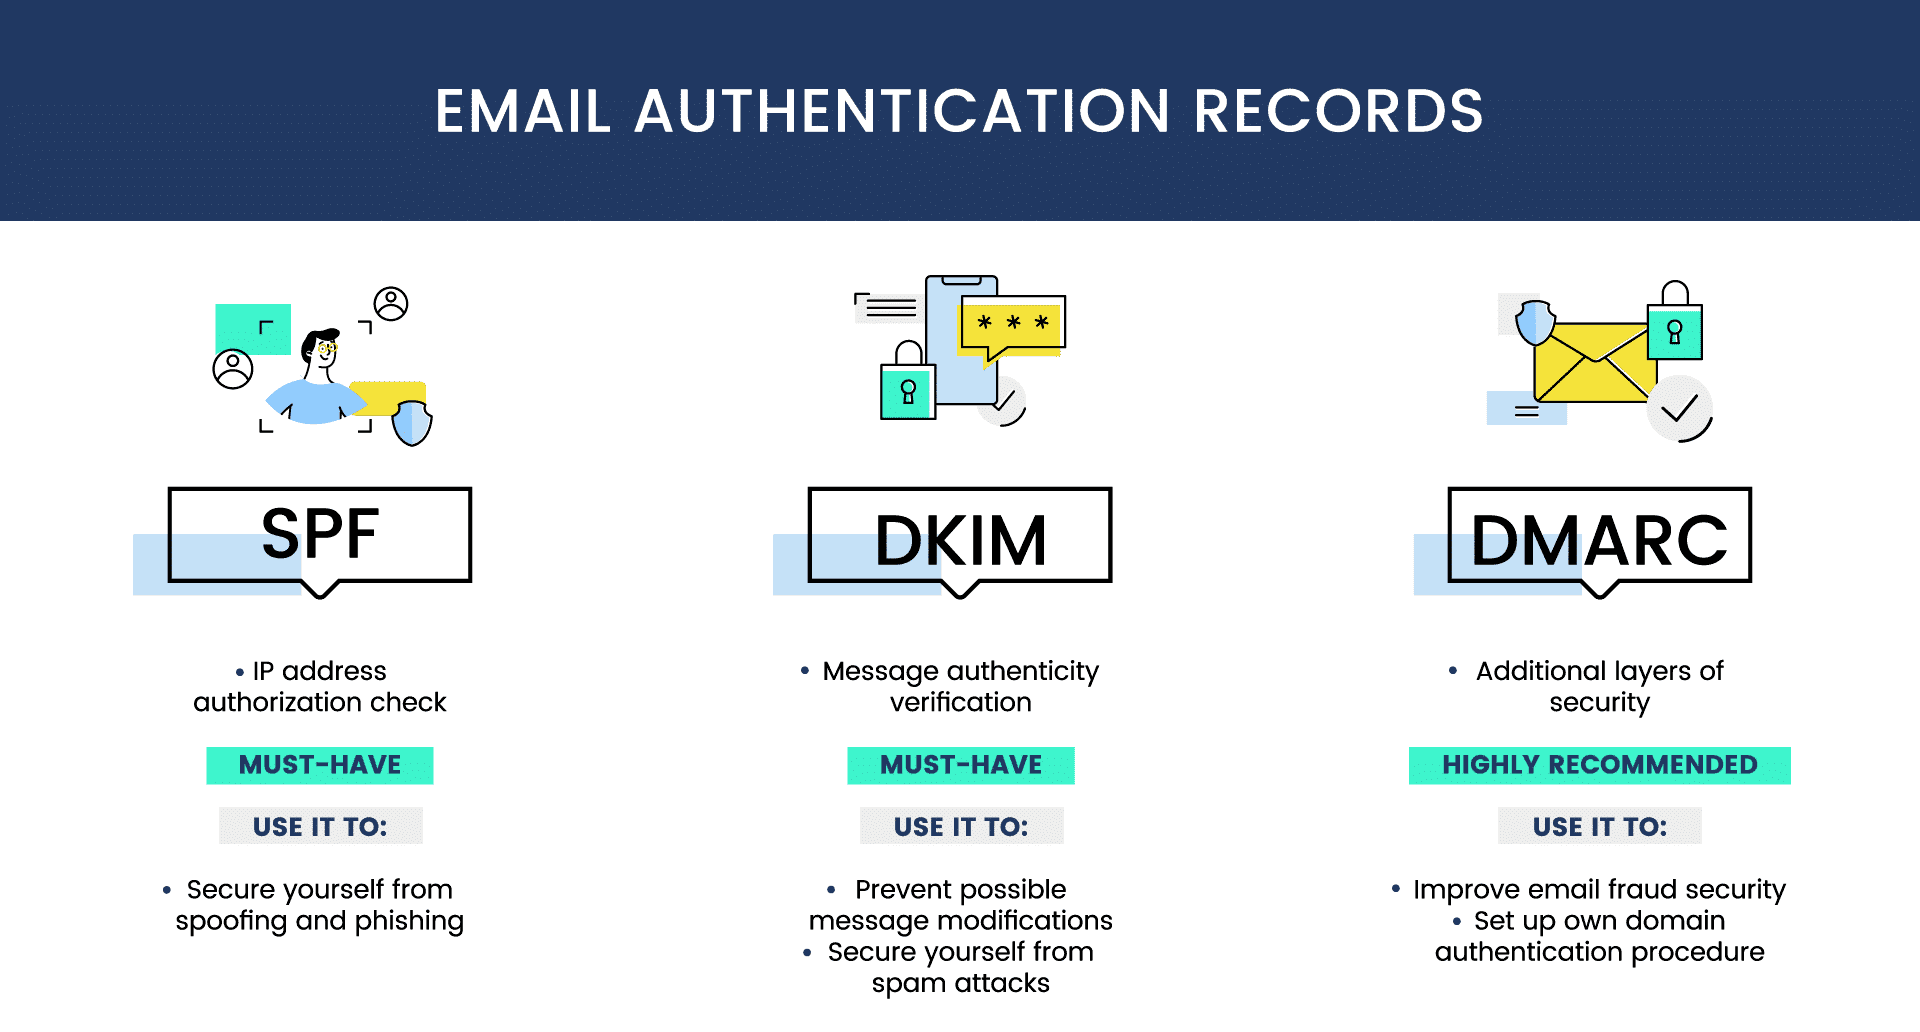
SPF vs DKIM vs DMARC
| SPF | DKIM | DMARC | |
| Authentication framework | SPF uses IP addresses to verify the email sender | DKIM uses digital signatures to verify the authenticity of the email content | DMARC uses both |
| Reporting | SPF does not provide email reports | DKIM does not provide email reports | DMARC provides aggregate and forensic reports |
| Part of email | SPF analyzes the return path or bounce address | DKIM analyzes the email signature | DMARC analyzes both, including the From: address |
| Reliance | SPF can function alone | DKIM can function alone | DMARC relies on SPF and DKIM |
| Policy | SPF uses qualifiers to determine how email servers should handle failed email authentications | DKIM has no policies for handling failed email authentications | DMARC has clear policies for handling failed email authentications |
Read also: Email Sunsetting Policy 101 For Beginners
How To Check if Your Email Has Passed SPF, DKIM, and DMARC
1. Using your email service provider (ESP)
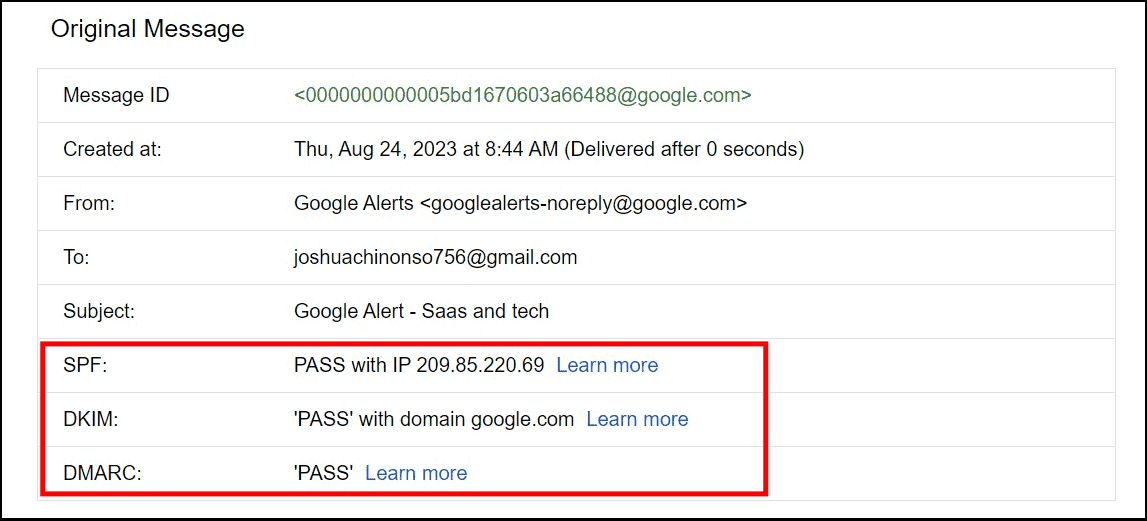
The simplest way to check the status of your email authentication methods is by looking at the full header of your email in the original HTML format. Here, you can view other header details such as IP addresses, DKIM signatures, sender details, etc.
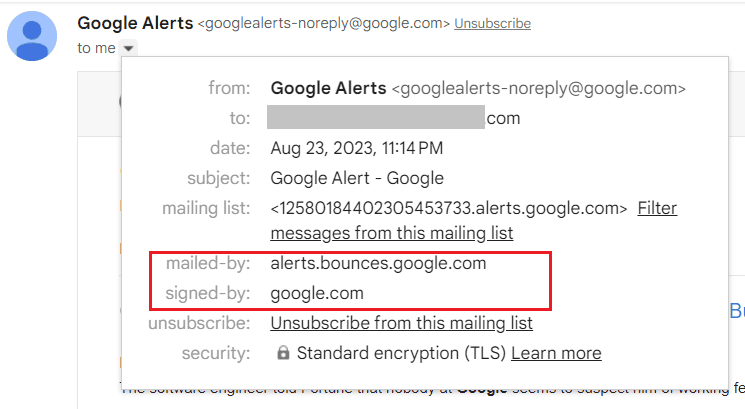
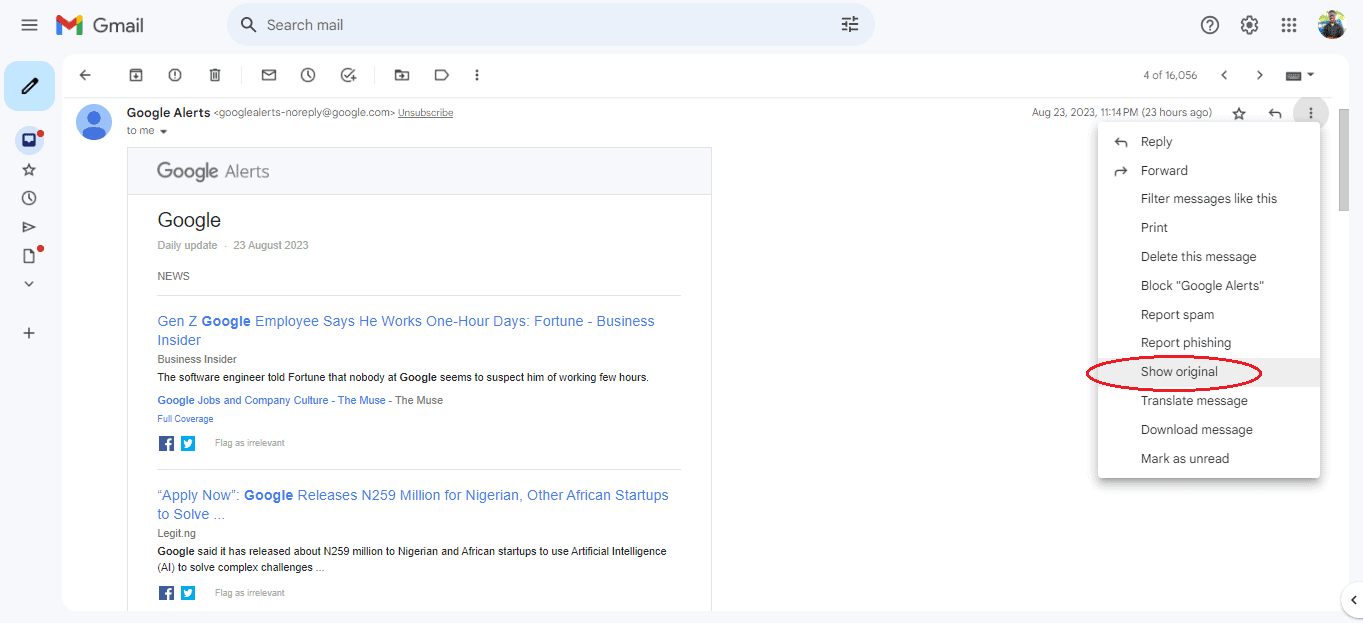
Here’s how you can check your setup in Gmail:
- First, send a test email to your address
- You can either click on the down arrow to show the first header.
- If the “mailed-by” and “signed-by” header matches your domain, then your SPF and DKIM pass.
- You can also click on the three dots at the upper left corner to view the full header in HTML format
- If the email passes, it will be indicated with a “PASS”
2. Using email tools
This is preferably the easiest way to check your email authentication setup and get additional information about your emails.
- Go to MxToolbox
- Input the required details

- The results may look like this if the email passes the authentication

The data from this tool helps you analyze your SPF, DKIM, and DMARC records and identify internal or external sources.
Read also: Bounce Back Emails: What Are They And How To Fix Them
How Email Authentication Protocols SPF, DKIM, & DMARC Help
1. Protect brand reputation
When cybercriminals use your identity to defraud your subscribers or bog them with unsolicited emails, lose interest in your brand, and switch to a “safer” brand.
Even more, they’d mark your emails as spam. This sends signals to spam filters, and over time, your brand reputation decreases.
But with email authentication, you can ensure only legitimate emails from your company go to your subscribers. This helps you run safe and successful email marketing campaigns to build trust and stronger customer relationships.
2. Prevent phishing and spoofing
Malicious actors can bypass simple security checks, attack your email server, and use your domain to steal your recipients’ information. However, protocols like SPF, DKIM, and DMARC can help you prevent this.
These authentication methods ensure only emails from legitimate senders reach the inbox. Also, they ensure the messages are not tampered with in transit. And when receiving servers spot suspicious content, they can either reject or flag it as spam.
3. Improve email deliverability
Authentication protocols possess functions that enhance your email deliverability by reducing your spam score and rejecting malicious, unwanted, or harmful emails.
When subscribers receive more unsolicited emails from your brand, they may move them to the junk folder. This increases your spam score and harms your reputation. Over time, spam filters may filter your legitimate emails into the spam folder where your recipients will not see them, thus, hurting your marketing campaigns.
Read also: ISP and Email Deliverability: How To Hit The Inbox Always
Wrap Up
SPF, DKIM, and DMARC are powerful authentication methods that enhance your overall email security. Although you can use SPF and DKIM alone, it’s best to combine the three protocols to cover their limitations.
This way, you can identify sources that send emails on your behalf, protect your email content, and receive valuable email reports.
You can authenticate your emails with EngageBay to boost your brand reputation and ensure successful email campaigns.