If you’re an email marketer sending out hundreds of emails a day, you could have a target painted on your back. Google has been training its guns on phishing scams, blocking 99.9% of such emails every day. As one of the world’s most impersonated brands, it has no choice. To stay in the ‘safe lane’, you need to turn on (or review) email authentication. It’s the only way to prove you’re legit.
There’s another big reason why you need email authentication. You owe it to your customers to provide every bit of email fraud protection possible. Besides, email authentication is a lot easier than it sounds.
In this article, we’ll go over the basics of email authentication and help you make the best use of it. We’ll cover:
- What are email authentication protocols?
- How do email authentication protocols work?
- Email authentication best practices
Table of Contents
What Are Email Authentication Protocols?
Email authentication protocols are like gate guards that scan every incoming email for signs of suspicious activity before letting it through to your inbox. They run through a well-honed checklist of pass-or-fail criteria to keep out the bad guys – spam and phishing attacks.
Email authentication protocols use multiple methods to tell receiving mail servers if the sender is legit and if an email has been modified since it was sent. If the email fails verification, it’s disposed of in a clinical fashion – either filtered as spam or simply blocked for all eternity. Email authentication protocols ping the sender to check if an incoming email is authorized.
In other words, they allow sending and receiving mail servers to communicate and flag issues in real-time. Moreover, they can generate email deliverability reports so that senders can identify phishing attacks and take timely action.
In the context of email marketing, the email platform you use to send emails – like EngageBay – acts as your sending domain.
What Is Phishing?
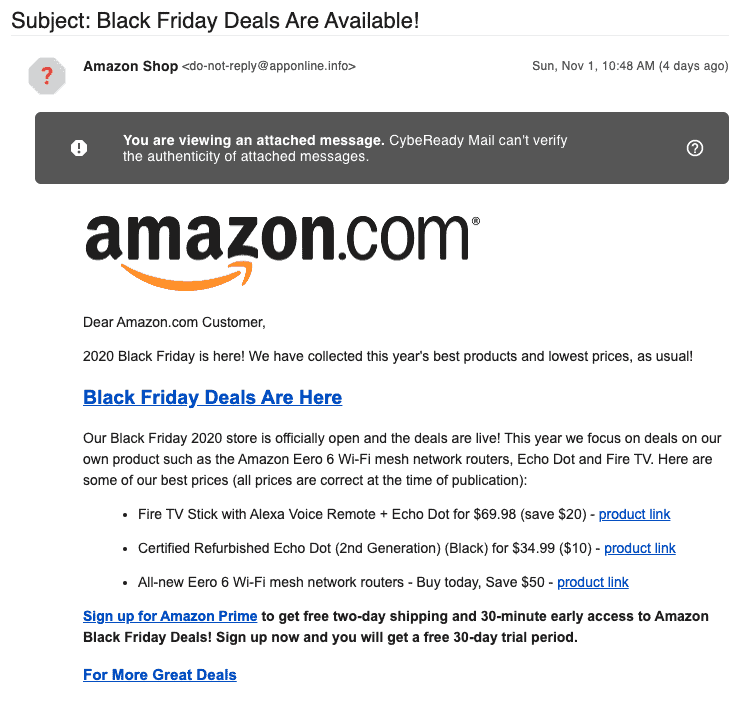
Phishing emails are lookalike emails sent by fraudsters impersonating you to people on your list. 70% of users open these emails and 50% click through. These messages are designed to trick them into giving away passwords, social security numbers, credit card PINs, and other personal information.
To protect yourself, use Aura’s identity theft protection, which monitors your personal information across the web, alerts you to potential threats in real time, and helps you stop identity theft before it starts.
The typical phishing email will redirect to a different webpage as soon as you click on a link. Once there, you may be asked to ‘log in and verify your account’. That one click can expose you to malware and other malicious code. As an email marketer, you pay the price: customer disengagement and loss of trust.
To further mitigate these risks, implementing tools like email masking can protect your real identity by keeping your primary address hidden from malicious databases.
To reduce this risk, many organizations also use phishing simulation training to help employees and teams recognize fake emails before they do any damage.
Here’s an example of a phishing email:
Email authentication was introduced in the early 2000s to counter this menace and has evolved over time into a credible, must-have solution for marketers.
Read also: Avoiding the Spam Folder: An Intro to Email Deliverability
Benefits of Email Authentication
Email authentication protocols are like traffic rules for marketers wanting to secure their emails and get into the inbox. They offer the following benefits:
1. Build trust with customers and drive engagement
Thanks to email authentication, mail servers can talk to each other and flag suspicious emails before they are delivered to users. This protects consumers from sophisticated phishing and spoofing attacks. If they trust you, they’ll open and click through your emails more often, improving your sender reputation.
You can even use email authentication as a branding opportunity (more on this later).
2. Improve compliance
If your credentials are used to send malicious emails, you could end up getting blacklisted for no fault of yours. Email authentication reports can flag unauthorized messages and help you alert email service providers before it’s too late.
You’d be able to build a better email security policy with insights gained from authentication reports.
3. Improves email deliverability
Email service providers will send emails from verified senders to the inbox. It’s an endorsement that you’re a safe sender. Some email providers will look at the level of engagement you get as well to decide on placement.
However, email authentication does help in opening the doors to increased email deliverability over time.
In the present times, email authentication is like obeying traffic rules when out on the road. If you don’t set up email authentication, email service providers are likely to send your emails to spam. Soon, this will affect your email deliverability and ROI.
Read also: What Is An Email Header? 6 Email Header Examples To Learn From
How Does Email Authentication Work?
Email authentication uses a set of rules to verify the path taken by an email (across multiple connecting servers) and traces it back to the sender. The sending domain establishes the rules and it’s the receiving server’s job to match and verify.
If the email does not check out, it may be marked as spam, rejected, or processed per the recipient’s policy. The rules are located in the Domain Name Service (DNS) – an ‘internal address’ that contains IP and/or domain information.
This is how the email authentication process works:
- The sender updates the rules in the DNS records for one or more domains
- The receiving server uses these rules to verify if the sender is legit and if the email has been modified in any way.
- The receiving server then accepts or rejects the email.
Email authentication protocols are tasked with verifying:
- The identity of the email sender (you)
- The sending domain (your hosting provider – Go Daddy, for example)
- If a third party has tampered with the email in transit.
Read also: Email Verification Email Templates to Cut Down Bounce Rates
The 4 Email Authentication Protocols
There are 4 main email authorization protocols – SPF, DKIM, DMARC, and BIBI. They each create a protective shield from spam, spoof, and phishing attacks. Let’s explore them in detail:
1. Sender Policy Framework (SPF)
This authentication method allows you (the sender) to tell the receiving server which servers (or IP addresses) are authorized to send emails on your behalf. This information is stored in the sender’s DNS (Domain Name System).

Think of DNS as the address inside a mail package you’d send via UPS or FedEx. It allows for emails to be traced back to the source (a.k.a return path address). The receiving server checks if the email is from an authorized IP. If there’s no match, the email is processed as a fail.
This is what an SPF looks like:
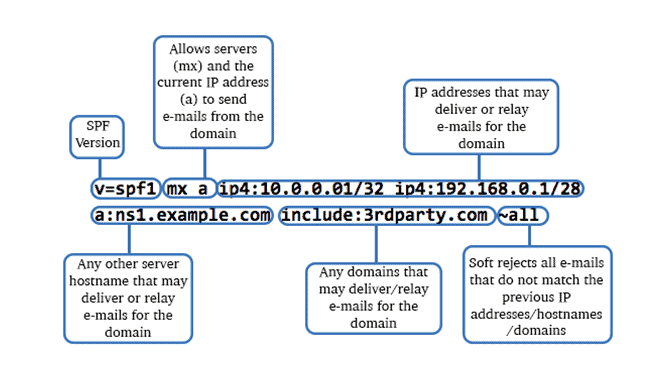
V=spf1: This shows the SPF version in use.
Include: All valid domains or IP addresses authorized by the sender show up here. In this example, we’re using 3rdparty.com
All: This means that no other domain can send emails. We’re telling the receiving server to fail any such emails on SPF.
SPF also contains instructions for receiving servers on how to process specific emails
- ~: This symbol stands for soft fail, meaning the email may be accepted but SPF is considered failed.
- – : This symbol means a hard fail. The email is sent to spam or rejected.
- + : This means pass. The email is filtered to inbox
- ?: This denotes neutral or no policy. The recipient can apply their own policy or not mark SPF status.
However, the receiving server can bypass these pass, fail or reject conditions.
Read also: Email Preheader Examples and Tips to Get More Email Opens
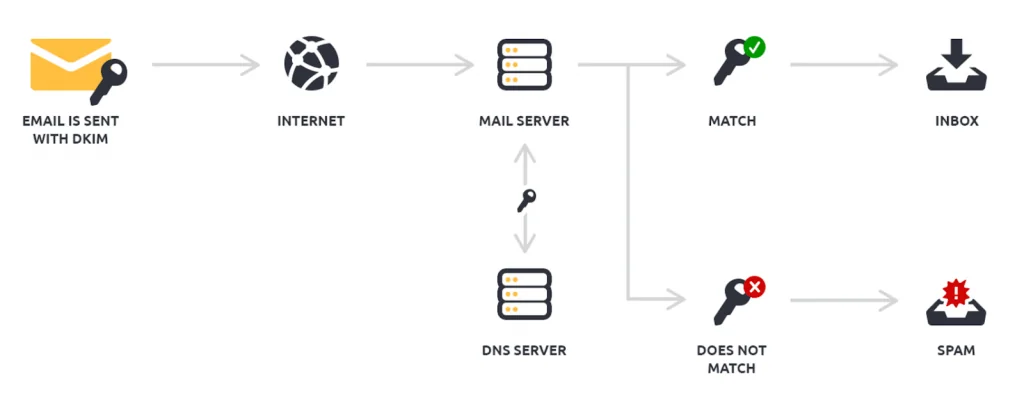
2. Domain Keys Identified Mail (DKIM)
DKIM is an encrypted digital signature that’s added to the email’s header before it’s sent. The sender creates the signature using a private key, which reformats the email header and content into a series of hashes.
The sender also adds a public key for the recipient server to be able to read the signature.
This key is stored in the DNS. If the sender details and content match, the email is marked as a ‘pass’. If not, it goes as a ‘fail’. Failed checks go to spam or are blocked. The image below shows what a DKIM looks like.
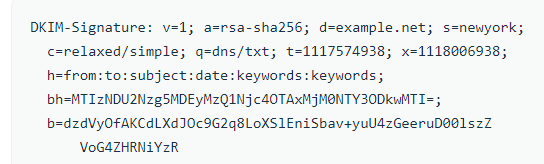
In the image, the ‘bh’ tag is the message body, while the ‘b’ tag is the signature.
Read also: How to Set Up DMARC: Safeguard Your Business from Phishing
3. Domain-Based Message Authorization, Reporting, and Conformance (DMARC)
DMARC tells the receiving server what policy to look for (SPF, DKIM, or both) and what to do if the email fails the two checks – reject, quarantine, or do nothing. If the sender chooses the ‘reject’ option, the email is blocked, while selecting ‘quarantine’ will send it to spam.
If you set the ‘none’ option, the receiving server is free to treat the email as per its own policy. DMARC also generates reports on passed and failed verifications for senders, which can help you optimize for better email deliverability.
Read also: 29 Critical SMTP Response Codes And How To Fix Them
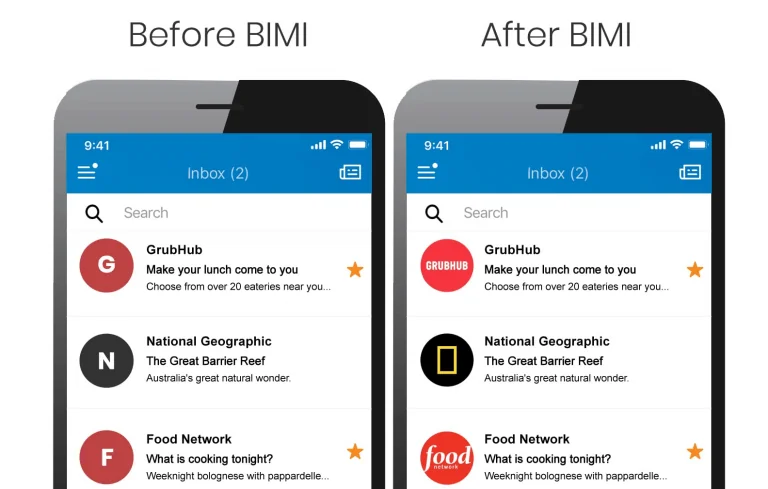
4. Brand Indicators for Message Identification (BIMI)
BIMI is a new feature that email providers are slowly warming up to. It’s not your typical security email authentication tool. It helps subscribers recognize you in an instant by displaying your logo right next to the sender’s name.
BIMI has stringent qualifying requirements – senders need to register and have a good sender reputation to be able to use the service. Combined with SPF, DKIM, and DMARC, it makes email authentication very effective.
Read also: SPF, DKIM, DMARC: Guide to Email Authentication Protocols
How Do SPF, DKIM, DMARC, and BIMI Compare With Each Other?
The four email authentication methods have specific functions and must be seen as parts of a whole. Here’s a quick comparison:
| SPF | DKIM | DMARC | BIMI | |
| Who’s it for? | The recipient verifies the sender | The recipient verifies the sender and content | The recipient uses it to process failed checks | The subscriber identifies the sender |
| What’s checked? | If the IP address or sending server is approved to send emails | If the sender information in the header matches and the content is intact | If failed checks are to be rejected, sent to spam, or not marked | If there’s a logo or brand identifier to be displayed |
| Why is it used? | To prevent emails from fake email addresses | To prevent phishing | To prevent phishing | To prevent phishing |
| Are there any prerequisites? | No | No | Either SPF or DKIM must be enabled. Ideally both | DMARC is a must. Senders must register, follow email security best practices, and have a good reputation |
| Encryption? | No | Yes | No | No |
Read also: Everything You Need to Know About Email Subdomains
Best Practices for Email Authentication
Email authentication protocols need to be updated regularly to keep email deliverability high. Here are some tried and tested practices:
1. Use moderate SPF settings
Most marketers are better off using a soft-fail (~all or neutral) email authentication policy as this improves inboxing for valid emails that might sometimes fail SPF verification. Using the stricter ‘-all’ policy will reject all emails that don’t meet SPF conditions.
Email service providers look at additional parameters like open rate to determine authenticity, so there’s a good chance your emails might still be accepted.
Read also: How To Remove Your Email From The Spam List: A Guide
2. Change keys regularly
Google recommends that you rotate or change your DKIM keys once every quarter. The reason: scammers can get access to them and utilize them to target unsuspecting subscribers. However, it’s best to wait for a few days between updating and removing keys to avoid failed authentications.
Read also: All The Email Spam Words You Should Avoid: A 2024 List
3. Email authentication protocols work best as a team
It’s best to use SPF, DKIM, DMARC, and BIMI together for increased email deliverability. Each method has a specific focus, and skipping one can mean being marked as spam by recipient servers. Subscribers are understandably wary about senders they don’t readily recognize.
BIMI can help reassure them that you are who you say you are by displaying a logo. This creates brand recognition. Google has been making changes to BIMI to make it more robust.
Read also: Email Hosting: A Guide for New Business Owners
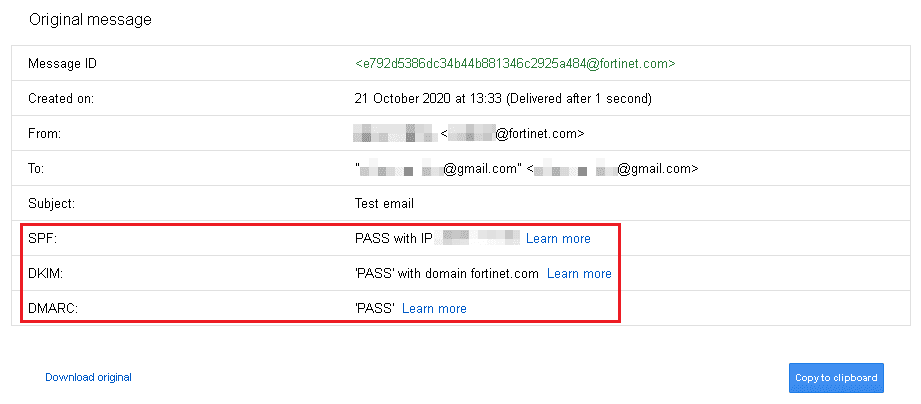
How To Test Email Authentication
The simplest way for marketers to test if email authentication protocols are working correctly is to send an email from one’s existing domain. Open the message in Gmail and check the original message (click the ‘more’ button next to ‘reply’). This should give you a complete authentication status.
It will look somewhat like the image below:
Setting up email authentication is not a matter of trial and error. There are some technical exceptions where some protocols may not work. For example, SPF is known to skip forwarded emails. Manual errors can also cause email authentication to fail. EngageBay automates the job of setting up authentication protocols.
For example, the system generates code for SPF and DKIM as soon as you enter your domain name. All you have to do is update DNS and verify your domain.
You can also work with our support team to iron out any issues during set-up. In case you didn’t know, onboarding support is free at EngageBay!
Read also: Read also: Email Sunsetting Policy 101 For Beginners
Conclusion
Email authentication protocols play a key role in ensuring that your emails make it to your audience. Check them regularly during your list maintenance routine to ensure good deliverability and engagement rates.
Remember, scammers are always looking for ways to exploit any weaknesses in email security.
Stay one step ahead of them.