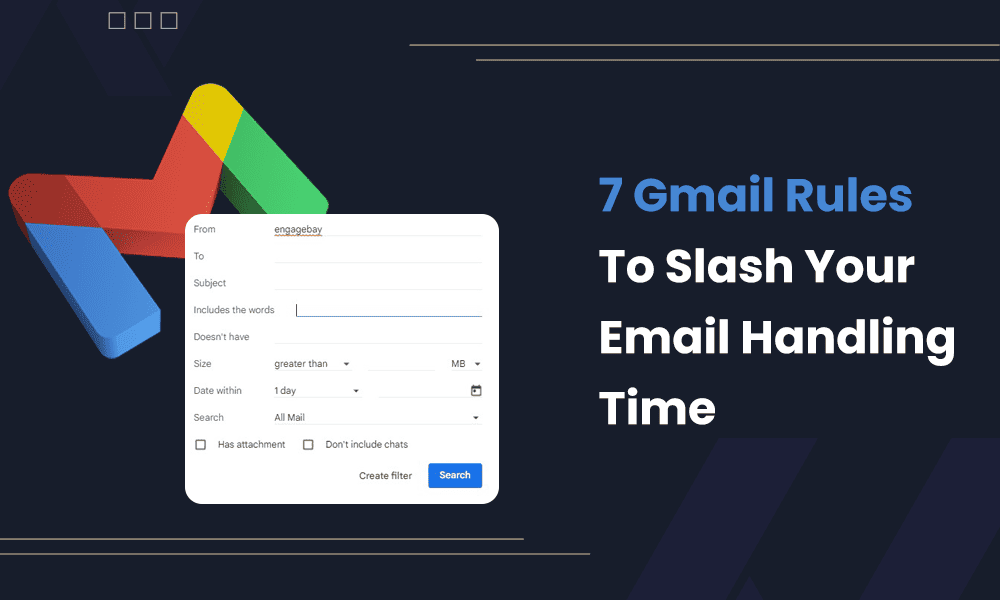
Imagine slashing your email management time in half – Gmail rules make it possible!
According to a survey by Mailbird, over one-third of professionals spend three to five hours weekly to manage emails, and close to 37% report spending six hours or more on this task. This could affect productivity and increase the burden on the workers. But Gmail users can eliminate this stress with Gmail rules.
Use the automatic filtering feature to handle your emails. You can automate sorting your inbox, save time organizing emails, and worry less about missed client messages, your boss’s emails, or important payment reminders.
This post will help you create rules for your Gmail account with a step-by-step guide. We’ll also list the seven most useful Gmail rules for a professional’s day-to-day needs.
Table of Contents
What Are Gmail Rules?
Gmail rules act as custom email filters to sort your emails automatically based on specific criteria. These criteria can vary from senders, keywords, and subject, which triggers a particular action on your Gmail account. There are three ways to create Gmail rules in your email account:
- From search bar
- From an existing email
- From Gmail settings
The Purpose of Setting Up Rules in Gmail
In any automation, rules set triggers for the automated action. Gmail rules trigger filter criteria to organize your inbox. You may create rules to:
- Label emails you receive in a certain time frame
- Forward emails with certain keywords to a different email
- Mark emails from a specific sender as important
- Spam recurring emails with a specific subject line
Now, let’s look at the step-by-step process to set up Gmail rules using the three mentioned methods.
Read also: Gmail Signature Guide For Beginners [With Examples]
Set Up Gmail Rules Using the Search Bar
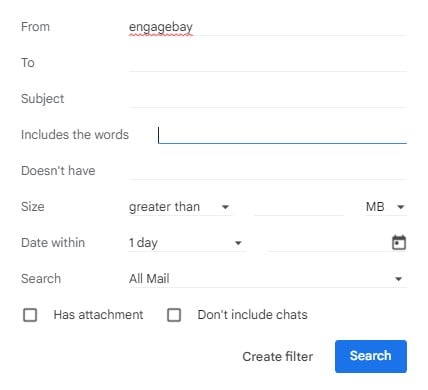
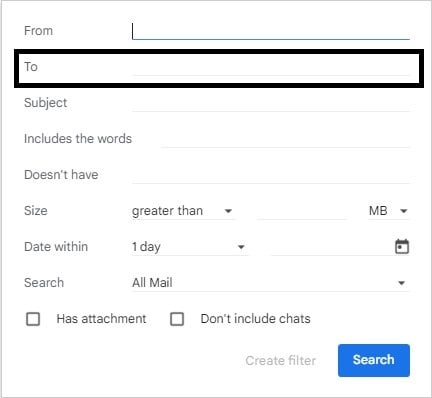
Regardless of the method you choose, you will filter emails with the same set of search criteria listed below:
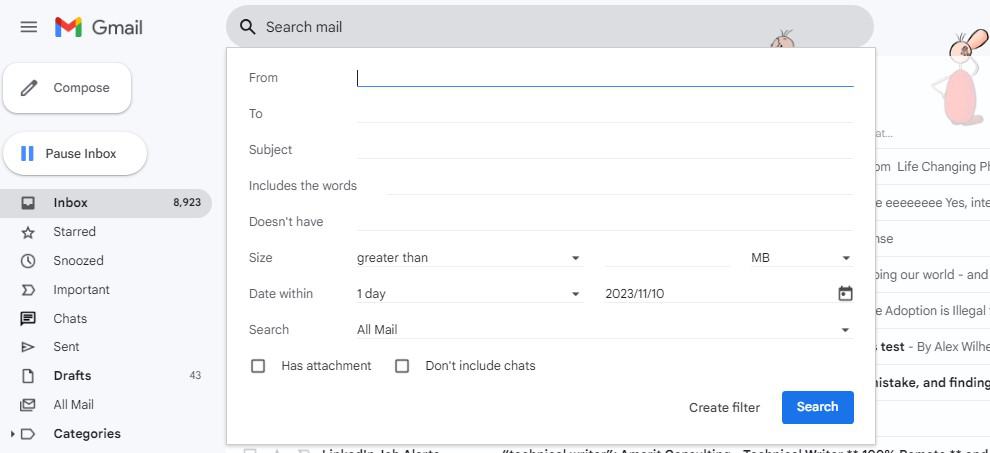
- From: Filter messages from a specific sender
- To: Filter based on what email address the sender uses
- Subject: Filter with a particular subject line
- Has the words: Filter your emails with exact keywords
- Doesn’t have: Exclude emails with certain keywords
- Size: Filter emails based on size
- Has attachment: Filter emails with attachments
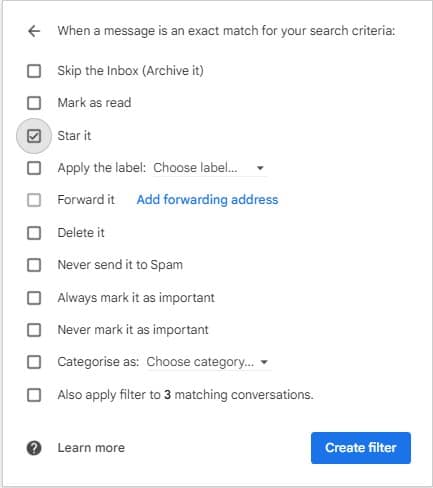
Once you’ve selected your filter criteria, you can automate the following actions (one or more):
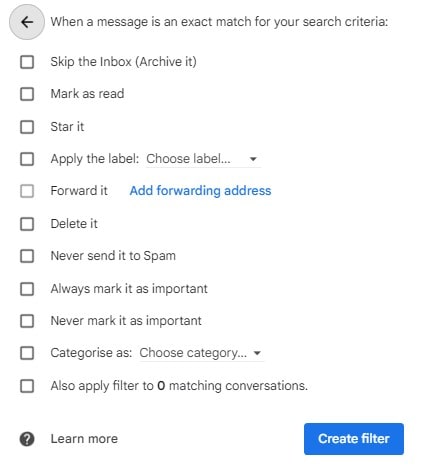
- Skip the Inbox (Archive it): Goes automatically archive
- Mark as read: Message shows opened
- Star it: Star emails to mark them as important
- Apply the label: Segregate certain emails in a separate folder accessible on the left-hand panel
- Delete it: Goes straight to the trash folder
- Never send it to Spam: Stops certain emails from going to spam
- Always mark it as important: Cues marking certain emails as important
- Never mark it as important: Stops Gmail from prioritizing certain messages
- Categorize as: Categorize emails
- Also apply filter to # matching conversations: Applies the Gmail filter to all new and existing emails that fit the parameters you choose
Now, follow this step-by-step guide to create a Gmail rule with the search bar:
Step 1: Go to your Gmail account
Step 2: Navigate to the Gmail search bar and click on Show search options

Step 3: Fill in the search criteria to sort the search
Step 4: Click on Search to ensure accurate results
Step 5: Once confirmed, open Show search options again
Step 6: Click on Create filter option
Step 7: Choose action for messages that meet your filter criteria
Step 8: Click again on the Create filter option
Read also: Gmail Out-of-Office Messages Made Easy [With Templates]
Create Gmail Rules From an Existing Email
Follow the steps below to create email rules with the second method – from existing emails:
Step 1: Choose an email from your inbox
Step 2: Click on the three vertical dots
Step 3: Click on Filter messages like these
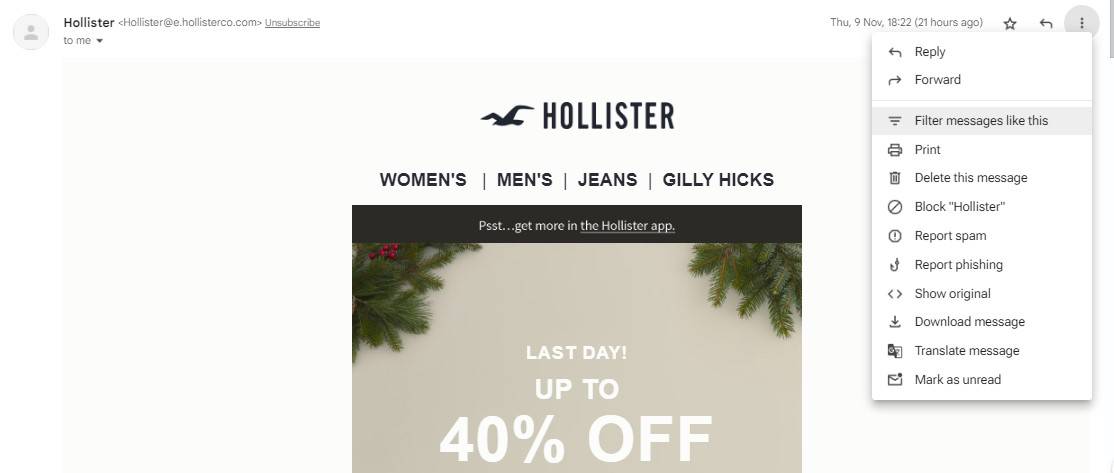
Step 4: Click again on Create filter
Repeat steps 3 to 8 from the search option method above.
Read also: Gmail Cleanup: Unleash the Power of an Organized Inbox
Create and Modify your Gmail Rules From the Gmail Settings Menu
You may create a rule or modify existing Gmail rule from your settings menu, with the steps below:
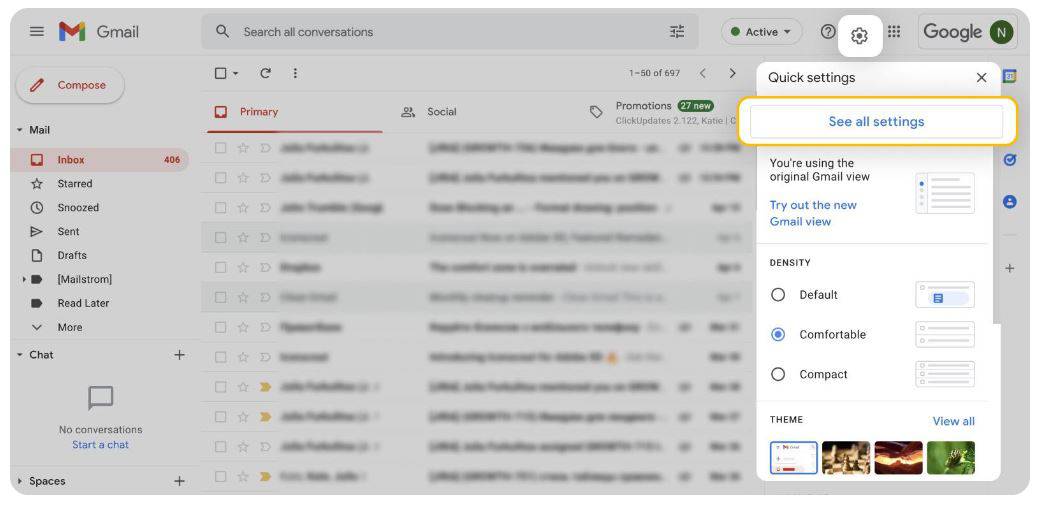
Step 1: Go to the settings menu
Step 2: Click on See all settings
Step 3: Open Filters and Blocked Addresses
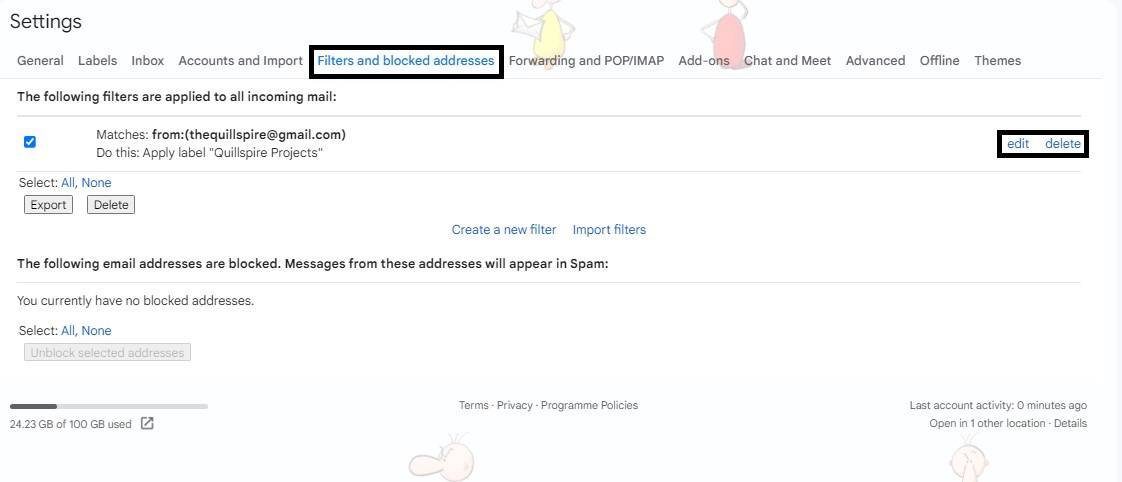
Step 4: Create a new filter or choose the filter you’d like to modify
Step 5: You may either edit, delete, or export selected email filters
Read also: Organizing Made Easy: Learn to Export Gmail Contacts
7 Gmail Rules for Marking, Deleting, and Labeling Emails
Now you know how to create rules for Gmail filters. Let us discuss some of the most useful Gmail rules to apply right away.
1. Automatic deletion of all marketing emails
Marketing emails often flood Gmail inboxes to the point that it’s difficult to keep track of the emails that matter and emails that don’t. If this happens to you, too, you may carry out a quick Gmail cleanup to automatically delete these unwanted emails by creating a Gmail rule.
Add “unsubscribe” in the Includes the words search criteria. When prompted to choose an action, you can select either:
- Delete it
- Skip the Inbox (archive it)
Read also: How to Recall an Email in Outlook and Gmail [Simple Steps]
2. Star all emails from a certain domain
Are you getting important messages from a certain domain? You can star them to keep track of every email.
Add an asterisk before the domain name in the “From” blank. When prompted to choose an action, select the option to Star it.
For example, if you add *@engagebay.com, Gmail will star all emails from EngageBay.
3. Add a label to emails with a specific keyword
Gmail rules may also help sort emails on a certain matter in a folder (or Gmail labels).
Say you’re traveling to Japan sometime in the future. You have emails for itineraries, reservations, flight tickets, and more. You may filter emails using the keyword “Japan” and set the action to Apply the label. Create a desired label called “Trip to Japan” and use that label.
You’ll now find all emails with the word “Japan” in the Trip to Japan label on the left sidebar.
Read also: Gmail Contact Groups: A Simple Guide to Easy Group Emails
4. Manage multiple Gmail accounts with separate inboxes under one account
It might be difficult to keep switching inboxes if you have multiple Gmail accounts. You can create email rules to sort emails under a single Gmail account with the following steps:
Step 1: Create Gmail labels for both accounts, say “work emails” and “personal emails”
Step 2: Click on Show search options and add the personal email address in the To field
Step 3: Click on Create filter
Step 4: Check options:
- Skip the Inbox (Archive it)
- Apply the label (Personal emails)
Step 5: Create filter
Repeat the process for the work email.
These Gmail rules move messages in your primary inbox to separate queues that function similarly to account-specific inboxes.
Read also: Gmail Search Tips: 33 Search Operators For The Smart User
5. Filter specific emails sent to aliases
Aliases let you tweak your Gmail address in a certain way and still deliver emails to your inbox. Here are a couple of examples.
Plus sign alias
You may add a plus sign (+) followed by any word to your email anywhere before @. If anyone sends you a message to that alias, it still goes to your inbox. For example, you will get emails on [email protected] even if people send emails to:
Period alias
Gmail ignores if you use periods anywhere in your email address before @. For example, all emails go to the same email if you use any of the following aliases:
Despite getting your emails normally in your inbox with the aliases, you may create rules in Gmail to filter them. You create a filter for emails sent To a certain alias and choose the desired action.
For example, you may create a filter to star all emails sent to [email protected].

6. Delete spam emails automatically
If your spam folder gets full quickly, create a filter that empties the spam folder automatically. Type “in: spam” in Has the words criteria and set Delete it as the action.
Note: In rare cases, Google could misidentify a valid email as spam. If you use this filter, you will lose the ability to check your Spam folder for critical messages.
Read also: 41 Gmail Tips and Tricks for a More Productive 2024
7. Automate a to-do list
Many people send themselves email reminders of things that need to get done. You may use Gmail filters to label those emails to differentiate if you’re one of them.
First, create a label named “To-do.” Then, Create a filter that sorts emails From yourself and set the following actions:
- Skip the Inbox (Archive it)
- Apply the label (To-do)
You may also use this email filter to sort messages from your manager, clients, editors, etc., that include tasks for you.
Read also: 21 Gmail Integrations To Supercharge Your Email Experience
What Are Gmail Search Operators?
Email search operators are words or symbols that refine a query to provide more relevant results. You may use them while filling in criteria blanks in Show search options to create rules.
For example, you may use “or” in the keyword filter to use more than one keyword to sort emails. Here are some more commonly used Gmail search operators for email management:
| Operator (symbol) | Operator | Function | Example | Fill in the Blanks With |
| “ ” | Quotation Marks | Instructs Gmail to include emails with keywords in the quotes | Filter emails with the words “best regards” | “Best regards” |
| * | Asterisk | Instructs Gmail to allow any text before the asterisk | Filter all the emails from the EngageBay domain | *@engagebay.com |
| – | Minus sign | Instructs Gmail to exclude emails with the keyword following the minus sign. | Exclude filtering emails with the words get help. | – get help |
| ( ) | Parenthesis | Instructs Gmail to include all keywords in parentheses | Filter emails with the words best regards and get help now | ( best regards OR get help now) |
Use any of these operators to create a Gmail filter to sort recurring and automated marketing emails. You may use them in the examples above to filter emails per your needs.
Read also: How To Recall an Email in Outlook: A Quick Guide
Conclusion
Your Gmail inbox can get messy when there is a lot of incoming mail. If your inbox is always full, you may miss critical messages from your team, clients, or even your family and friends.
Gmail rules can be a great way to achieve more efficiency. It lets you automatically sort through the ocean of email, making email management effortless. By now, you should know how to set up email rules in your Gmail account. It’s time to automate filtering your inbox and keep it free from clutter.
FAQ
How to create folders in Gmail?
Gmail recognizes folders as “labels.” You may quickly create labels from the settings menu. See all settings and open Labels. You may then choose the Create new label option there.
Can you create Gmail rules in the email app?
No, you can’t create Gmail rules on the email app. You must use a web browser to create rules on your Gmail account.
What is Gmail’s priority inbox setting?
You may select the custom Gmail priority inbox setting to view emails in a certain order based on your priorities. Unless you make changes, Gmail will automatically divide your inbox into the following sections:
- Important
- Unread
- Starred