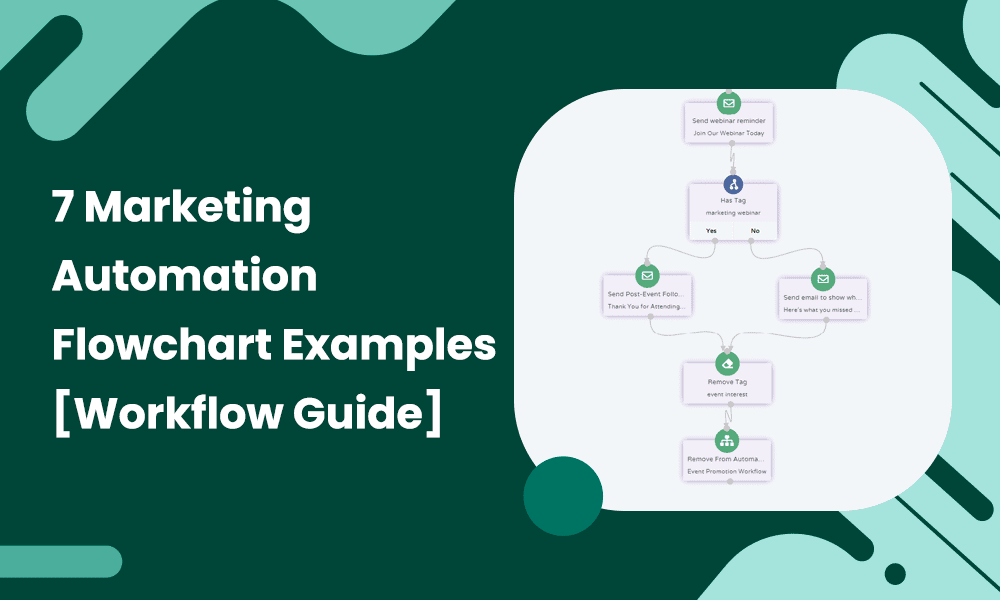
Chase Dimond has one of the most high-converting marketing automation workflows.
His welcome series brings in close to six figures and saves him time, which can be used in other business areas. The welcome series starts by thanking subscribers and setting expectations. It also includes a call to action that encourages subscribers to take the next action.
However, the next step in the workflow is where the backbone of the automation lies. He uses tagging and segmentation to gather data about individual subscribers and uses this data to group contacts with similar tags. So, each contact will be enrolled in an email workflow based on their tags and characteristics.
“The next one, I’ll ask people who they are and what they do so I can learn about each person. So based on whether they run an ecommerce brand or a SaaS company, sell info products or they are an agency, for every person that clicks it (the email), I’ll tag their profile.
Saying, Jackie runs an agency and James does fitness, he’s an influencer. I’ll tag each person’s profile to the specific segment. For offers or content around agencies, I’m gonna send it to Jackie. For anything about growing a following around fitness, I’ll send that to James.”
And after a subscriber opens ten emails, they receive a series introducing the main course with a $100 discount.
You, too, can run more automated email campaigns like this. Whether you are a SaaS company or an SME, this guide will show you marketing automation flowcharts and how to create each workflow.
Table of Contents
What Is Workflow Automation?
Workflow automation refers to using marketing automation software to run and manage repetitive tasks like sending welcome emails, nurturing leads, or sending abandoned cart emails. It can be used to create complex email workflows that specific events or data can trigger. For example, if customers reach a certain level of loyalty, they can be automatically enrolled in a rewards program.
Workflow automation allows you to automate mundane tasks so you can focus on more critical tasks. It also reduces human error and saves time, money, and resources.
Elements of a Marketing Automation Workflow
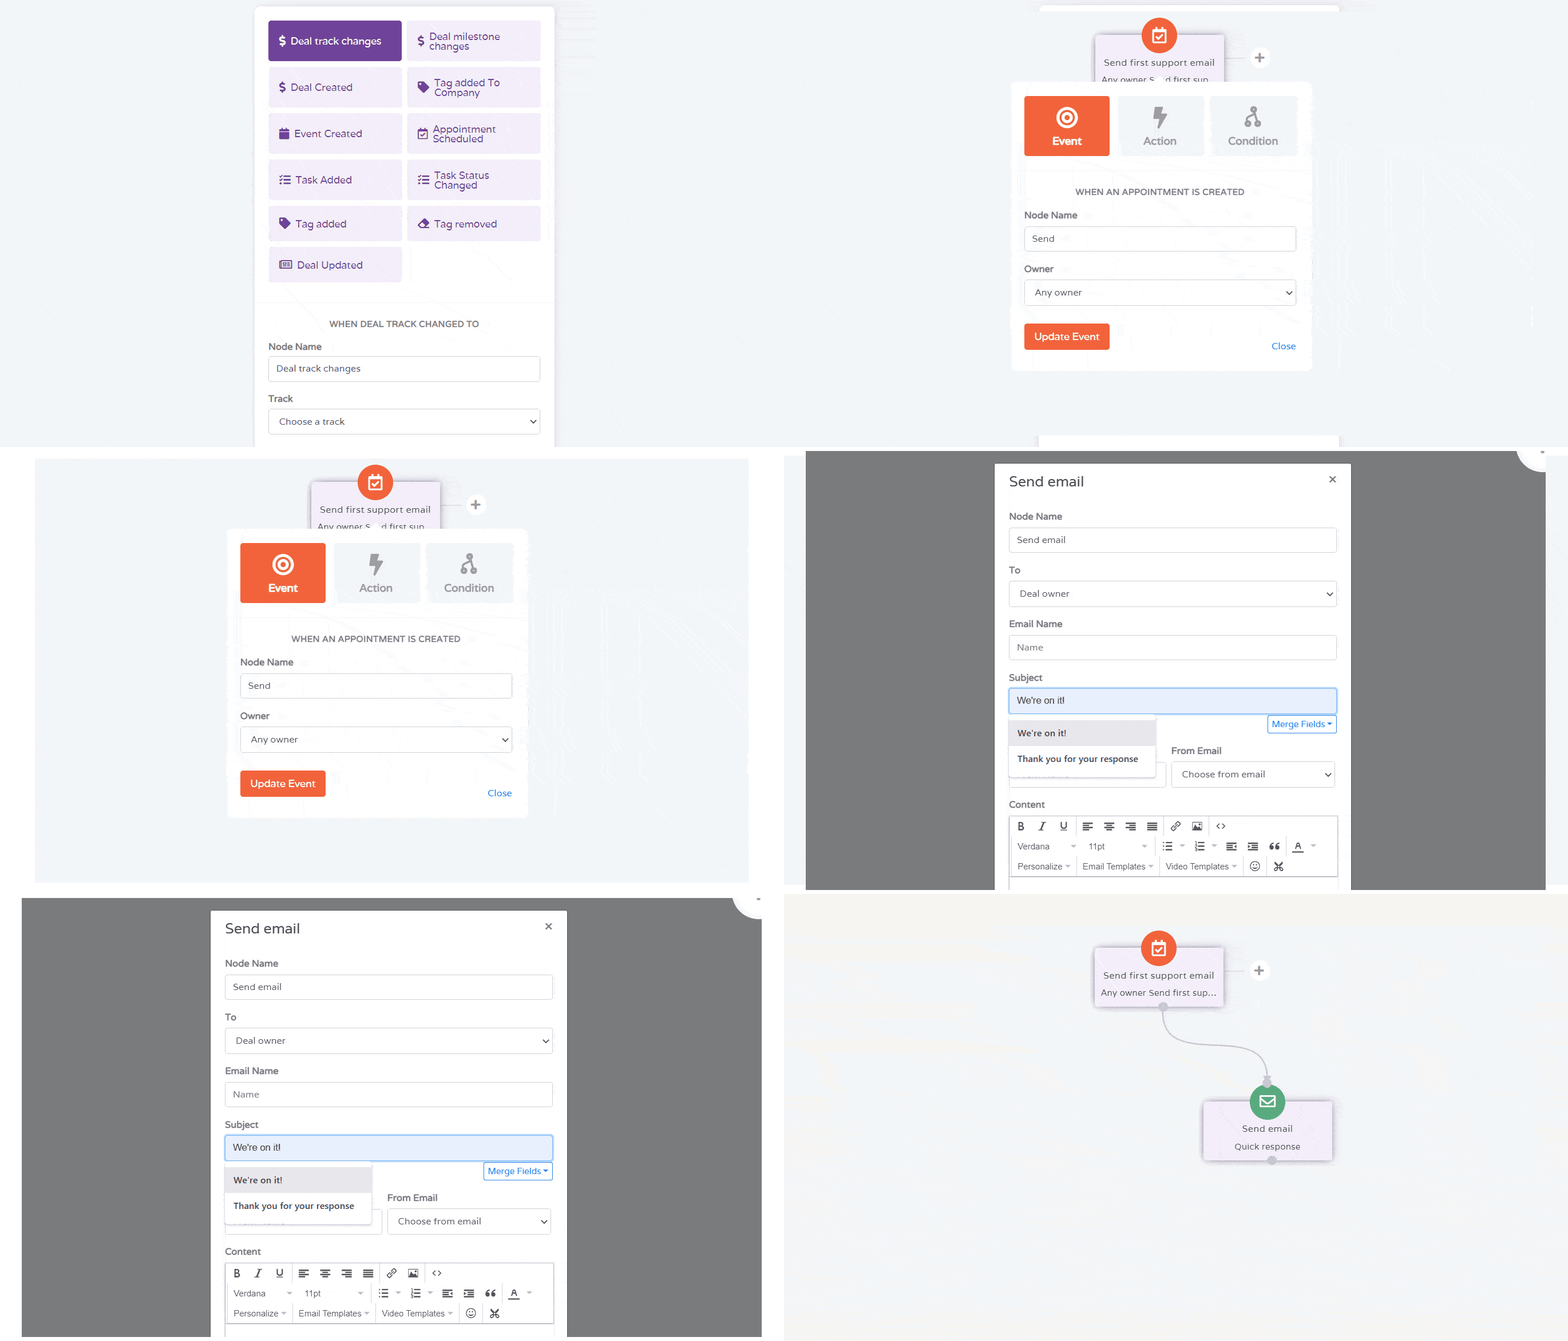
Marketing automation workflows can be organized, targeted, and automated effectively with the help of tags, segmentation, actions, triggers, and conditions.
Here are the elements of an automation workflow:
1. Tags
Tags are labels or identifiers assigned to contacts based on their behaviors or interactions. They help categorize contacts for targeted marketing.
They can be used as a condition or trigger in an automation workflow. For example, triggering an action when a contact is tagged as “Interested in Product X.”
Tags can also be used to segment contacts into different groups for targeted marketing efforts. For example, contacts who have been tagged as “High-Value Customers” can be sent a special offer or discount.
2. Segmentation
Segmentation involves dividing your audience into specific groups based on shared characteristics. It helps in tailoring marketing strategies for each group.
It can be used as a condition to determine which actions should be triggered for a particular segment. For instance, sending a targeted email marketing campaign to a segment of “Frequent Shoppers.”
You can create more personalized experiences for each group by segmenting your audience. For example, you can offer discounts to a segment of “Loyal Customers” or send personalized messages to a segment of “New Customers” to encourage them to make a purchase.
Read also: The Top 12 Omnichannel Marketing Automation Platforms For 2024
3. Action
An action is a step or set of steps that occur due to a trigger or condition being met. Actions are the automated tasks that streamline marketing activities.
Actions can be defined based on triggers or conditions. For instance, sending an automated email (action) when a contact completes a specific form (trigger).
You can also send a personalized thank you message (action) to each customer who makes a purchase (trigger). This type of automation helps save time and resources while providing a better customer experience.
4. Trigger
A trigger is an event or action that sets an automation into motion. It initiates the automation workflow based on specific conditions being met.
Triggers can be events such as a new lead sign-up, a completed purchase, or a webpage visit. For example, triggering an automated welcome email when a new contact subscribes to a newsletter.
Enhance Your Email Marketing
Want to make your emails more impactful? Check out our beautiful, easy-to-customize HTML email templates. Designed to boost engagement, these templates from EngageBay will help your emails stand out. Just customize the images, headings, and CTAs for your brand, and hit send in a few minutes!
5. Condition
A condition is a rule determining when a particular action should be executed in the workflow. Conditions help in decision-making within the automation process.
Conditions can be based on various factors like contact attributes, interactions, or tags. For example, sending a follow-up email (action) only if a contact opened the previous email (condition).
Conditions can be used to create highly personalized automation campaigns tailored to each contact’s individual needs. For example, you can set a condition to send a personalized message to contacts who have been inactive for more than two weeks. This way, you can ensure that your contacts are engaged with your brand and increase their chances of taking the desired action.
Marketing automation software like EngageBay uses these elements to identify specific events or conditions and determine appropriate actions. We’ll see how each piece plays a role in the examples below.
Read also: How To Nail Your Retail Marketing Automation [Tools, Examples]
7 Marketing Automation Workflow Examples With Flowcharts and How to Set Them Up
Here are examples of marketing automation workflows with their respective flowcharts.
1. Lead Nurturing Email Workflow
Lead nurturing is about nurturing potential customers (leads) to help them grow their interest in your product or service.
A lead nurturing email workflow is a series of automated actions (like sending emails, offering content, or providing discounts) that guide and engage potential customers at different stages of their buying journey. These are also known as drip campaigns. The goal is to nurture their interest, build trust, and eventually turn them into happy customers.
Not everyone is ready to buy right away. Lead nurturing allows you to provide valuable and relevant information to your leads, helping them understand your product or service. It’s like giving them a guidebook for their journey.
And this increases the likelihood that they’ll choose your product or service when they’re ready to decide.
How to create this email workflow
Below is a marketing automation flowchart representing this lead nurturing workflow. I created this entire workflow in EngageBay.
Objective: To nurture leads who have shown interest in your software product with educational content and guide them toward a demo request, considering various engagement levels.
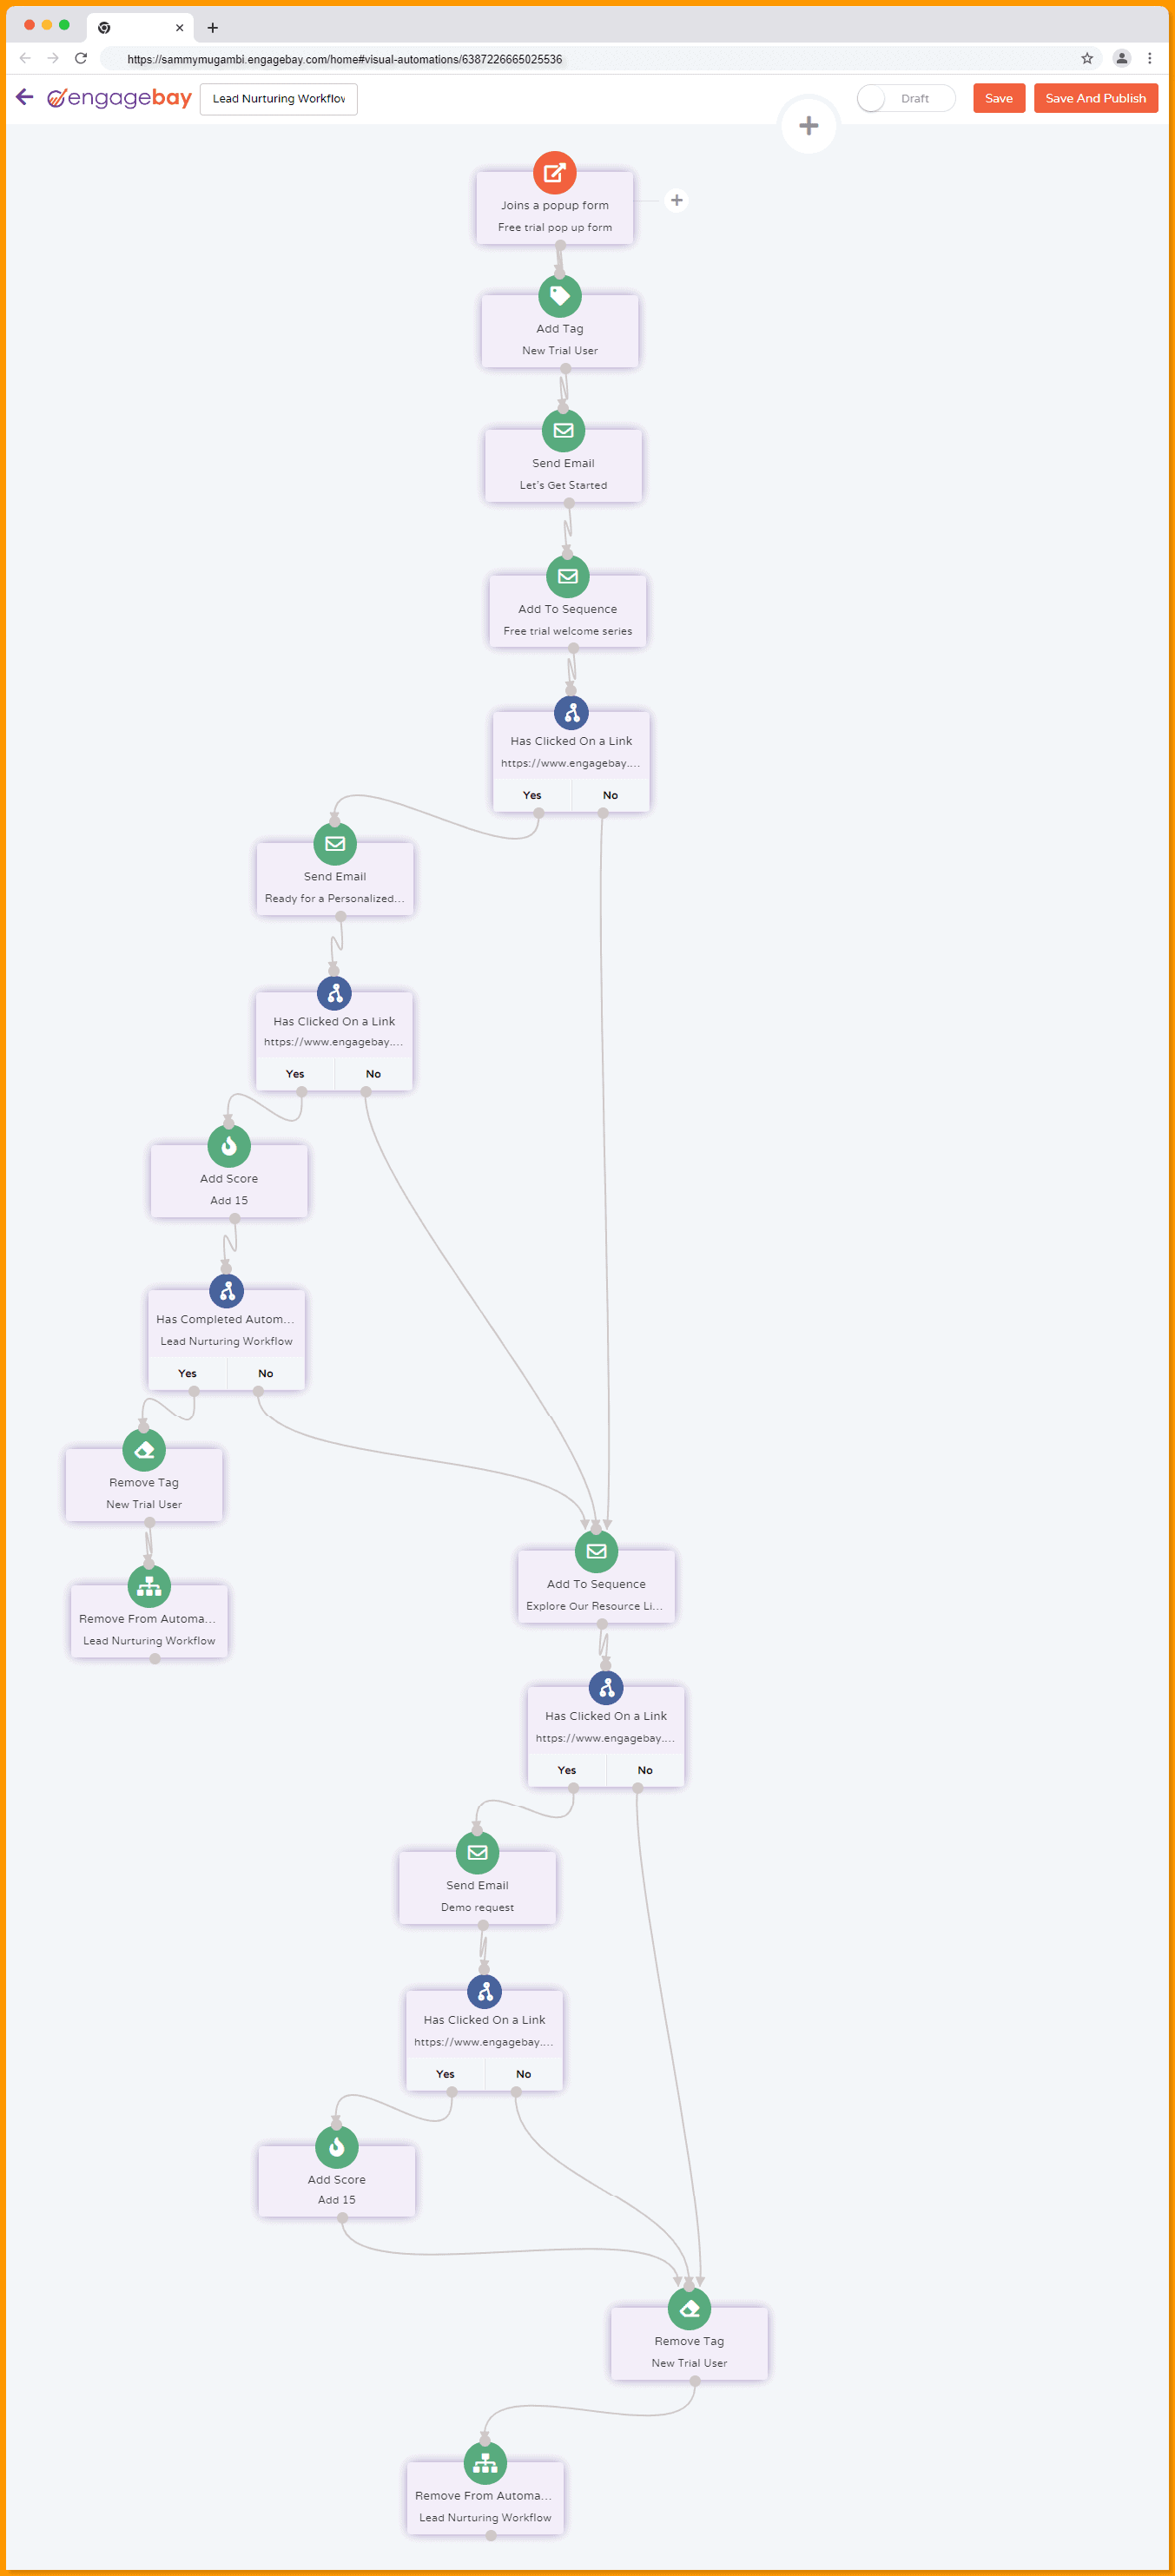
Here’s what happens in this workflow:
- The lead receives a welcome email and a series of educational emails about the software.
- For leads who click on links in the educational emails, they are directed to a personalized demo request email, and if they request a demo, they receive a high lead score.
- However, leads who don’t click on links in the educational emails, receive a “Resource Library” email. If they click on links within this email, they receive a follow-up demo request email. Engaging with this follow-up email also results in a score increase.
- The workflow ends after leads request a demo, engage with follow-up resources, or complete their journey through both paths, indicating varying levels of interest and engagement.
This example demonstrates a lead nurturing workflow that accommodates different levels of engagement and provides multiple opportunities for leads to express interest and request a demo.
You can also add subscribers who completed this automation to other running automations. They can move from “free trials” to newsletter subscribers if they’re up for it.
Read also: Marketing Automation For Financial Advisors: Beyond The Basics
2. Abandoned Cart Recovery Email Workflow
The abandoned cart recovery workflow is like a friendly reminder from the store, encouraging customers to return and finish their purchase.
The abandoned cart email automation kicks in when customers add items to their shopping cart but leave the website without buying. It automatically sends reminders like emails or notifications to nudge the customer to complete their purchase.
Many customers abandon their carts for various reasons – distractions, comparing prices, or second thoughts. This workflow helps recapture these potential sales by reminding them to complete the purchase.
How to create this email workflow
Below is a marketing automation flowchart representing this abandoned cart recovery workflow. I created this entire workflow in EngageBay.
Objective: To recover potential sales by re-engaging users who have abandoned their shopping carts on your eCommerce website.
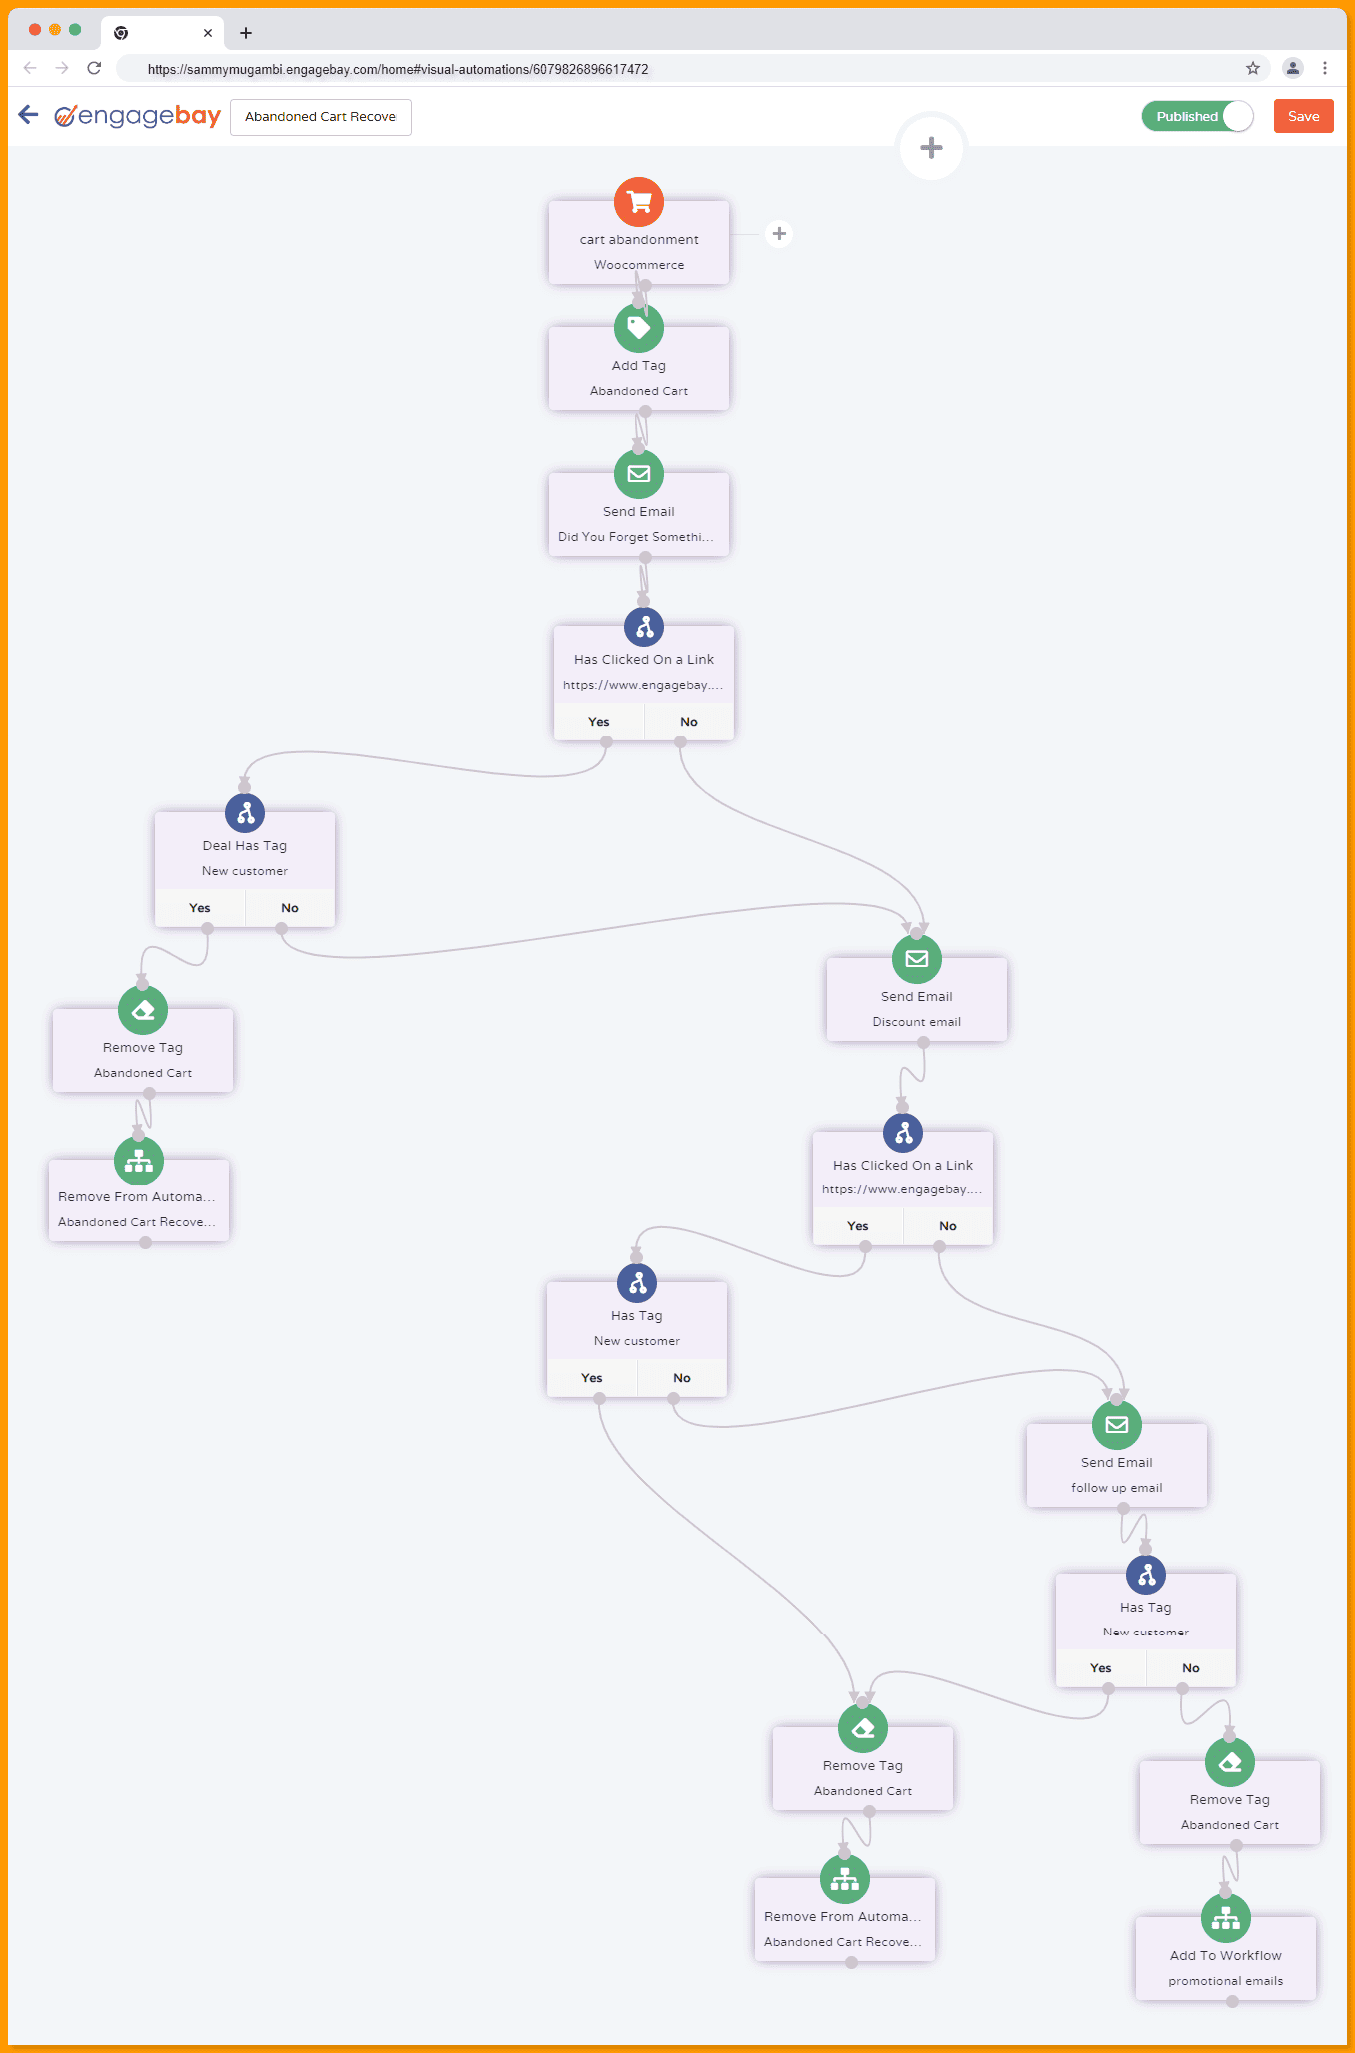
Here’s what happens in this workflow:
- The user’s cart abandonment triggers the workflow, and they are tagged as “abandoned cart.”
- A reminder email is sent to the user, reminding them of the items in their cart and encouraging them to complete the purchase.
- After 24 hours, the workflow checks if the user clicked on a reminder email link.
- If they have, EngageBay will check if they have the “new customer” tag to see if they completed their purchase.
- If they didn’t click on the link in the email, I’ll send a second email with a discount offer.
- If they did click on a link in the first reminder email and didn’t complete the purchase, I’ll also send the discount offer.
- If they have completed the purchase, I’ll remove the “abandoned cart” tag and remove the user from this automation.
- For those to whom I sent the discount offer, I’ll check if they clicked on a link in the email.
- If they didn’t, I’ll send a follow-up email. EngageBay will check if they have the “new customer” tag if they click on a link.
- If they have completed the purchase, the automation will remove the “abandoned cart” tag and also remove the user from this automation.
- For those to whom I sent the follow-up email, EngageBay will check if they completed their purchase and, therefore, have the “new customer” tag.
- If they have the “new customer” tag, EngageBay will remove the “abandoned cart” tag and remove the user from this automation.
- If they didn’t finish their purchase, EngageBay will still remove the “abandoned cart” tag but add the user to another workflow for promotional emails.
This workflow provides a personalized and incentive-driven approach to encourage users to return and complete their purchases.
👉 Boost your marketing efforts with our email templates. Just customize and send!
Best Practices for Abandoned Cart Recovery Workflow
Here are some tips to consider when creating this workflow.
- Timely and personalized reminders: Send reminders promptly after the cart is abandoned. Personalize the message with the items left in the cart and incentives like discounts.
- Clear CTAs: Make it easy for customers to complete their purchase by including a clear and enticing CTA in your reminder messages.
- Offer incentives: Provide special discounts or offers to entice customers to complete the purchase. It could be a limited-time discount or free shipping.
- Optimize email content: Craft engaging and visually appealing emails. Use persuasive language and images of the abandoned items to remind customers of what they left behind.
- A/B Testing: Experiment with different email subject lines, incentives, and designs to see what encourages customers to return and complete their purchase.
- Monitor and analyze results: Keep track of how many abandoned carts were recovered and what strategies were most effective. Use this data to improve your workflow continually.
Read also: Data-Driven Marketing Automation For Maximum Impact
3. Lead Scoring and Sales Handoff Email Workflow
Lead scoring is like giving points to potential customers based on their actions and behaviors. It helps decide which leads are more interested and ready to buy. For example, if a lead visits your pricing page, they might get more points than if they just visited your homepage.
A sales handoff smoothly moves the leads with more points from the marketing team to the sales team once the lead is “warm” and ready for a sales conversation.
This workflow is important because it helps sales teams focus on the most promising leads first. It saves time and effort by identifying the hottest leads that are most likely to become customers.
How to create this workflow
Here’s a marketing automation flowchart showing how this automation would look in action.
Objective: To identify and prioritize leads based on their level of engagement and readiness for sales contact.
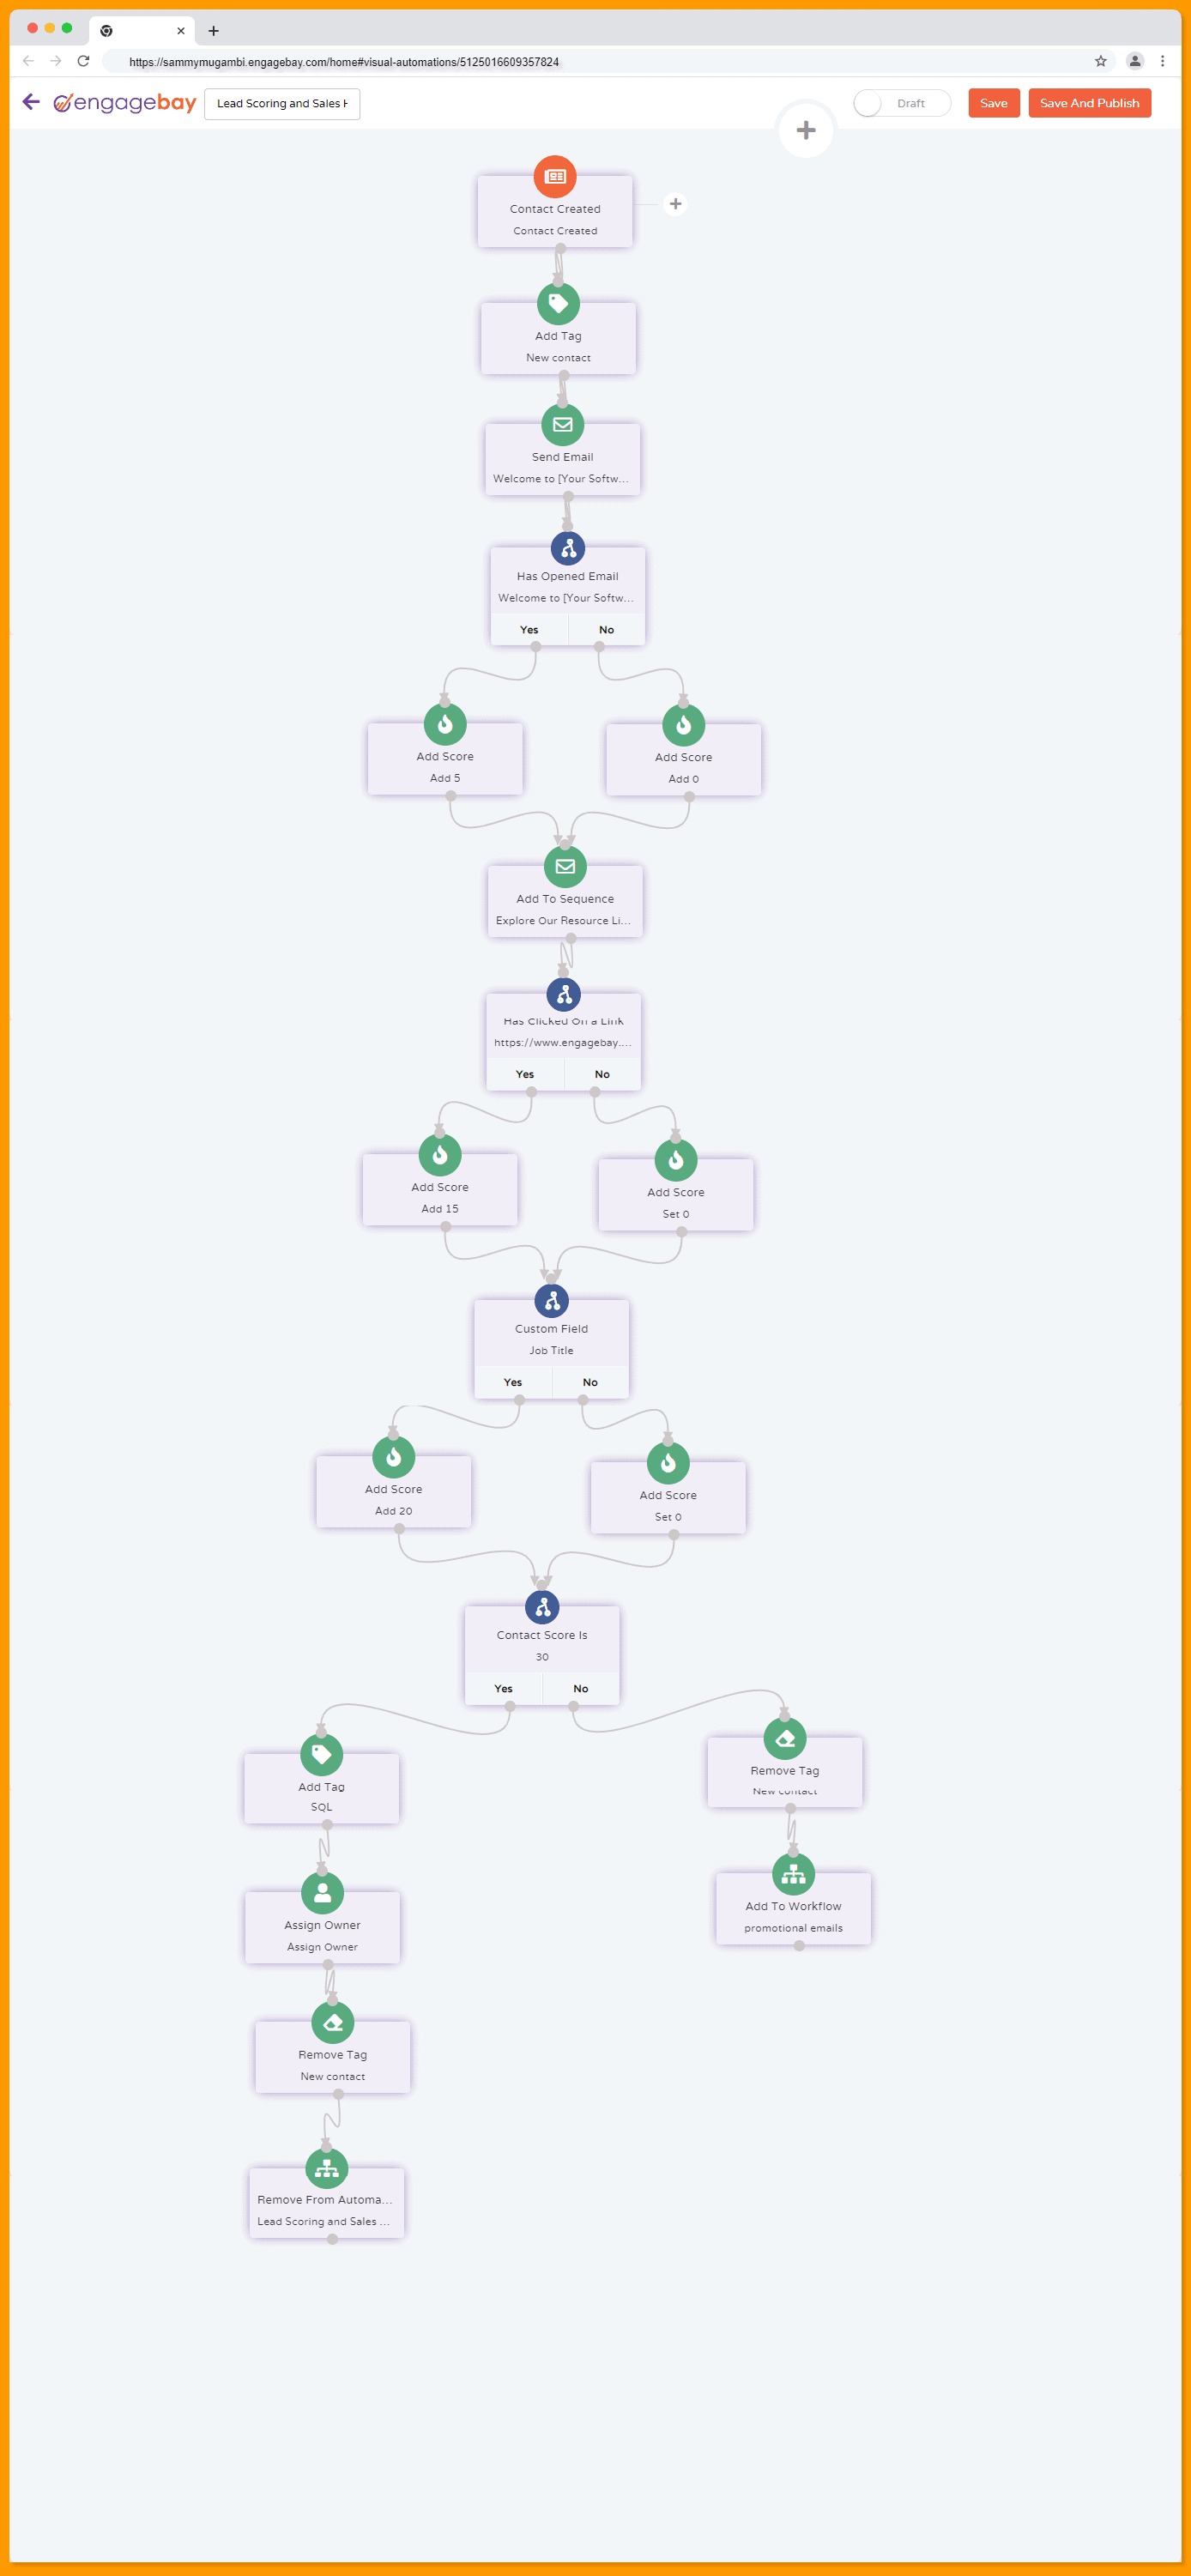
Here’s what happens in this workflow:
- The subscriber receives a welcome email and starts receiving educational content about your software and industry.
- Over time, they click on links within the educational emails, indicating active engagement and accumulating a higher lead score.
- The workflow checks their job title and identifies them as a “Director.”
- Since their score has reached 30 points and they have a relevant job title, they are tagged as a “Sales Qualified Lead (SQL),” and a notification is sent to the sales team.
- The “New Contact” tag is removed, indicating they have progressed from being a new lead.
- And those with fewer points are added to another workflow, and the tag “new contact” is removed.
This workflow identifies and prioritizes leads based on their engagement and characteristics. It provides relevant content, using lead scoring to measure engagement, and seamlessly handing off qualified leads to the sales team for further conversion efforts.
👉 Create and launch successful email campaigns with EngageBay’s all-in-one solution and stunning, free email templates. Don’t miss out — get started today!
Best Practices for lead scoring and sales handoff workflow
Here are some tips to consider when creating this workflow:
- Understand your ICP: Know the traits and behaviors that signify a good fit for your product. Assign higher scores to leads that closely match these traits.
- Collaborate with sales: Work closely with the sales team to determine which lead actions most indicate buying readiness. Their input is invaluable in setting up effective scoring criteria.
- Regularly review and update scores: As you learn more about your audience and their behaviors, adjust your scoring system accordingly. It should evolve to stay effective.
- Balance actions and demographics: Consider lead activities (like website visits) and lead characteristics (like job titles) in your scoring. A mix of both gives a more accurate picture.
- Set thresholds for sales engagement: Define clear score thresholds for passing leads to the sales team. For example, leads with a score above 80 might be considered sales-ready.
Read also: Marketing Automation For Dummies: Top 10 Takeaways From The Classic Book
4. Event Promotion Email Workflow
An event promotion workflow is a structured, automated series of steps and actions designed to market and promote an event effectively, whether it’s a webinar, conference, or product launch.
You can ease the planning process by automating event promotion tasks such as sending invitations, reminders, and confirmations. This automation also plans automated follow-up sequences to share event highlights and seek feedback for future improvements.
How to create this email workflow
Here’s how the event promotion workflow would look in action:
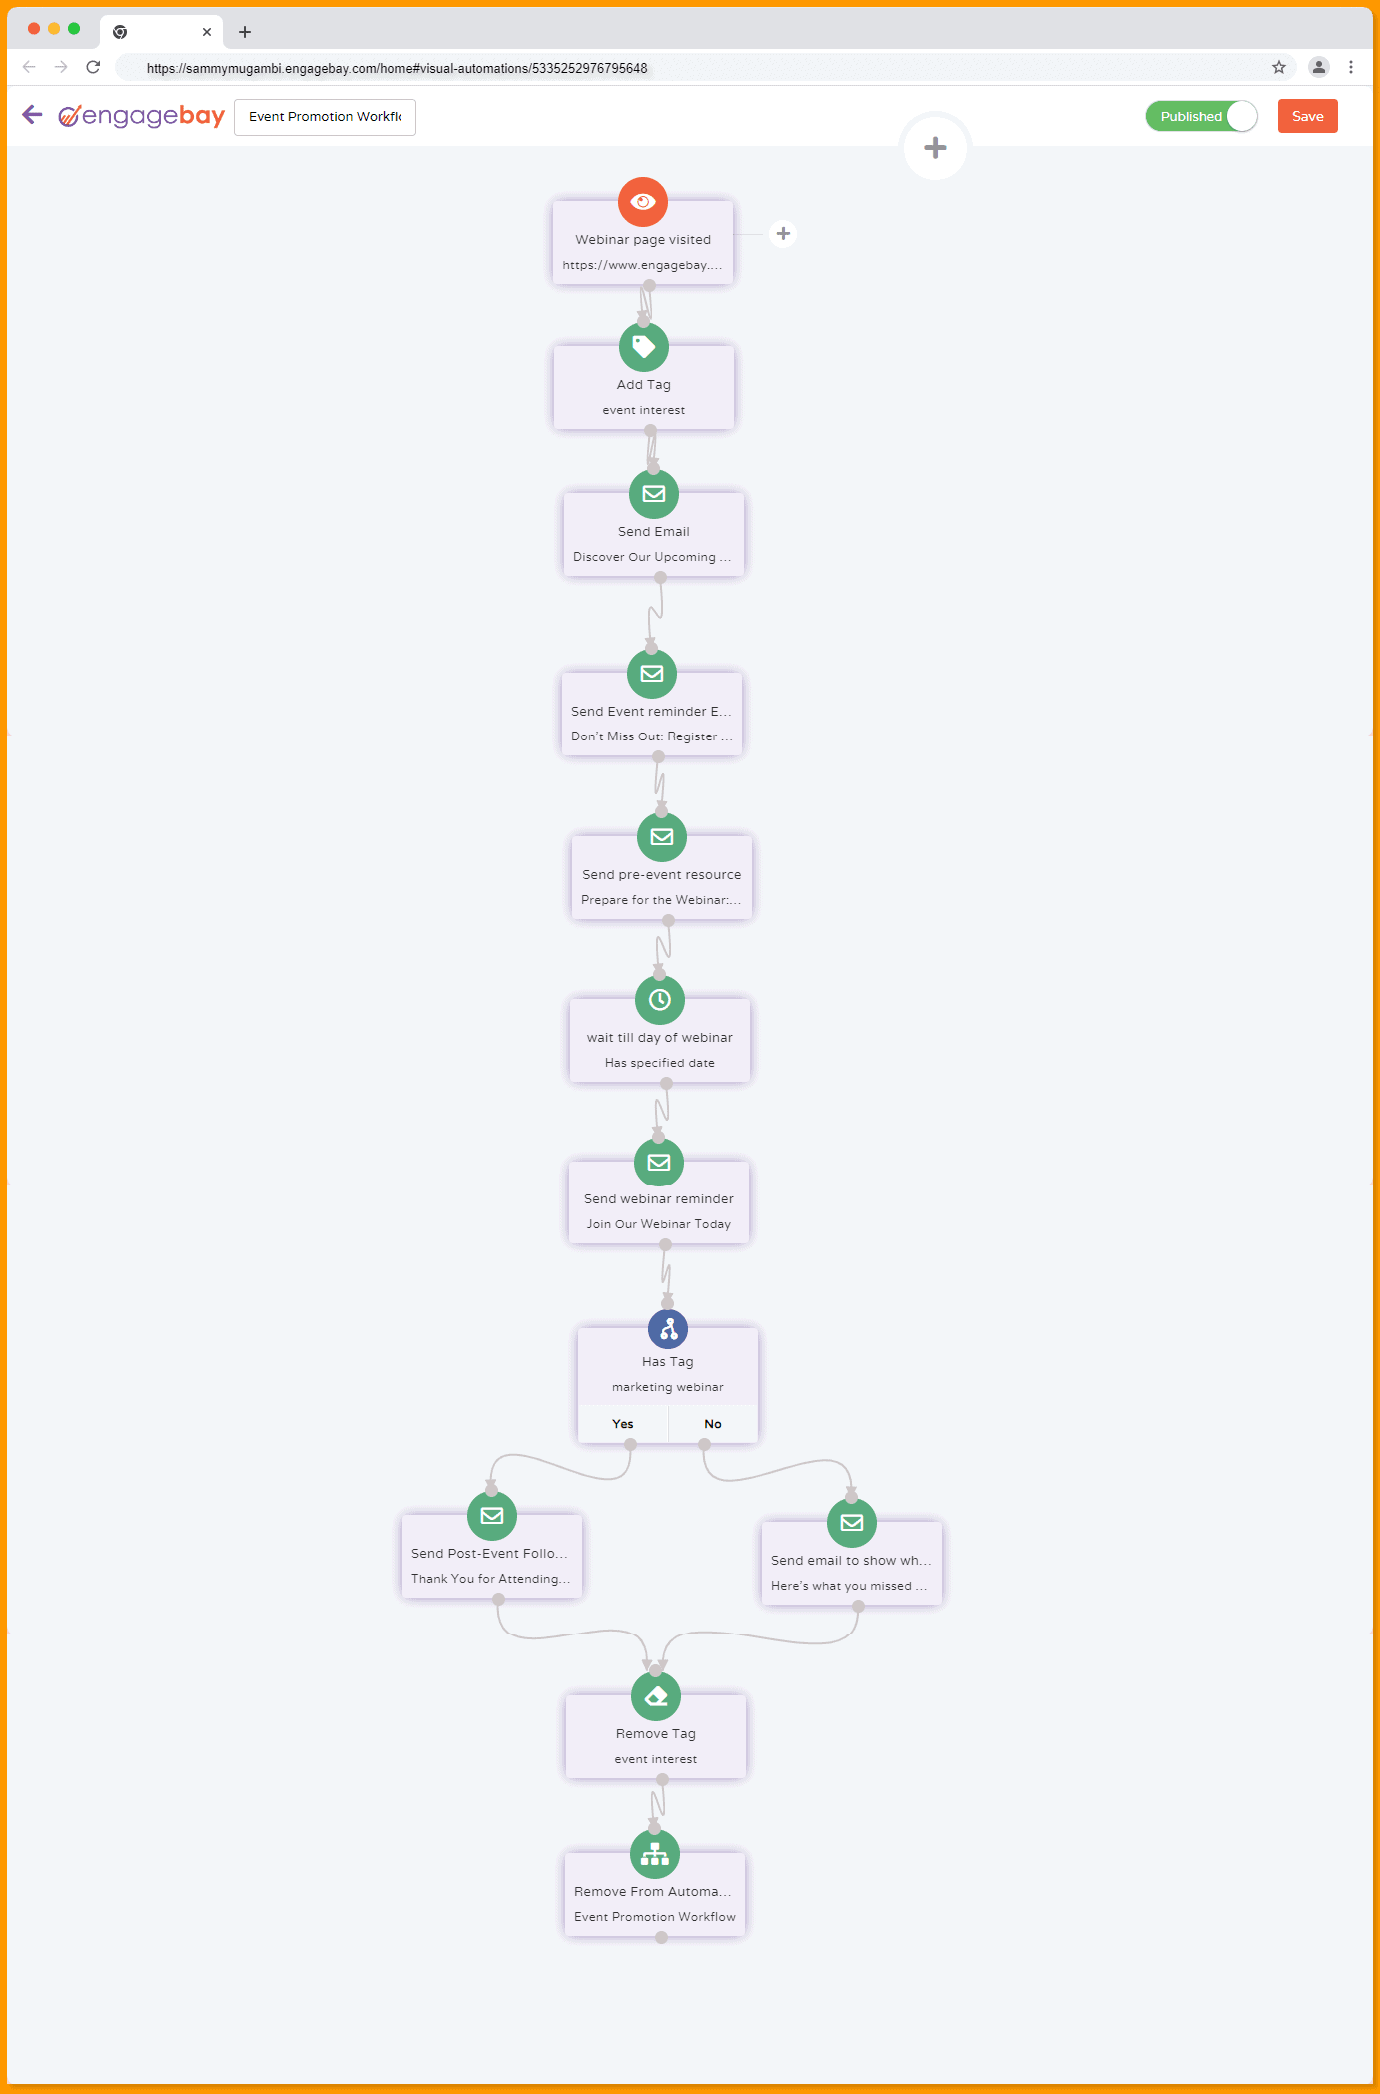
Here’s what happens in this workflow:
- A lead visits the event webpage for the upcoming webinar, and an “event interest” tag is added.
- They receive an introductory email detailing the webinar’s topic, date, and benefits.
- Forty-eight hours before the webinar, they receive a reminder email with a clear registration CTA.
- They then receive pre-event resources to prepare for the webinar.
- On the day of the webinar, they receive a final reminder email to join the live event.
- After attending the webinar, they receive a post-event email with a thank-you message and access to the webinar recording. And for those that didn’t register or attend, will still receive an email showing what they missed.
- The automation ends by removing the “event interest” tag and removing the user from the automation.
Best Practices for an event promotion workflow
Here are some tips to consider when creating this workflow:
- Clear and compelling messaging: Craft clear, compelling, and persuasive messages highlighting the event’s value proposition, benefits, and agenda to grab attention and drive registrations.
- Automated reminders: Set up automated reminder emails or messages at strategic intervals before the event to keep attendees informed and excited about the upcoming event.
- Engagement opportunities pre-event: Provide pre-event engagement opportunities like Q&A sessions, polls, or teaser content to generate interest and anticipation among attendees.
- Post-event communication and follow-up: Plan automated follow-up sequences to engage attendees post-event.
Read also: Marketing Automation Use Cases & Examples From Top Brands
5. Customer Feedback and Surveys Email Workflow
This automation campaign is a way to collect opinions and suggestions from your customers about your product or service. It’s a systematic plan to gather, organize, and analyze these opinions and suggestions.
Feedback helps you understand what your customers want and need so you can tailor your offerings to suit them better. It points out areas that need improvement, helping you enhance customer satisfaction.
But what does this automation look like?
How to create this email workflow
Here’s a marketing automation flowchart showing how the customer feedback and survey workflow would look in action:
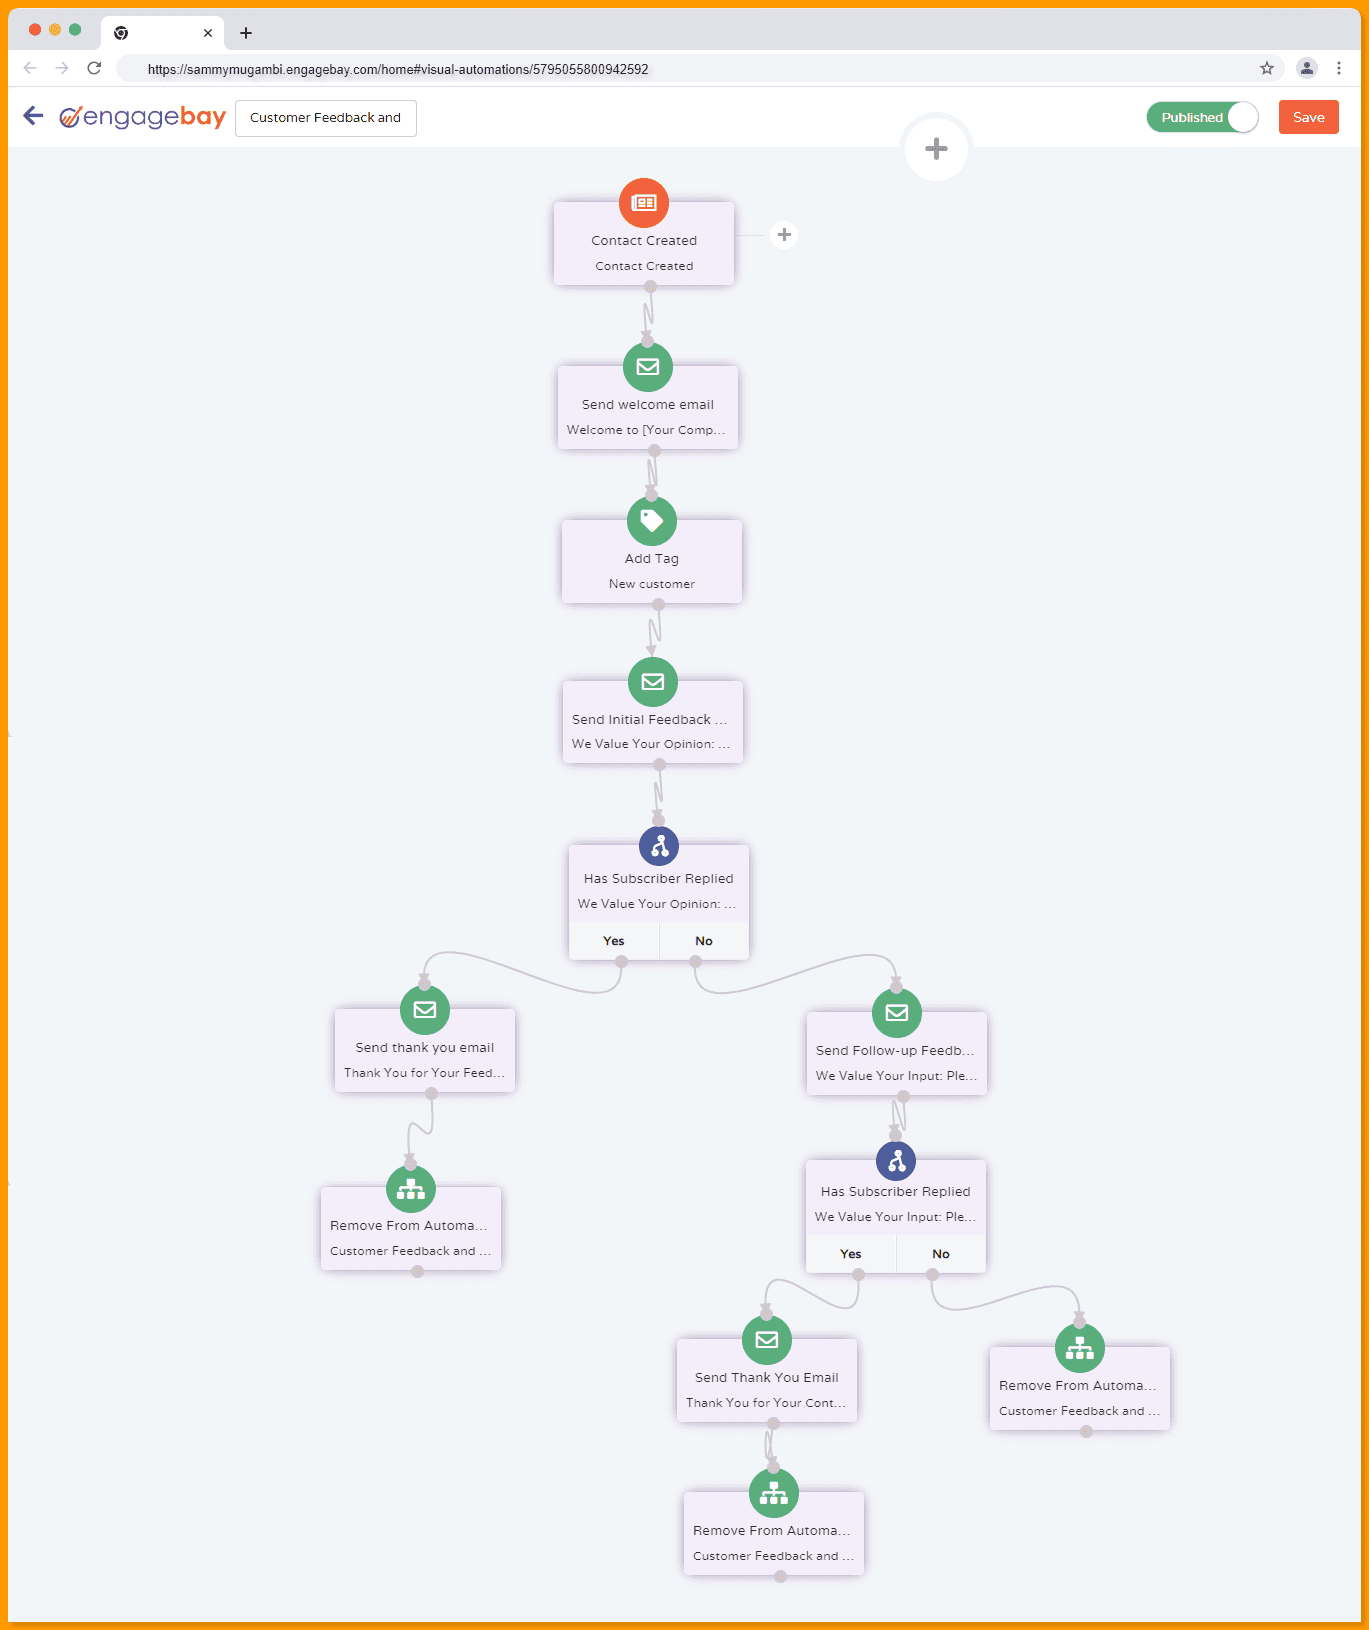
Here’s what happens in this workflow:
- The new customer receives a welcome email, setting a positive tone for the relationship.
- They are tagged as a “New Customer” for tracking purposes.
- An initial feedback request email is sent, asking the customer to take a quick satisfaction survey.
- After a week, the workflow checks if the customer has replied to the initial survey. If they have, they receive a thank-you email.
- If customers haven’t responded to the initial survey, they receive a follow-up feedback request.
- The workflow waits for an additional week to allow time for responses to the follow-up survey.
- It then checks if the customer has replied to the follow-up survey. If they have, they receive a thank-you email.
- The workflow ends for all customers, whether they’ve provided feedback or not.
Best Practices for a customer feedback and surveys workflow
Here are some tips to consider when creating this workflow.
- Clear objectives and goals: Define what you want to achieve with your feedback and surveys. Are you looking to improve product features, customer service, or overall user experience? Clear goals guide your survey design and analysis.
- Targeted and relevant questions: Ask questions that directly relate to your objectives. Keep questions clear, specific, and relevant to gather actionable insights. Avoid vague or general questions that might confuse respondents.
- Respect your customers’ time: Keep the survey concise and easy to complete. Respect your customers’ time by avoiding unnecessarily lengthy surveys. Focus on gathering critical information efficiently.
- Use a mix of question types: Employ a variety of question types, including multiple-choice, open-ended, rating scales, and yes/no questions. This provides a well-rounded view of customer opinions and allows for both qualitative and quantitative analysis.
Read also: Marketing Automation Landscape: A Guide To Scaling Your Business
6. Product Upsell Email Workflow
A product upsell workflow is about suggesting and offering customers a better or upgraded version of what they’re already buying. It’s a win-win – customers get more value, and the business increases its sales.
When customers choose a higher-end version or additional products, it increases the average purchase value, directly boosting revenue without acquiring new customers.
So, what does this workflow look like?
How to create this email workflow
Here’s how the product upsell workflow would look in action:
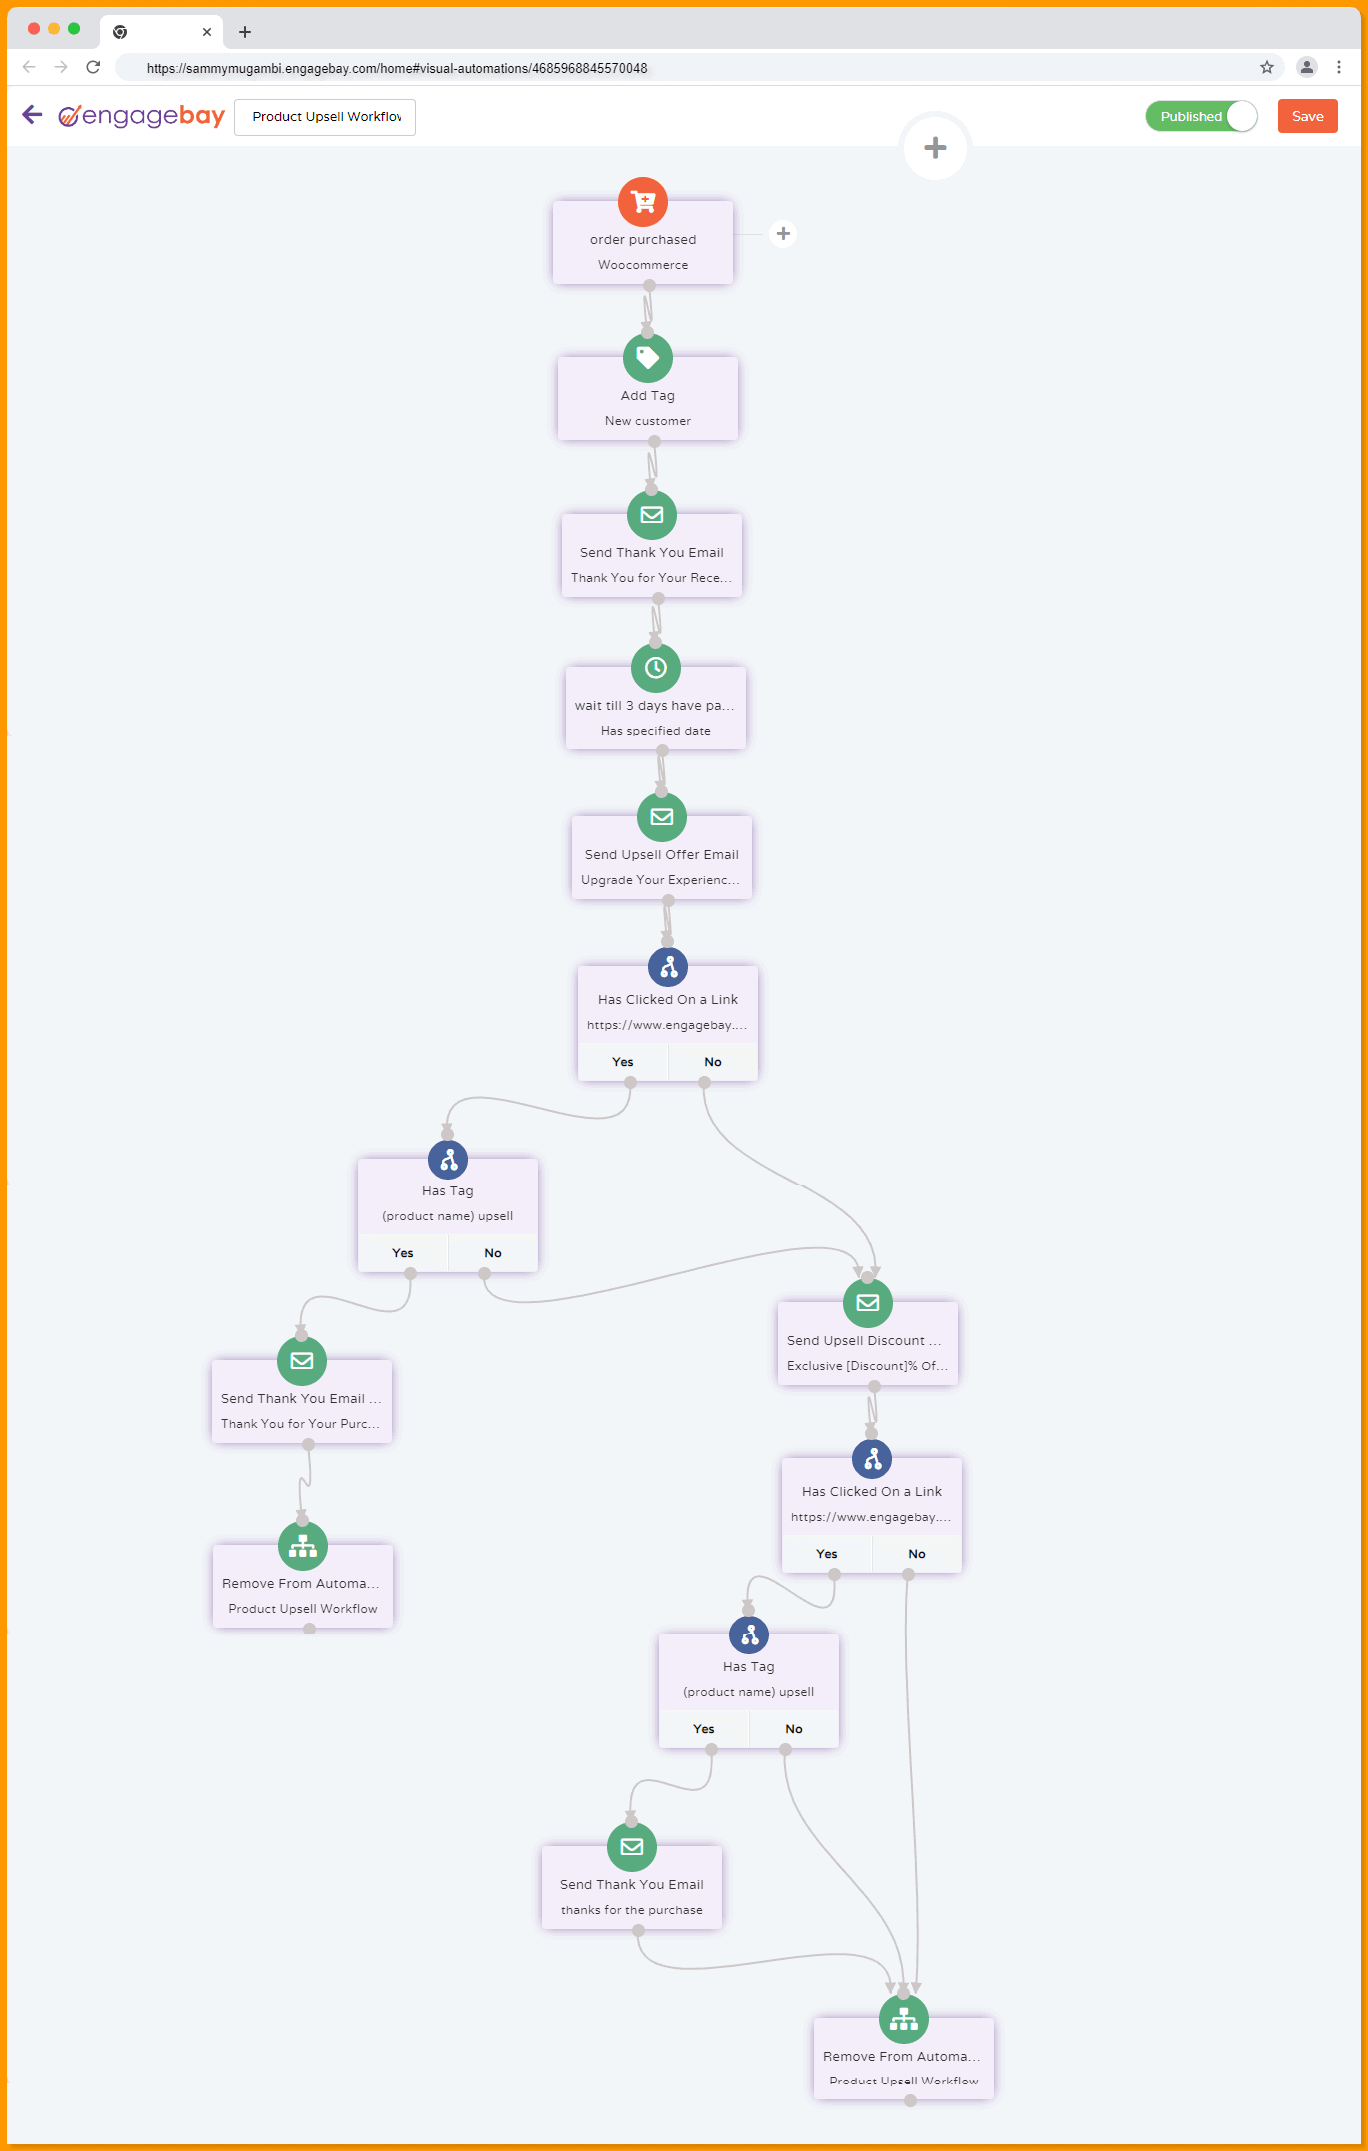
Here’s what happens in this workflow:
- The customer’s purchase triggers the workflow, and they are tagged as a “New Customer.”
- A thank-you email is sent to express appreciation for their recent purchase.
- After a few days, an upsell offer email is sent, suggesting complementary products.
- After a week, the workflow checks if the customer clicked on a link in the upsell offer email to gauge interest.
- Customers who didn’t click receive an exclusive discount on the upsell products.
- For customers who click, EngageBay will check if they have a tag suggesting they purchased the upsell offer.
- Those who didn’t buy will be sent the discount email, and those who bought the (upsell) item will receive a thank you email and be removed from the automation.
- EngageBay will check if those who received the discount email clicked on the link. If they didn’t click on the link and didn’t purchase the upsell offer, they’ll be removed from the automation.
- If they purchase the item, they’ll receive a thank you email and be removed from the automation.
This workflow highlights products that customers might have missed or didn’t consider.
Best Practices for a Product Upsell Workflow
Here are some tips to consider when creating this workflow.
- Understand customer needs: Analyze customer data and purchase history to understand what products would genuinely add value to their current purchase.
- Relevance and timeliness: Recommend products that are directly related to what the customer is buying, and present the offer at the right time during their buying journey.
- Clear and attractive offers: Make the upsell offer enticing and easily understandable. Highlight the benefits of the upgrade or additional product clearly.
- A/B Testing: Experiment with different upsell offers and strategies to understand what works best for your audience, and optimize based on results.
Read also: A B2C Marketing Automation Guide To Reach Buyers With Less Effort
7. Customer Support Email Workflow
A customer support workflow is like a step-by-step guide or a map that a company follows to provide assistance and solutions to its customers when they have questions, issues, or concerns. It outlines how customer inquiries are received, how they’re handled, and how the customer’s problem is solved effectively.
A structured workflow ensures every customer query is addressed consistently and no issue falls through the cracks. This builds trust and reliability.
How to create this email workflow
Here’s a marketing automation flowchart representing this workflow:
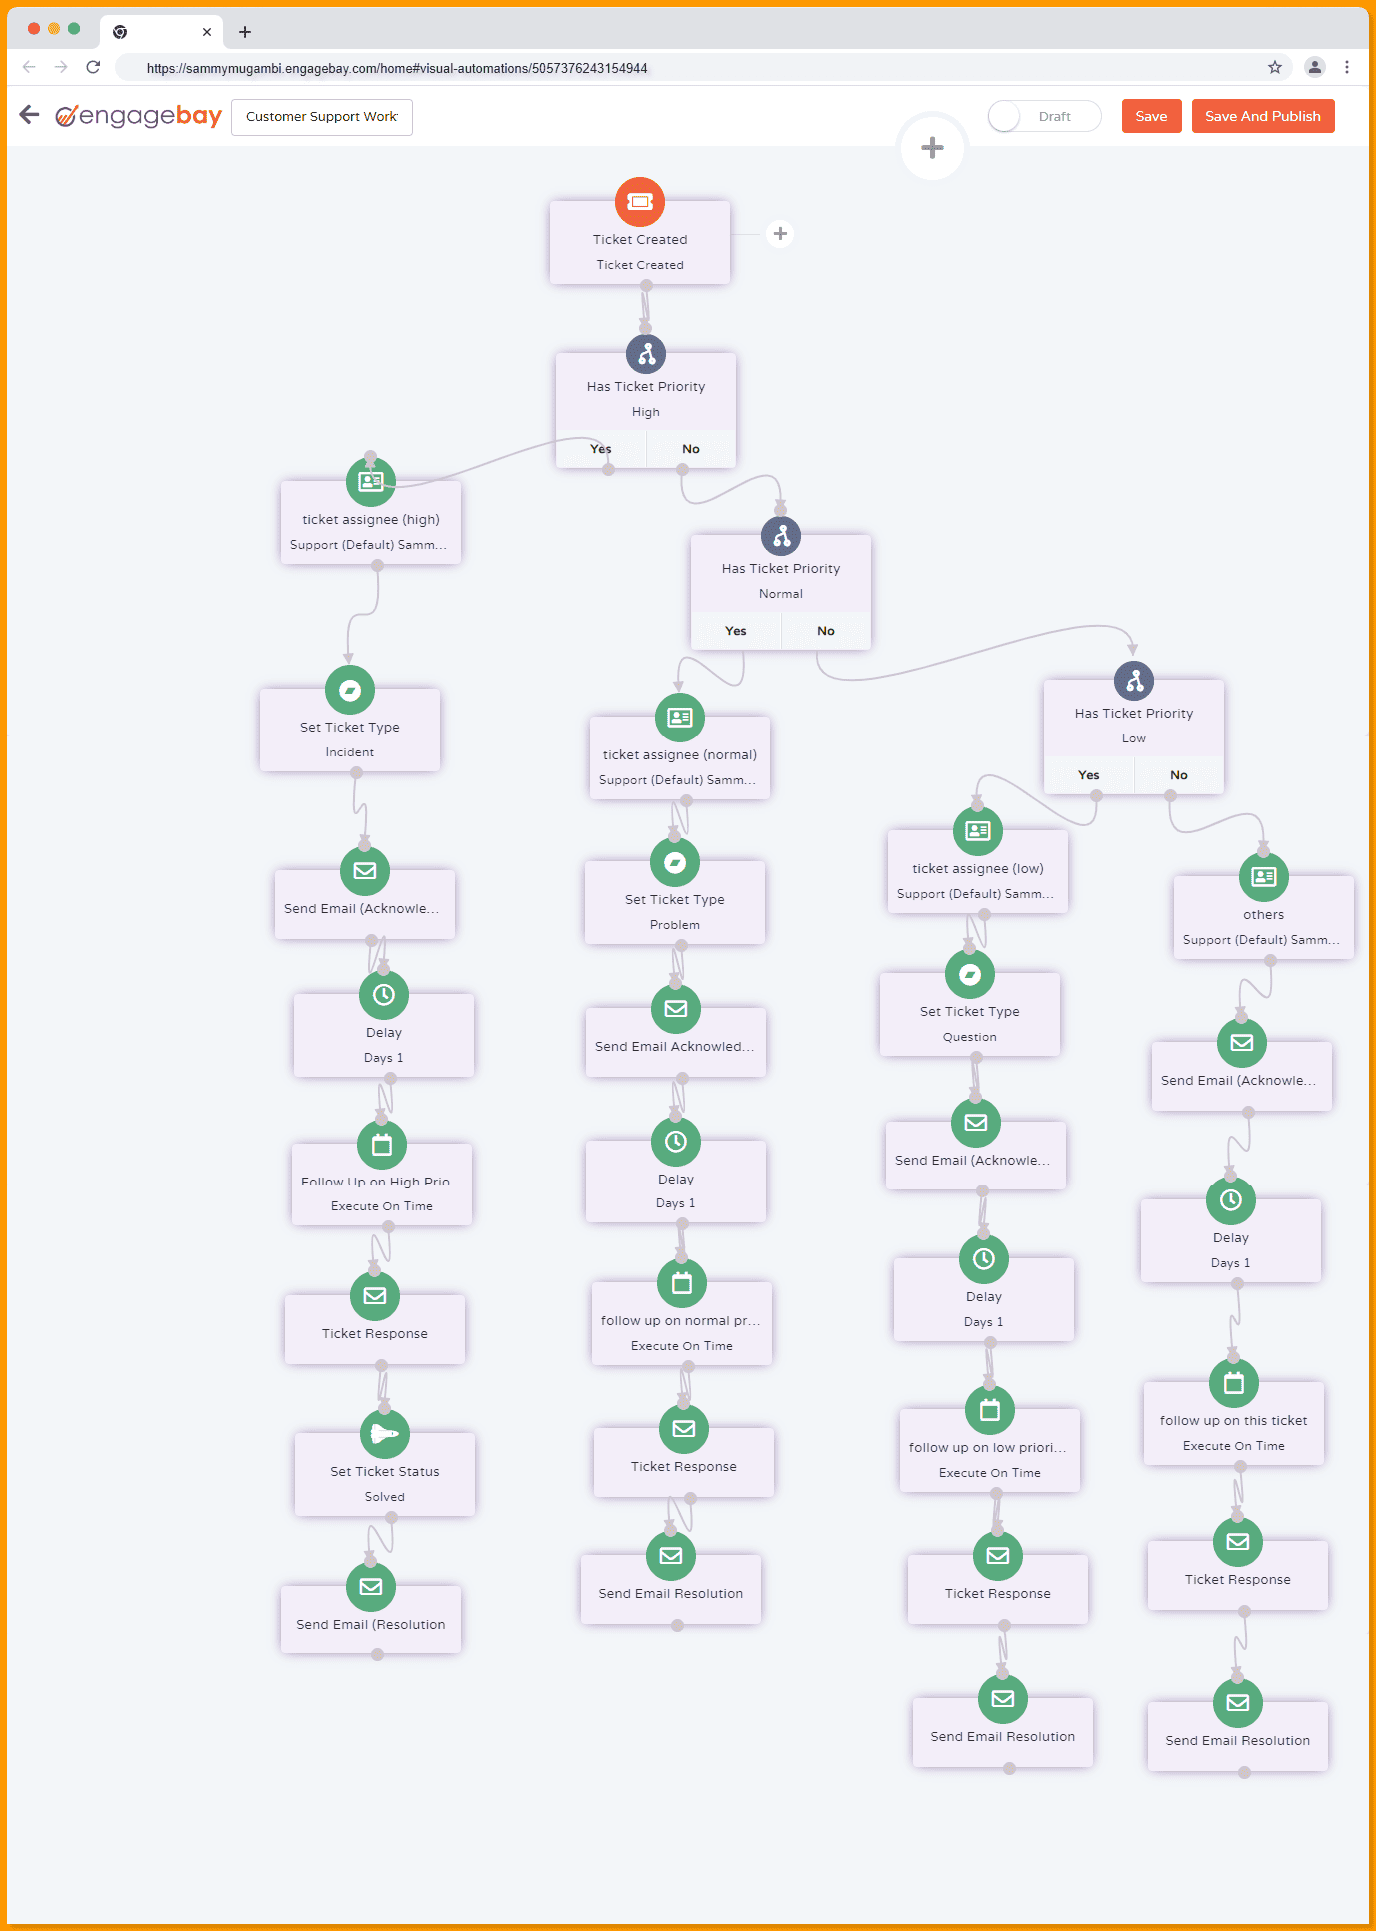
Here’s what happens in this workflow:
- The workflow begins when a user creates a support ticket with a specified priority level, either high, normal, or low.
- An appropriate support agent is assigned a ticket based on the priority.
- The ticket is categorized based on its type, ensuring it is directed to the most relevant support team.
- An acknowledgment email is sent to the customer, reassuring them that their support request has been received and will be addressed promptly.
- The workflow then sends a follow-up reminder to the assigned support agent about the ticket after 24 hours.
- Support agents provide personalized responses and actions tailored to the ticket’s priority.
- The ticket’s status is changed to “Solved” if the issue is resolved.
- The workflow ends when an email is sent to the customer, notifying them of the successful resolution of their support request.
This workflow adapts to different priority levels (high, normal, low) set by customers when creating support tickets. This ensures that each inquiry receives the appropriate attention.
Best Practices for a customer support workflow
Here are some tips to consider when creating this workflow:
- Clear ticketing system: Implement a clear and easy-to-use ticketing system that tracks and categorizes customer queries for efficient handling.
- Priority settings: Establish a priority system to promptly address urgent issues, ensuring that critical problems are resolved with high urgency.
- Automated responses: Use automated responses to acknowledge receipt of a customer query, providing reassurance and setting expectations for response times.
Read also: Marketing Automation KPIs You Need Like Coffee (Must-Have)
Conclusion
Triggers, conditions, and actions help you create automation campaigns tailored to your specific goals, from lead nurturing to abandoned cart email campaigns. These workflows save time and allow you to engage with your audience immediately with personalized messages.
As we’ve seen, EngageBay can help you run these automations. Sign up now and experience it for yourself.
