Standard set of fields that are available generally, like First Name, Last Name, Email, Company, Phone Number, Country and so on. However, certain businesses or maybe certain campaigns requires unique fields. Say you are trying to sell a marketing software, you can then create a “source of income” custom field with choices of business, employment, or others. This will allow you to send a campaign to those who subscribed and capture the required details. Custom fields got much more application.
EngageBay allows you to add a custom field(s) for Contact, Company, Deal and Tickets. Configuration wise, the fields and manner of setup is exactly the same.
To set up a “Custom Field” just follow the steps below:
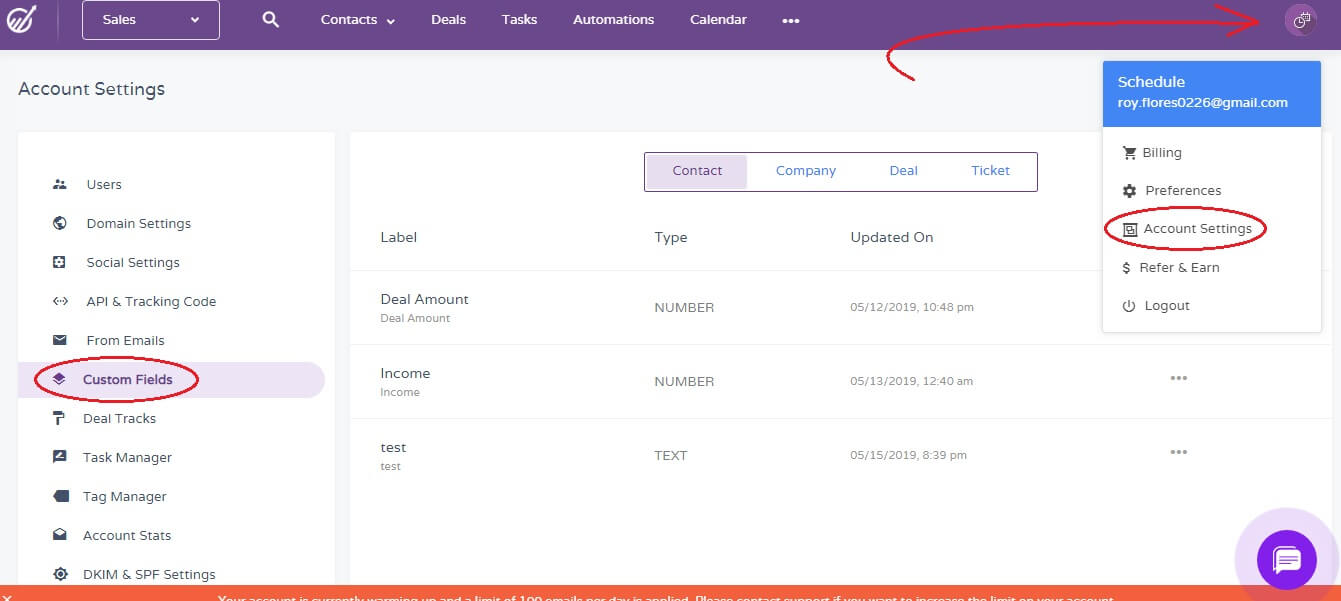
1. Click on "Account Avatar" located on the upper right side of your screen then click on "Account Settings" then choose “Custom Field” on the left side
2. If you need the custom field on a specific type of data only, please be sure to click on the tab of the type of data you want. Example, you want it under “Contacts” only and not in Company, Deals or Tickets, make sure the "Contact" tab is highlighted, if not click on it to be sure it is the one selected. Once you are sure that you are under the "Contact" tab, please click "Add Custom Field". Make sure the Company, Deal and ticket are not checked. Just complete the data needed then hit Submit and this field will appear only under Contacts.
3. If you need the Custom Field available to more than one type of data, then click on one of the data types you need and choose on the others where you need it to appear as well. Example, you need it on Contacts and Deals, then you can either be under the Deals tab or contacts tab then just put a checkmark on the one you need.
4. Set up the Custom Field on the pane displayed. It's good to play around with it to explore features. In my case, I am adding "Gender" as a custom field and I am providing drop-down options for it, so I am using a list as type. I also provide the options on that list separated by commas(,). Once you are done with the configuration then click the "Submit" button.
5. You will now see the field you created listed on the "Custom Fields" page. Once you go back to contacts, you will now see Gender as one of the fields listed.
Back on the Contacts page
I wanted to recommend EngageBay to all those small businesses out there that are looking to grow their businesses through a marketing and sales automation platform. We've been able to see a great adaption of our agency clients to the EngageBay platform and being able to leverage their digital marketing efforts.